
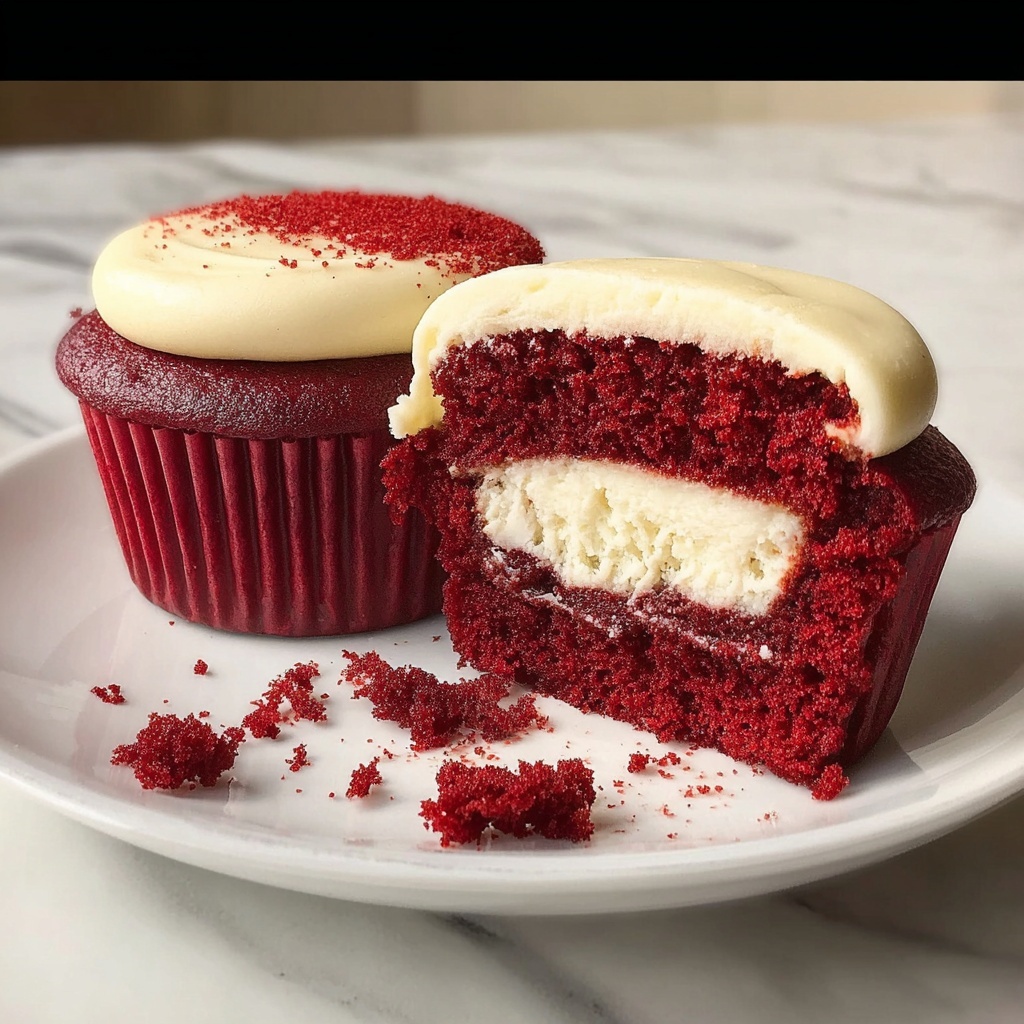
If you are on the hunt for a dessert that perfectly balances rich, tender cookie goodness with a luscious cream cheese frosting, then the Red Velvet Cookie Cups: 7 Irresistible Reasons to Indulge Recipe is about to become your new favorite. These bite-sized treats capture the essence of classic red velvet cake but transform it into a fun, playful cookie cup that’s bursting with color, flavor, and that oh-so-satisfying creaminess. Whether you’re planning a party, a cozy night in, or just craving a sweet pick-me-up, this recipe delivers seven irresistible reasons why these cookie cups should be your go-to indulgence.
Ingredients You’ll Need
Simple yet crucial, each ingredient plays a starring role in bringing together the distinctive taste, perfect texture, and vibrant red color of this delightful treat. From creamy butter to the zing of cocoa powder and the unmistakable hint of vanilla, every component works in harmony to create those irresistible cookie cups.
- 1 cup unsalted butter, softened: Provides a rich, creamy base that makes the cookies tender and moist.
- 1 cup granulated sugar: Adds sweetness and helps create the perfect cookie texture.
- 1 cup brown sugar, packed: Brings deep, caramel notes and keeps the cookies chewy.
- 2 large eggs: Binds ingredients and adds moisture for that soft, cakey feel.
- 2 teaspoons vanilla extract: Gives a warm, aromatic flavor that enhances the red velvet essence.
- 2 1/2 cups all-purpose flour: The foundation that builds the structure of your cookie cups.
- 1 tablespoon cocoa powder: Delivers that subtle chocolate flavor essential to red velvet.
- 1 teaspoon baking soda: Helps cookies rise nicely and maintain their shape as cups.
- 1 teaspoon salt: Balances sweetness and intensifies flavors.
- 1 tablespoon red food coloring: Creates the signature eye-catching red hue that makes these cookie cups irresistible.
- 1 cup cream cheese, softened: Core ingredient for the luscious frosting filling.
- 1/2 cup powdered sugar: Sweetens the frosting smoothly without grit.
- 1 teaspoon vanilla extract for frosting: Adds fragrance and rounds out the frosting’s taste.
How to Make Red Velvet Cookie Cups: 7 Irresistible Reasons to Indulge Recipe
Step 1: Preheat and Prepare
Start by setting your oven to 350°F (175°C). Make sure your muffin tin is lightly greased so your cookie cups come out cleanly and keep their perfect shape. This initial step is key to baking success.
Step 2: Cream the Butter and Sugars
In a large bowl, beat the softened butter with both granulated and brown sugars until the mixture is smooth and creamy. This creaming process ensures the sugar is evenly distributed, which will give your cookie cups a tender, buttery texture and lovely sweetness.
Step 3: Add Eggs and Vanilla
Mix in the eggs one at a time, followed by the vanilla extract. This combination boosts the flavor and binds the dough together for excellent cookie structure.
Step 4: Combine Dry Ingredients
In a separate bowl, whisk together the flour, cocoa powder, baking soda, and salt. Mixing these ingredients beforehand guarantees they’re evenly dispersed throughout your dough without lumps or clumps.
Step 5: Bring It All Together
Gradually incorporate the dry mixture into the wet mixture. This slow addition prevents overmixing and helps maintain a tender crumb. Stir until just combined.
Step 6: Add the Red Food Coloring
Now for the magic: mix in the red food coloring until you achieve that iconic, brilliant red hue so essential to red velvet treats. This step makes those cookie cups visually stunning and absolutely irresistible.
Step 7: Scoop the Dough and Bake
Spoon the dough evenly into the greased muffin tin, filling each cup about two-thirds full so the dough can rise beautifully without overflowing. Bake for 12 to 15 minutes, until the edges are set but the centers remain soft.
Step 8: Cool Completely
Allow the cookie cups to cool entirely in the tin to preserve their shape and avoid any frosting mishaps. Patience here ensures your dessert looks as good as it tastes.
Step 9: Make the Cream Cheese Frosting
While the cookies are cooling, beat together the softened cream cheese, powdered sugar, and vanilla extract until smooth and fluffy. This luscious frosting is what makes the Red Velvet Cookie Cups: 7 Irresistible Reasons to Indulge Recipe truly stand out.
Step 10: Frost the Cookie Cups
Pipe or spoon the frosting generously into each cooled cookie cup. The creamy texture pairs perfectly with the cakey cookie base, creating layers of decadence in every bite.
How to Serve Red Velvet Cookie Cups: 7 Irresistible Reasons to Indulge Recipe

Garnishes
One of the best parts about these cookie cups is how versatile they are with garnishes. Consider sprinkling mini chocolate chips, crushed pecans, or a dusting of cocoa powder for a texture and flavor upgrade. Fresh strawberries or a light drizzle of white chocolate can add an elegant touch that will wow your guests.
Side Dishes
Red Velvet Cookie Cups shine on their own but pair beautifully with creamy beverages such as milk, hot chocolate, or a rich cup of coffee. For a party, consider serving them alongside fresh fruit platters or a scoop of vanilla ice cream to balance sweetness with freshness.
Creative Ways to Present
Consider arranging your cookie cups on a tiered dessert stand for a beautiful display that invites guests to indulge. You can also serve them in individual mini cupcake liners or place them on decorative doilies for a charming, homemade feel that suits any celebration.
Make Ahead and Storage
Storing Leftovers
Store leftover cookie cups in an airtight container in the refrigerator to keep the cream cheese frosting fresh. They’ll stay moist and delicious for up to 4 days, making them a fabulous option for prepping ahead.
Freezing
If you want to make these ahead of time for a special occasion, these cookie cups freeze beautifully. Wrap each cup individually in plastic wrap and place them in a freezer-safe bag. Freeze for up to 2 months. Thaw overnight in the refrigerator before serving.
Reheating
To bring a little warmth back to your cookie cups, remove them from the fridge and let them sit at room temperature for about 15 minutes. If you prefer a warmer treat, gently reheat the cookie cups without frosting in the oven at 300°F for about 5 minutes, then add fresh frosting before serving.
FAQs
Can I substitute cream cheese frosting with something else?
Absolutely! While the cream cheese frosting is classic for red velvet, you can try whipped cream, mascarpone frosting, or even a simple vanilla buttercream if you prefer.
What if I don’t have red food coloring?
You can omit the coloring for a more subtle appearance, but adding it is what gives red velvet its signature look and feel. Natural alternatives like beet juice powder can work, but they may affect the flavor slightly.
How do I know when the cookie cups are done baking?
The edges should be set and lightly firm, while the center might still look slightly soft. They will firm up as they cool, so avoid overbaking for that perfect tender texture.
Can I make these cookie cups gluten-free?
Yes! Substitute the all-purpose flour with a one-to-one gluten-free baking flour blend. Just be sure to check for any changes in texture or baking time.
Is there a way to make the frosting less sweet?
Try reducing the powdered sugar slightly and balancing with a small pinch of salt or a splash of lemon juice to cut sweetness and add complexity.
Final Thoughts
There is something truly magical about Red Velvet Cookie Cups: 7 Irresistible Reasons to Indulge Recipe — a recipe that takes the classic red velvet experience and transforms it into a fun, bite-sized treat bursting with flavor and charm. Whether you’re baking for a crowd or just a cozy night in, these cookie cups deliver a perfect balance of texture, color, and creamy sweetness that’s simply unforgettable. I can’t wait for you to try this recipe and discover your own seven irresistible reasons to cherish every bite!
Print
Red Velvet Cookie Cups: 7 Irresistible Reasons to Indulge Recipe
- Prep Time: 15 minutes
- Cook Time: 15 minutes
- Total Time: 30 minutes
- Yield: 24 servings
- Category: Dessert
- Method: Baking
- Cuisine: American
Description
Red Velvet Cookie Cups are a delightful twist on classic red velvet cake, baked into soft, chewy cookie cups and topped with a creamy vanilla cream cheese frosting. Perfect for parties or a special treat, these cookie cups combine a rich chocolate flavor with vibrant red color and a smooth, sweet topping for an irresistible indulgence.
Ingredients
Cookie Dough
- 1 cup unsalted butter, softened
- 1 cup granulated sugar
- 1 cup brown sugar, packed
- 2 large eggs
- 2 teaspoons vanilla extract
- 2 1/2 cups all-purpose flour
- 1 tablespoon cocoa powder
- 1 teaspoon baking soda
- 1 teaspoon salt
- 1 tablespoon red food coloring
Cream Cheese Frosting
- 1 cup cream cheese, softened
- 1/2 cup powdered sugar
- 1 teaspoon vanilla extract
Instructions
- Preheat Oven: Preheat your oven to 350°F (175°C) to ensure it reaches the perfect temperature for baking the cookie cups evenly.
- Cream Butter and Sugars: In a large bowl, cream together the softened butter, granulated sugar, and packed brown sugar until the mixture is smooth and fluffy, which helps create a tender cookie texture.
- Add Eggs and Vanilla: Beat in the eggs one at a time followed by the vanilla extract, mixing thoroughly to combine all wet ingredients evenly.
- Mix Dry Ingredients: In a separate bowl, whisk together the all-purpose flour, cocoa powder, baking soda, and salt to ensure they are well incorporated.
- Combine Wet and Dry: Gradually add the dry ingredients to the wet mixture, stirring gently until just combined to avoid overmixing and maintain a soft cookie texture.
- Add Red Food Coloring: Stir in the red food coloring until the dough is uniformly colored with a vibrant red hue typical of red velvet desserts.
- Prepare Muffin Tin: Grease a muffin tin to prevent sticking, then scoop the red velvet cookie dough evenly into each cup, filling them to nearly full to shape perfect cookie cups.
- Bake: Place the muffin tin in the preheated oven and bake for 12-15 minutes, or until the cookie cups are set but still soft in the center.
- Cool Cookie Cups: Remove the muffin tin from the oven and allow the cookie cups to cool completely in the tin; this helps them firm up and maintain their shape.
- Make Frosting: In a clean bowl, beat together the softened cream cheese, powdered sugar, and vanilla extract until smooth and creamy for the frosting.
- Pipe Frosting onto Cookie Cups: Once the cookie cups have cooled, use a piping bag or spoon to fill each cup generously with the cream cheese frosting, creating a beautiful and delicious topping.
Notes
- Ensure butter and cream cheese are softened at room temperature for easier mixing.
- Do not overbake the cookie cups; they should remain soft inside.
- Use gel food coloring for the best vibrant red without adding extra moisture.
- Chill the frosting slightly if it’s too soft to pipe smoothly.
- Store finished cookie cups in an airtight container in the refrigerator for up to 3 days.


