
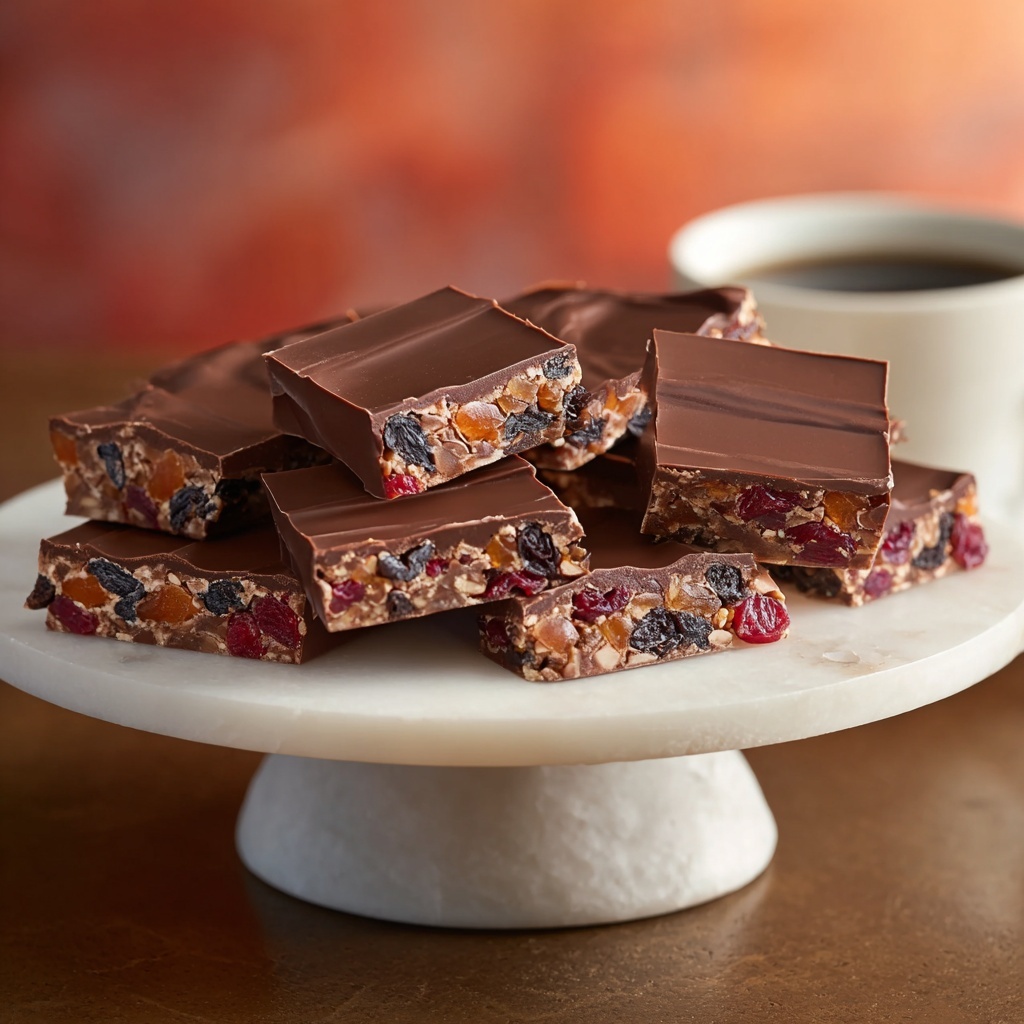
If you have been searching for a delightfully rich, yet wonderfully simple treat to satisfy your sweet tooth, this No-Bake Milk Chocolate Coconut Slice Recipe is an absolute game-changer. Picture a fudgy, cocoa-infused base loaded with the lovely texture of shredded coconut, all topped with a glossy, creamy milk chocolate layer that melts in your mouth. It’s effortless to prepare, requiring no oven time, yet it delivers maximum flavor and indulgence in every bite. Whether you’re whipping this up for a casual afternoon tea or as a crowd-pleasing dessert, this recipe is sure to become your new favorite go-to no-bake delight.
Ingredients You’ll Need
Getting the taste and texture just right depends on using a few simple but essential ingredients. Each component plays a special role, from the crumbly base to the smooth chocolate top, coming together in perfect harmony.
- 1 1/2 cups crushed graham crackers or digestive biscuits: Offers a sturdy yet tender base with subtle sweetness and crunch.
- 1 cup desiccated coconut: Adds chewy texture and a lovely tropical flavor that lifts the cocoa.
- 1/2 cup sweetened condensed milk: Acts as a rich binding agent, infusing the base with creamy sweetness.
- 1/4 cup unsweetened cocoa powder: Gives the slice a deep, chocolatey earthiness without extra sweetness.
- 1/2 cup unsalted butter (melted): Provides moisture and richness that melds the ingredients together perfectly.
- 1 teaspoon vanilla extract: Enhances all the flavors with a warm, aromatic note.
- 1 1/4 cups milk chocolate chips or chopped milk chocolate: Creates the luscious, glossy topping that’s the real star.
- 1 tablespoon coconut oil (optional): Ensures a smooth, luscious chocolate layer that’s easier to spread and slice.
How to Make No-Bake Milk Chocolate Coconut Slice Recipe
Step 1: Prepare the Base
Start by lining an 8×8-inch square baking pan with parchment paper to make removal a breeze. In a large mixing bowl, combine your crushed biscuits, desiccated coconut, cocoa powder, and a pinch of salt. This dry mix forms the foundation of your slice. Pour in the melted butter, sweetened condensed milk, and vanilla extract, then stir everything together until you have a thick, well-bound mixture.
Step 2: Press the Base into the Pan
Firmly press the mixture evenly into the prepared pan, making sure the layer is compact and level. This ensures your slice will hold together beautifully once set and makes for neat, tidy pieces when sliced.
Step 3: Melt the Chocolate Topping
Using a microwave-safe bowl or a double boiler, gently melt together the milk chocolate and coconut oil. Stir frequently to achieve an irresistibly smooth and glossy consistency. The coconut oil is optional but highly recommended for a silky finish and easier slicing.
Step 4: Spread the Chocolate Over the Base
Pour the melted chocolate mixture evenly over the biscuit base, using a spatula to spread it to the edges. This shiny layer not only looks impressive but also seals in the base’s moist richness beneath.
Step 5: Chill Until Set
Pop the pan into the refrigerator and allow your slice to chill for at least 2 hours. This step is key to letting everything firm up to the perfect consistency. Once fully set, cut into 16 squares and get ready to indulge!
How to Serve No-Bake Milk Chocolate Coconut Slice Recipe

Garnishes
Sprinkle some toasted coconut flakes or a dusting of cocoa powder on top to add texture and a lovely finishing touch. If you’re feeling fancy, a few chocolate shavings or chopped nuts can elevate the look and add even more flavor layers.
Side Dishes
This slice pairs beautifully with a scoop of vanilla ice cream or a dollop of whipped cream for extra decadence. A fresh fruit salad or a handful of berries can cut through the richness nicely with their bright, juicy contrast.
Creative Ways to Present
Arrange the slices on a wooden board or pretty platter with edible flowers or mint leaves for a charming touch when serving guests. For parties, consider poking some small sticks into each square to create bite-sized “slice pops,” perfect for mingling and easy snacking.
Make Ahead and Storage
Storing Leftovers
The leftover slices keep really well in an airtight container in the refrigerator for up to one week. This means you can enjoy this treat over several days, and it continues to taste fresh and delicious each time.
Freezing
You can freeze the slices by wrapping them tightly in plastic wrap and placing them in a freezer bag or container. They’ll be good for up to 2 months, making this slice a fantastic option for holiday prep or quick grab-and-go desserts.
Reheating
Since this is a no-bake dessert, reheating isn’t necessary or recommended. Just allow frozen slices to thaw in the fridge or at room temperature, and you’ll retain that perfect melt-in-your-mouth texture.
FAQs
Can I use a different type of chocolate?
Absolutely! While milk chocolate provides that classic creamy sweetness, you can use dark or white chocolate depending on your preference. Adjust the sugar in the base accordingly if using darker chocolate.
What if I don’t have coconut oil for the topping?
No worries at all; the chocolate will still set nicely without coconut oil. The oil just helps create a smoother texture and makes slicing easier, so feel free to skip it if you don’t have any on hand.
Is this recipe gluten-free?
It depends on the biscuits you use. To keep this slice gluten-free, choose gluten-free crackers or biscuits. Most desiccated coconut, condensed milk, and chocolate are naturally gluten-free, but always check ingredient labels to be sure.
Can I add nuts or other mix-ins?
Yes! Adding chopped nuts or even dried fruit into the base mix is a fantastic way to introduce extra crunch and flavor. Just be mindful if serving to people with nut allergies.
How long does it take to set properly?
Chilling for at least 2 hours is essential to achieve the ideal firm yet fudgy texture. If your fridge is extra cold, you might want to check after 90 minutes. Avoid rushing this step for the best results.
Final Thoughts
I can’t recommend the No-Bake Milk Chocolate Coconut Slice Recipe enough for those moments when you crave a fuss-free yet utterly indulgent sweet treat. It’s quick to pull together, requires minimal ingredients, and makes a fantastic addition to any dessert spread. Once you try it, it’s sure to become a beloved recipe you keep coming back to—so go ahead, treat yourself and your loved ones to this chocolatey, coconut delight!
Print
No-Bake Milk Chocolate Coconut Slice Recipe
- Prep Time: 15 minutes
- Cook Time: 0 minutes
- Total Time: 2 hours 15 minutes
- Yield: 16 squares
- Category: Dessert
- Method: No-Cook
- Cuisine: Australian-Inspired
- Diet: Vegetarian
Description
A delicious and easy-to-make No-Bake Milk Chocolate Coconut Slice that combines a rich chocolatey base with a smooth milk chocolate topping. Perfect for a quick dessert or sweet treat without the need for an oven.
Ingredients
Base
- 1 1/2 cups crushed graham crackers or digestive biscuits
- 1 cup desiccated coconut
- 1/4 cup unsweetened cocoa powder
- 1/2 cup unsalted butter, melted
- 1/2 cup sweetened condensed milk
- 1 teaspoon vanilla extract
- Pinch of salt
Topping
- 1 1/4 cups milk chocolate chips or chopped milk chocolate
- 1 tablespoon coconut oil (optional, for smoother topping)
Instructions
- Prepare the pan: Line an 8×8-inch square baking pan with parchment paper to prevent sticking and make it easier to remove the slice once set.
- Mix the base ingredients: In a large bowl, combine the crushed graham crackers or digestive biscuits, desiccated coconut, cocoa powder, and a pinch of salt. Stir thoroughly to distribute all dry ingredients evenly.
- Add wet ingredients to base: Pour in the melted butter, sweetened condensed milk, and vanilla extract. Mix well until the mixture is fully combined and holds together when pressed.
- Form the base layer: Press the mixture firmly and evenly into the prepared pan, creating an even and compact layer which will form the base of the slice.
- Melt the chocolate topping: In a microwave-safe bowl or using a double boiler, gently melt the milk chocolate chips along with coconut oil (if using) until the mixture is smooth and glossy.
- Spread the topping: Pour the melted chocolate evenly over the base layer in the pan, spreading it out to cover the base completely.
- Chill to set: Place the pan in the refrigerator and chill for at least 2 hours, or until the slice is fully set and firm enough to cut.
- Serve: Once set, remove the slice from the pan using the parchment paper, cut into 16 squares, and serve chilled.
Notes
- Store the slice in an airtight container in the refrigerator for up to 1 week.
- For a crunchier texture, add 1/4 cup chopped nuts to the base mixture before pressing it into the pan.
- Use parchment paper to ensure easy removal and clean cuts.
- For a dairy-free option, substitute condensed milk and butter with plant-based alternatives.


