
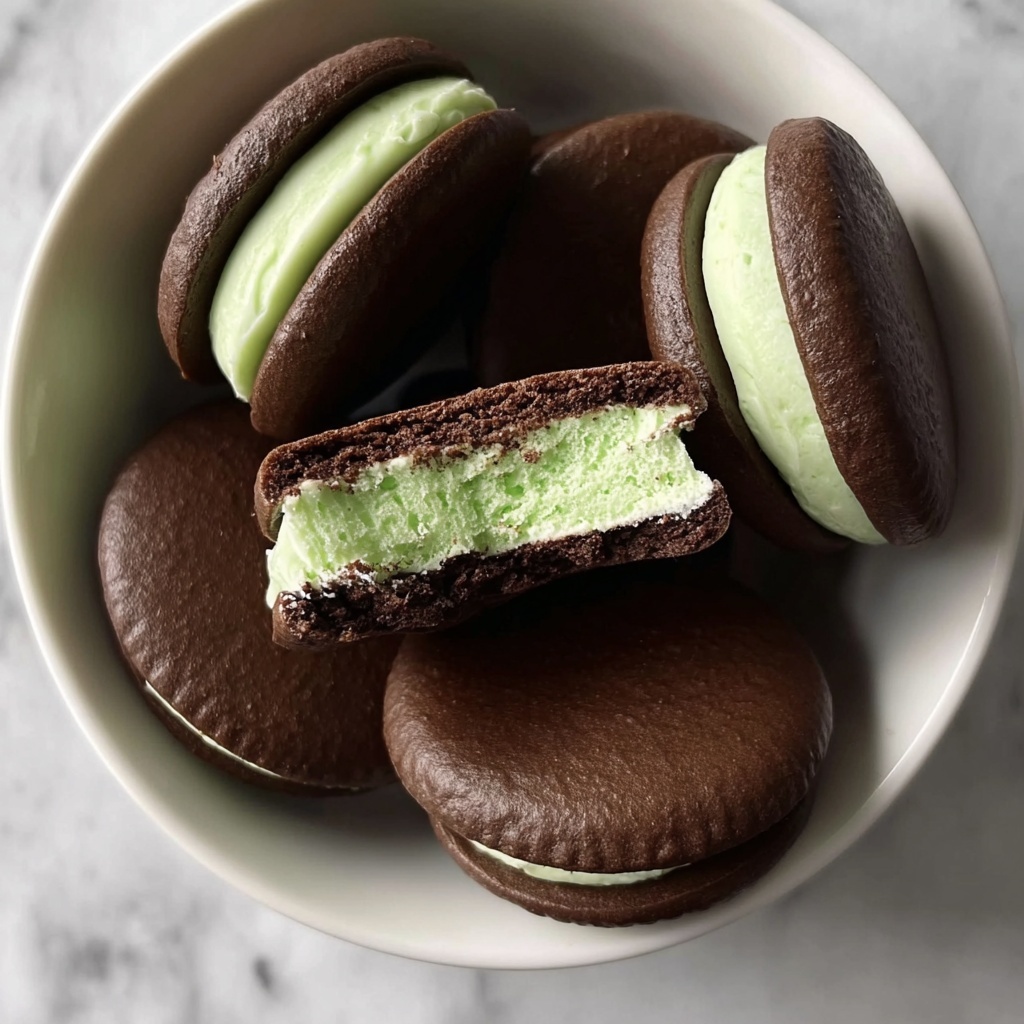
If you have a soft spot for refreshing mint flavors and indulgent chocolate treats, you are in for a real delight with this Mint Sandwich Cookies with Chocolate Coating Recipe. These little cookie sandwiches combine crisp buttery crackers with a luscious, creamy mint filling, all wrapped in a smooth, rich chocolate coating. They are quick to make, visually inviting with a hint of green, and perfect for sharing at gatherings or savoring throughout the week. Once you try these, you’ll find it hard not to reach for another!
Ingredients You’ll Need
The beauty of this recipe lies in its simplicity and how each ingredient plays a vital role. From the crisp texture of the crackers to the creamy mint filling and the glossy chocolate coating, every element contributes to a bite that’s perfectly balanced and utterly crave-worthy.
- Butter-Flavored Crackers: These form the crunchy base of the cookie sandwich, providing a buttery taste with each bite; gluten-free alternatives can easily be swapped in.
- Dark Chocolate Candy Coating: Melts smoothly to create the luscious outer layer; semi-sweet or milk chocolate are tasty substitutes depending on your preference.
- Vanilla Frosting: Acts as the creamy filling base; store-bought is convenient, and it brings sweetness and smoothness to the mint layer.
- Peppermint Extract: Adds that unmistakable refreshing mint flavor; adjust the amount to your liking or swap for mint extract for a stronger punch.
- Green Food Coloring: Optional but fun, it gives the filling a festive green hue that visually hints at the mint flavor inside.
How to Make Mint Sandwich Cookies with Chocolate Coating Recipe
Step 1: Prepare the Mint Filling
Start with a large bowl where you gently mix the vanilla frosting, peppermint extract, and green food coloring if you choose to use it. Stir just enough to get an even minty color and flavor. This creamy filling is what makes these cookies so irresistibly refreshing and smooth.
Step 2: Assemble the Cookie Sandwiches
Take half of your butter-flavored crackers and spread an even layer of the mint frosting mixture on their flat sides. Then, place the remaining crackers gently on top to form neat little sandwich cookies. This process is simple yet rewarding—we’re building the foundation for that perfect minty bite.
Step 3: Melt the Chocolate
Chop your dark chocolate candy coating into small pieces so it melts evenly and quickly. Using a microwave-safe bowl, heat the chocolate in 20 to 30-second bursts, stirring well between each to ensure a velvety smooth texture without any burnt spots. Perfect melting is key for a glossy and firm chocolate coating.
Step 4: Dip the Cookies in Chocolate
Carefully dip each sandwich cookie into the melted chocolate, making sure it gets fully coated. Let any excess chocolate drip off to avoid puddles on your wax paper. This step transforms your mint sandwich cookies into elegant little treats wrapped in a delicious chocolate shell.
Step 5: Let the Chocolate Set
Place the dipped cookies on waxed paper and allow the chocolate to harden completely at room temperature. This usually takes between 30 and 60 minutes. Patience here rewards you with a crisp, shiny coating that snaps delightfully when you bite in.
Step 6: Store Your Delicious Creations
Once the chocolate is firm, move the cookies into an airtight container to keep them fresh. These beauties can stay tasty at room temperature for up to a week, making them perfect for prepping in advance for parties or afternoon treats.
How to Serve Mint Sandwich Cookies with Chocolate Coating Recipe

Garnishes
To elevate your Mint Sandwich Cookies with Chocolate Coating Recipe, consider a decorative sprinkle of crushed peppermint candy or a light dusting of powdered sugar on top before the chocolate hardens. A few edible glitter flakes can give them a festive sparkle perfect for holidays or special gatherings.
Side Dishes
These cookies pair beautifully with a cold glass of milk or a warm cup of tea. Serve alongside a rich hot chocolate for an extra layer of indulgence, or present them with fresh berries to add a juicy contrast to the mint and chocolate flavors.
Creative Ways to Present
Try stacking the cookies into small pyramid shapes on a platter or placing each cookie in a cupcake liner for a charming, gift-ready look. Wrapping individual cookies in clear cellophane tied with a ribbon makes for delightful homemade presents that everyone will appreciate.
Make Ahead and Storage
Storing Leftovers
Leftover Mint Sandwich Cookies with Chocolate Coating Recipe should be kept in an airtight container at room temperature to maintain their crisp texture and creamy filling. Avoid humidity as it can affect the chocolate coating. Properly stored, they remain fresh and delicious for up to one week.
Freezing
If you want to keep these cookies for longer, freezing is a great option. Place them in a single layer on a baking sheet to freeze initially, then transfer to a sealed freezer-safe container or bag. They can last up to 3 months when frozen. Thaw at room temperature before serving to enjoy their full texture and flavor.
Reheating
Reheating is generally not necessary since these cookies are best enjoyed chilled or at room temperature. If you prefer a slightly warmer treat, allow the cookies to sit at room temperature for 15 minutes from the fridge or freezer, but avoid microwaving as it could melt the chocolate unevenly.
FAQs
Can I substitute the crackers with something else?
Absolutely! While butter-flavored crackers provide the perfect base, you can experiment with gluten-free crackers, thin cookies, or even wafer cookies, depending on your texture preference and dietary needs.
Is there a way to make this recipe vegan?
Yes, just swap out the vanilla frosting for a vegan version, use dairy-free chocolate, and choose vegan-friendly crackers. Adjust the peppermint extract to your taste, and you’re all set for a plant-based treat.
How strong is the mint flavor in this recipe?
The mint flavor is pleasantly refreshing but not overpowering. You can easily adjust the peppermint extract amount to make it more subtle or intense depending on your preference.
Can I use white chocolate instead of dark chocolate?
Definitely! White chocolate will give a sweeter, creamier coating that complements the mint filling nicely. Just make sure to melt it gently as white chocolate can burn easily.
How do I know when the chocolate coating is properly set?
The chocolate coating is set when it feels firm and no longer sticky to the touch, usually after 30 to 60 minutes at room temperature. It should have a glossy finish and a satisfying snap when bitten into.
Final Thoughts
There’s something truly magical about biting into these Mint Sandwich Cookies with Chocolate Coating Recipe: the crisp crackers, the smooth mint cream, and the rich chocolate shell create a symphony of flavors and textures that’s impossible to resist. Whether you’re making them for a special occasion or just because, this recipe is sure to become a beloved favorite. Go ahead, treat yourself and your loved ones—you won’t regret it!
Print
Mint Sandwich Cookies with Chocolate Coating Recipe
- Prep Time: 15 minutes
- Cook Time: 30 minutes
- Total Time: 45 minutes
- Yield: 12 servings
- Category: Dessert
- Method: No-Cook
- Cuisine: American
- Diet: Gluten Free
Description
These Mint Sandwich Cookies combine the refreshing flavor of peppermint with creamy vanilla frosting and a rich dark chocolate coating. Easy to make and perfect for sharing, these cookies offer a delightful balance of cool mint filling and smooth chocolate, making them a festive treat that will wow your taste buds.
Ingredients
Cookies
- 72 pieces Butter-Flavored Crackers (can substitute with gluten-free crackers for a gluten-free version)
Filling
- 1 container Vanilla Frosting (store-bought for convenience)
- 1 teaspoon Peppermint Extract (adjust to taste; substitute with mint extract for stronger flavor)
- 1 drop Green Food Coloring (optional)
Chocolate Coating
- 1 pound Dark Chocolate Candy Coating (semi-sweet or milk chocolate as alternatives)
Instructions
- Prepare the Minty Filling: In a large mixing bowl, gently stir together the vanilla frosting, peppermint extract, and a few drops of green food coloring to create a creamy, mint-flavored filling.
- Assemble the Sandwiches: Using a knife or spatula, evenly spread the frosting mixture over half of the butter-flavored crackers. Then, carefully place the remaining crackers on top to form sandwich cookies.
- Melt the Chocolate: Chop the dark chocolate candy coating into small pieces and place them in a microwave-safe bowl. Microwave in 20-30 second intervals, stirring frequently until the chocolate is smooth and fully melted.
- Dip the Sandwich Cookies: Carefully dip each sandwich cookie into the melted chocolate, making sure it is fully coated. Allow any excess chocolate to drip back into the bowl.
- Set the Chocolate Coating: Place the dipped cookies on a sheet of waxed paper. Let them sit at room temperature for 30-60 minutes until the chocolate coating hardens and sets completely.
- Store the Cookies: Once the chocolate has hardened, store the mint sandwich cookies in an airtight container at room temperature for up to one week to maintain freshness.
Notes
- You can substitute butter-flavored crackers with gluten-free crackers to make a gluten-free version.
- If you prefer a stronger mint flavor, replace peppermint extract with mint extract.
- Green food coloring is optional; omit it for a natural look.
- Chocolate alternatives like semi-sweet or milk chocolate candy coating can be used based on your taste preference.
- Make sure to stir the chocolate frequently during melting to prevent burning and ensure smooth texture.
- Store cookies in an airtight container at room temperature to maintain crispiness and freshness.


