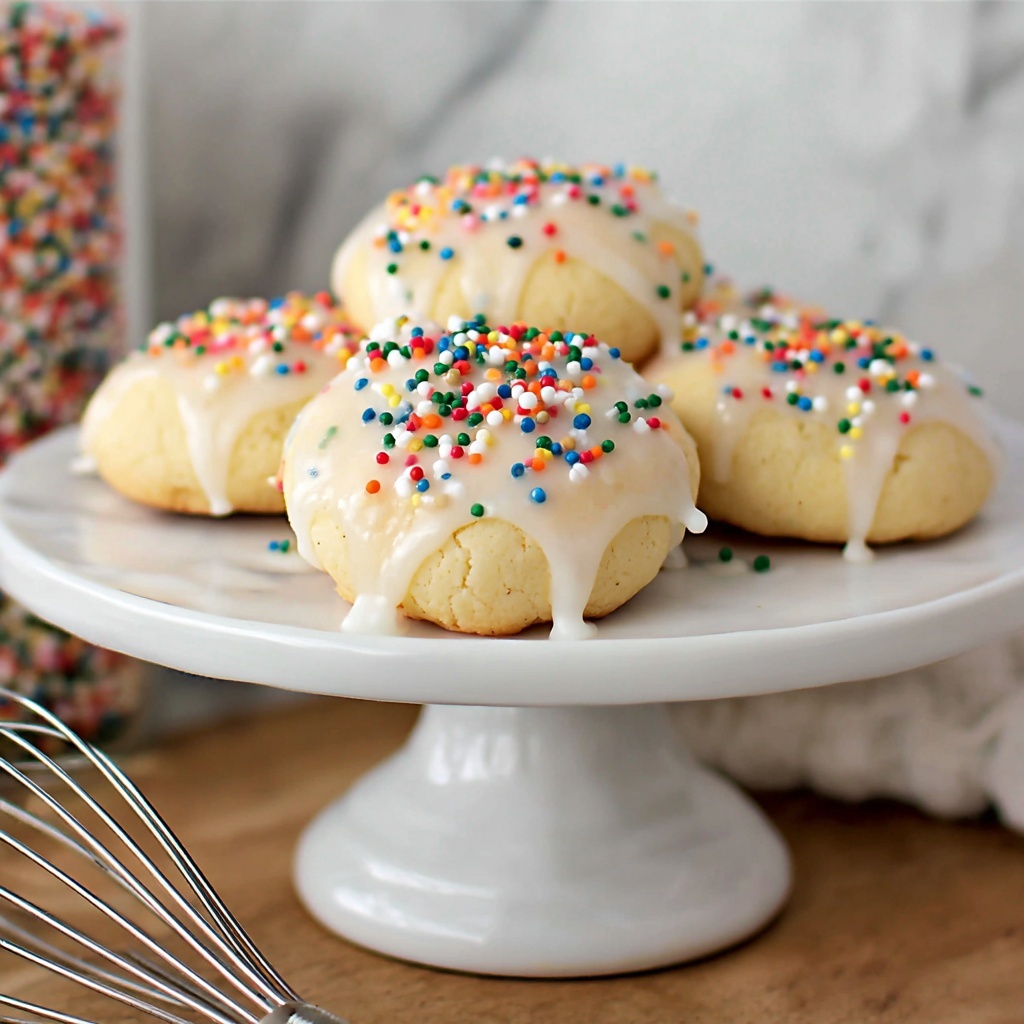
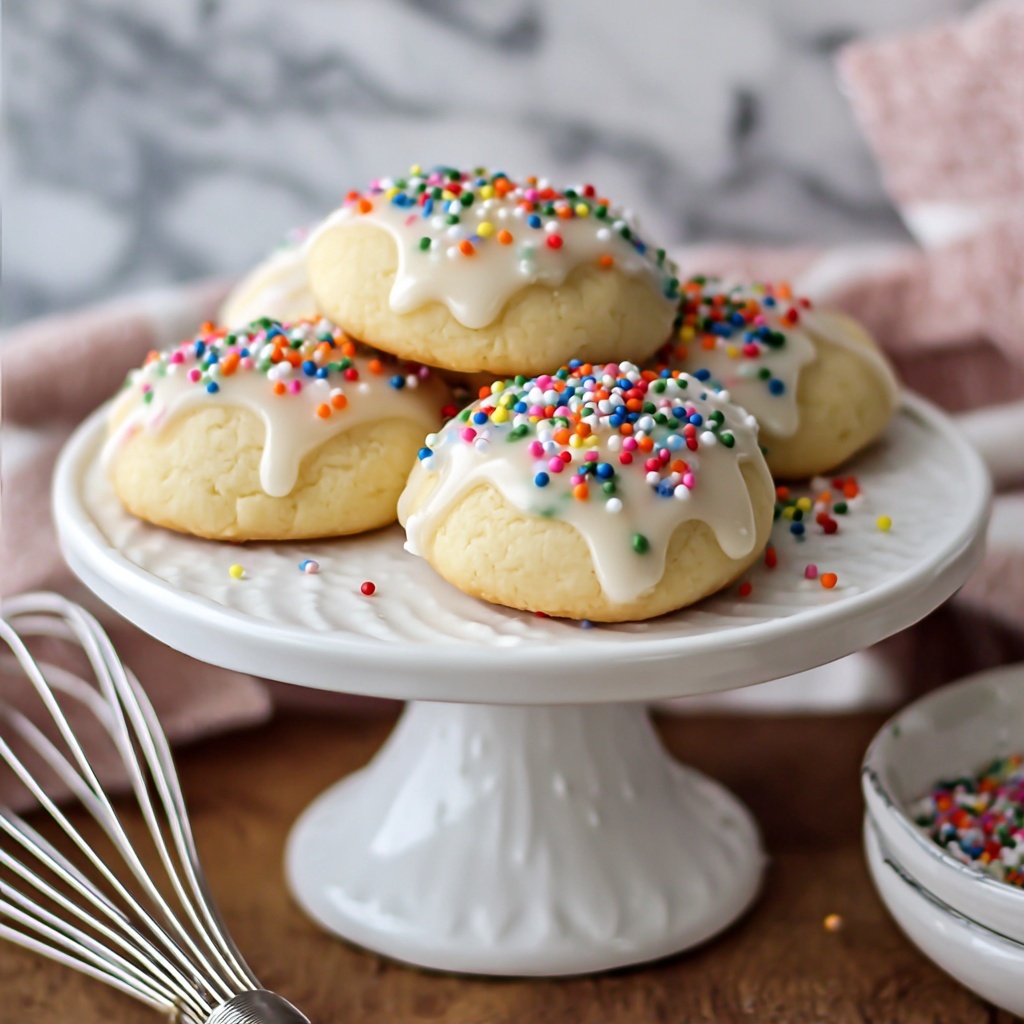
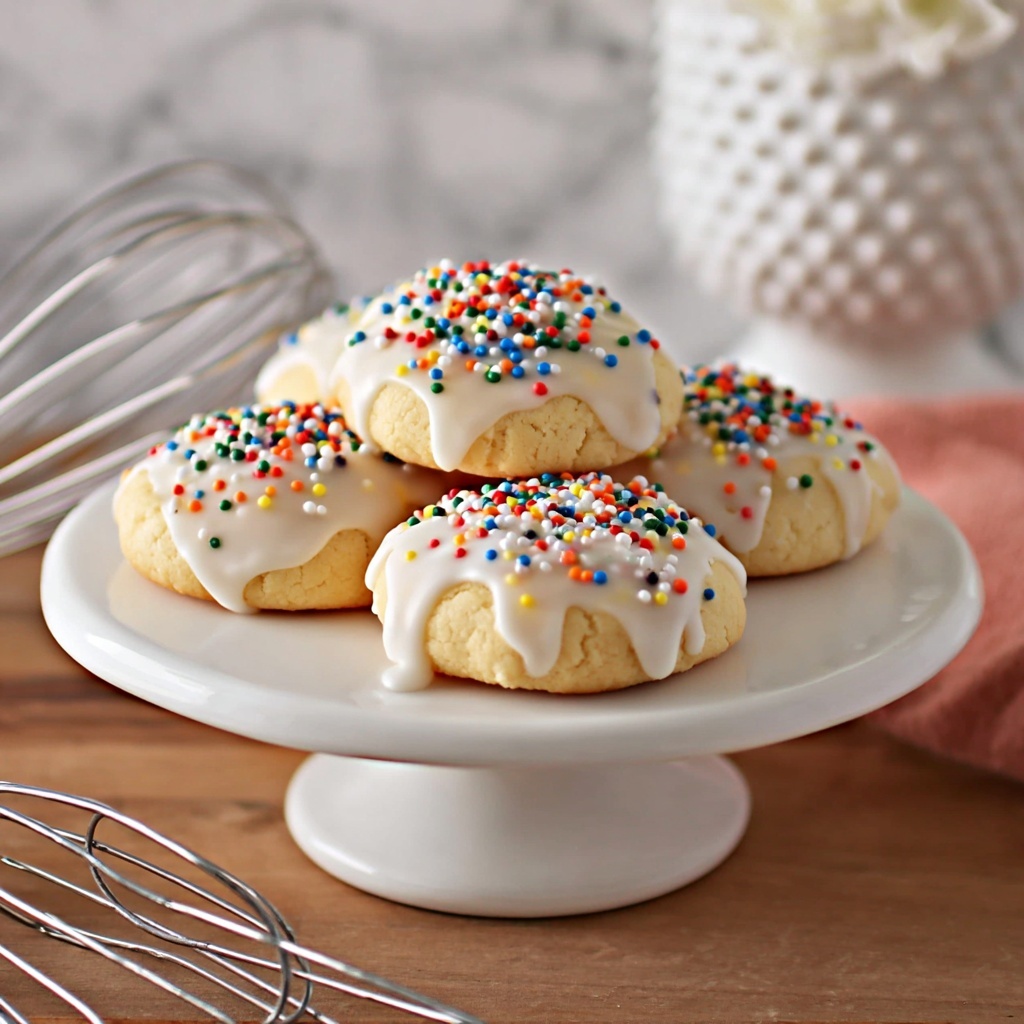
If you have a soft spot for delightful, tender cookies with a lovely touch of sweetness and a charming presentation, then you are absolutely going to adore this Italian Knot Cookies Recipe. These cookies are not only a feast for your taste buds but also a joy to make, with their soft, buttery texture, a whisper of citrus, and a gorgeous drizzle of icing topped with playful sprinkles. They perfectly blend tradition with a fun twist, making them ideal for everything from holiday celebrations to everyday treats shared over coffee with friends.
Ingredients You’ll Need
The magic of any great cookie lies in using simple, high-quality ingredients, and this Italian Knot Cookies Recipe is no exception. Each ingredient plays a pivotal role, from the flour providing structure, to the zest and extracts lending those delicate bursts of flavor.
- 3 cups all purpose flour: The foundation, creating a tender yet sturdy dough to form the knots.
- 2 teaspoons baking powder: Helps the cookies rise just enough for a light texture.
- ½ teaspoon baking soda: Works with the baking powder to ensure a subtle lift and softness.
- ½ teaspoon salt: Balances sweetness and enhances all other flavors.
- 4 tablespoons unsalted butter (softened): Adds richness and helps achieve that melt-in-your-mouth feel.
- ½ cup sugar: Provides sweetness and helps with cookie browning.
- 3 eggs: Bind everything together and contribute to the cookie’s tender crumb.
- 1 teaspoon vanilla extract: Adds a warm, familiar aroma and depth of flavor.
- 2 tablespoons lemon juice: Brightens the dough with fresh acidity.
- 2 tablespoons lemon zest (optional): Offers a natural citrus punch — totally optional but highly recommended.
- 1½ cups confectioners’ sugar: For the smooth, glossy icing that sweetly envelopes each cookie.
- 2½ tablespoons milk or water: Adjusts the consistency of the icing to perfect drizzle state.
- ¼ teaspoon desired extract (almond, lemon, anise or vanilla): Customizes the icing flavor to complement your cookies beautifully.
- Nonpareils or sprinkles: The cheerful finishing touch to make these cookies as delightful to look at as to eat.
How to Make Italian Knot Cookies Recipe
Step 1: Prepare the Dry Ingredients
Start by whisking together the flour, baking powder, baking soda, and salt in a medium bowl. This ensures they are evenly distributed throughout the dough, which is key for consistent cookies.
Step 2: Cream Butter and Sugar
In a stand mixer, beat together the softened butter and sugar until the mixture is light and fluffy. This step incorporates air, which helps your cookies stay tender and create that wonderful texture you expect from Italian Knot Cookies.
Step 3: Add the Eggs and Flavorings
Beat in the eggs one at a time, making sure each addition is fully incorporated before adding the next. Then mix in the vanilla extract and lemon juice for a subtle zing. If you love a pronounced citrus flavor, the lemon zest is a divine addition here.
Step 4: Combine Wet and Dry Ingredients
With your mixer set to low, gradually add the dry mixture to the wet. This gentle combining prevents overworking the dough, which can toughen your cookies. You’re aiming for a soft, sticky dough at this point.
Step 5: Chill the Dough
Cover your dough and pop it in the fridge for at least an hour. This rest time allows the dough to firm up, making it easier to shape the perfectly knotted cookies and enhancing the final texture.
Step 6: Shape Your Knots
Once chilled, lightly flour your work surface and hands to avoid sticking. Roll dough balls smaller than golf balls into 7-inch ropes and tie them gently into knots. The small ‘tail’ that pokes through the knot’s center is part of the cookie’s charming look.
Step 7: Bake to Perfection
Arrange the knotted dough on a parchment-lined baking sheet, spacing them nicely apart. Bake at 350°F for 12 to 15 minutes until puffed and just turning golden. Keep an eye out to avoid over-baking — you want soft, barely cracked cookies that will soak up the icing beautifully.
Step 8: Make and Apply the Icing
Whisk together the confectioners’ sugar, milk or water, and your chosen extract until smooth. Adjust the thickness so the icing drizzles but doesn’t run off too quickly. Dunk each cooled cookie upside down into the icing, let the excess drip, and then sprinkle merrily with nonpareils or sprinkles while still wet.
How to Serve Italian Knot Cookies Recipe
Garnishes
The sprinkled icing coating is a classic choice, but feel free to add finely chopped nuts or a dusting of lemon zest on top for extra color and texture. The contrast of the crunchy sprinkles against the soft cookie makes every bite a delight.
Side Dishes
These cookies pair wonderfully with a cozy cup of espresso or a creamy cappuccino. For an afternoon treat, serve alongside fresh berries or a tangy lemon curd to highlight the cookie’s citrus notes.
Creative Ways to Present
Present Italian Knot Cookies on a pretty platter stacked like little towers, or in quaint cellophane bags tied with cheerful ribbons for gifting. You can also arrange them nestled among fresh flowers or greenery for a charming dessert table centerpiece.
Make Ahead and Storage
Storing Leftovers
Store your baked and iced Italian Knot Cookies in an airtight container at room temperature for up to 3 days. They maintain their softness but be sure they are fully cooled and the icing completely set before storing to avoid sticking.
Freezing
If you want to keep these delicious cookies longer, freeze them uniced in a single layer on a baking sheet first, then transfer to a freezer bag for up to 2 months. After baking, you can also freeze iced cookies on a parchment-lined tray until firm, then wrap tightly.
Reheating
Reheat frozen cookies briefly in a warm oven (about 300°F for 5 minutes) to refresh their softness. Icing may soften slightly, so consider chilling them again before serving if you prefer crisp icing.
FAQs
Can I make these cookies without lemon zest?
Absolutely! The lemon zest adds a bright citrus note, but if you prefer a more classic flavor, simply omit it. The vanilla and optional extracts in the icing still deliver plenty of deliciousness.
What if I don’t have a stand mixer?
No problem! You can use a hand mixer or mix by hand with a sturdy spoon. Just take your time creaming the butter and sugar well, and gently incorporate the flour to avoid toughening the dough.
Can I use a different extract for the icing?
Yes! Almond, anise, lemon, or vanilla extracts all work beautifully. Feel free to experiment to find your favorite flavor combination with this Italian Knot Cookies Recipe.
Why does the dough need to chill for an hour?
Chilling firms up the dough, making it easier to roll and knot without sticking or losing shape. It also helps develop the flavors and results in a more tender cookie after baking.
Can I make the dough ahead of time?
Definitely! You can prepare the dough and keep it refrigerated overnight before shaping and baking. Just be sure to bring it back to a workable temperature if it becomes too hard before shaping.
Final Thoughts
Italian Knot Cookies bring together simplicity, tradition, and a touch of whimsy in every delicious bite. I truly hope this Italian Knot Cookies Recipe inspires you to roll up your sleeves, tie some sweet little knots, and share the joy of freshly baked homemade treats with the people you love. Once you try them, these charming cookies just might become your new favorite go-to for special occasions or cozy moments at home.
Print
Italian Knot Cookies Recipe
- Prep Time: 20 minutes
- Cook Time: 15 minutes
- Total Time: 1 hour 35 minutes
- Yield: About 24 cookies
- Category: Dessert
- Method: Baking
- Cuisine: Italian
Description
Italian Knot Cookies are charming, soft, and slightly lemony treats shaped into delicate knots. Baked until lightly golden and topped with a smooth, sweet icing and colorful sprinkles, these cookies bring a nostalgic, festive touch to any occasion. Perfect for gifting or enjoying with tea, these delightful cookies combine simple ingredients with an eye-catching presentation.
Ingredients
Dry Ingredients
- 3 cups all purpose flour
- 2 teaspoons baking powder
- ½ teaspoon baking soda
- ½ teaspoon salt
Wet Ingredients
- 4 tablespoons unsalted butter (softened to room temperature)
- ½ cup sugar
- 3 eggs
- 1 teaspoon vanilla extract
- 2 tablespoons lemon juice
- 2 tablespoons lemon zest (optional)
Icing
- 1½ cups confectioners’ sugar
- 2½ tablespoons milk or water
- ¼ teaspoon desired extract, such as almond, lemon, anise or vanilla
- nonpareils or sprinkles
Instructions
- Make Cookie Dough: In a medium bowl, whisk together the all-purpose flour, baking powder, baking soda, and salt. Set aside. In the bowl of a stand mixer, cream the softened butter and sugar until light and fluffy. Add eggs one at a time, beating well after each addition, then scrape down the sides of the bowl and beat again for an even mix. Stir in vanilla extract, lemon juice, and optional lemon zest. With the mixer on low, gradually add the dry ingredients to the wet mixture until just combined, creating a soft, sticky dough. Cover and refrigerate for at least 1 hour.
- Preheat Oven: While the dough chills, preheat oven to 350°F (175°C) and line a baking pan with parchment paper or a silicone mat.
- Shape the Cookies: Lightly flour your work surface and hands. Using a medium cookie scoop, portion dough into balls slightly smaller than a golf ball. Roll each ball into a 7-inch-long rope, then tie the dough rope into a loose knot with one end poking through the center. Place the knots on the prepared baking sheet, leaving 1½ inches between each cookie.
- Bake: Bake the cookies for 12–15 minutes until puffed and lightly golden; check at 10 minutes to avoid over-browning. Expect some cracking as they puff up, which is normal. Remove from oven and let cool completely before icing.
- Make Icing: Whisk together confectioners’ sugar, milk or water, and your chosen extract (almond, lemon, anise, or vanilla) until smooth. Adjust the consistency by adding more sugar to thicken or milk/water to thin until the icing drizzles smoothly and disappears quickly when drizzled with a spoon.
- Ice Cookies: Dip cooled cookies upside down into the icing, letting excess drip off. Place cookies on a wire rack over a baking pan to catch drips. While icing is still wet, decorate with nonpareils or sprinkles. Allow icing to set completely before serving or packaging.
Notes
- Chilling the dough is essential for easier handling and better cookie shape.
- Do not overmix the dough to keep the cookies tender.
- Adjust icing thickness for better coverage depending on personal preference.
- Use lemon zest for a bright, citrus flavor or omit for a more classic vanilla taste.
- Store cookies in an airtight container once the icing has fully set to maintain freshness.


