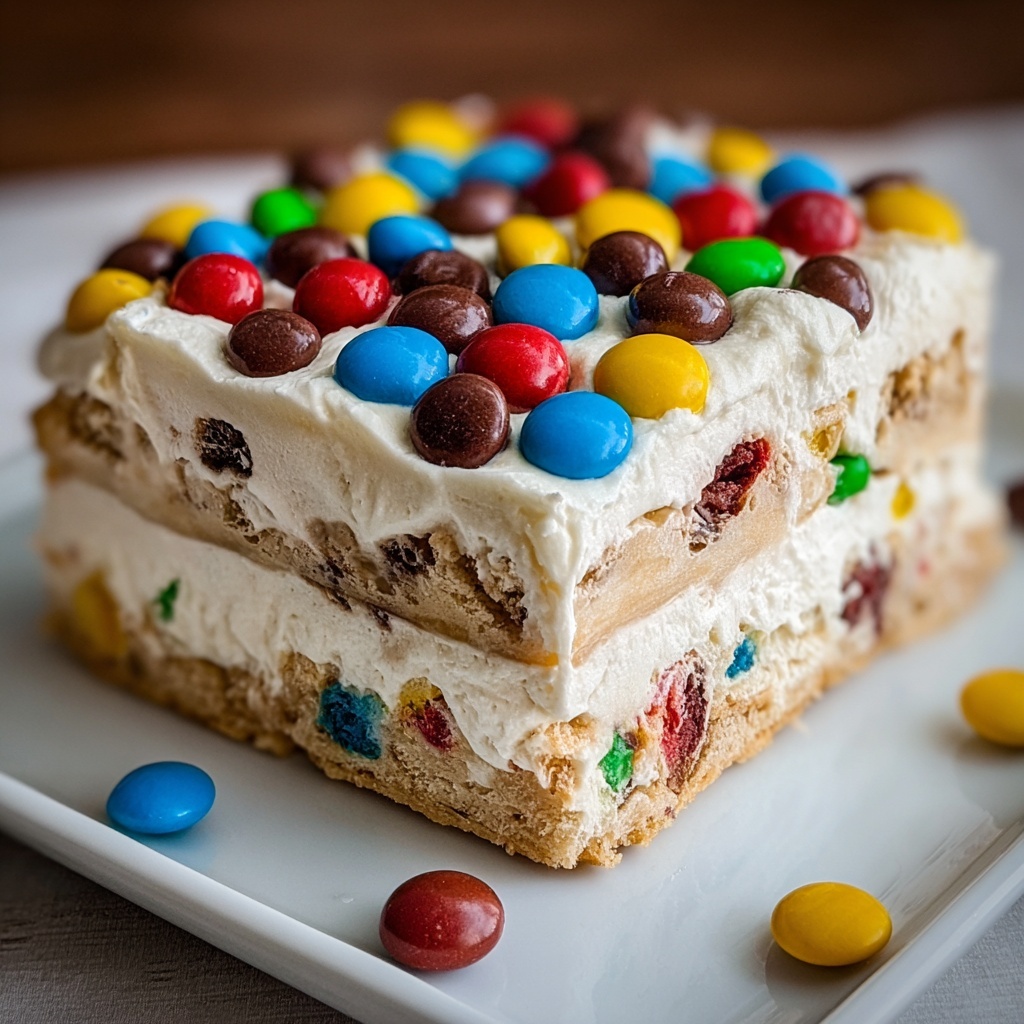
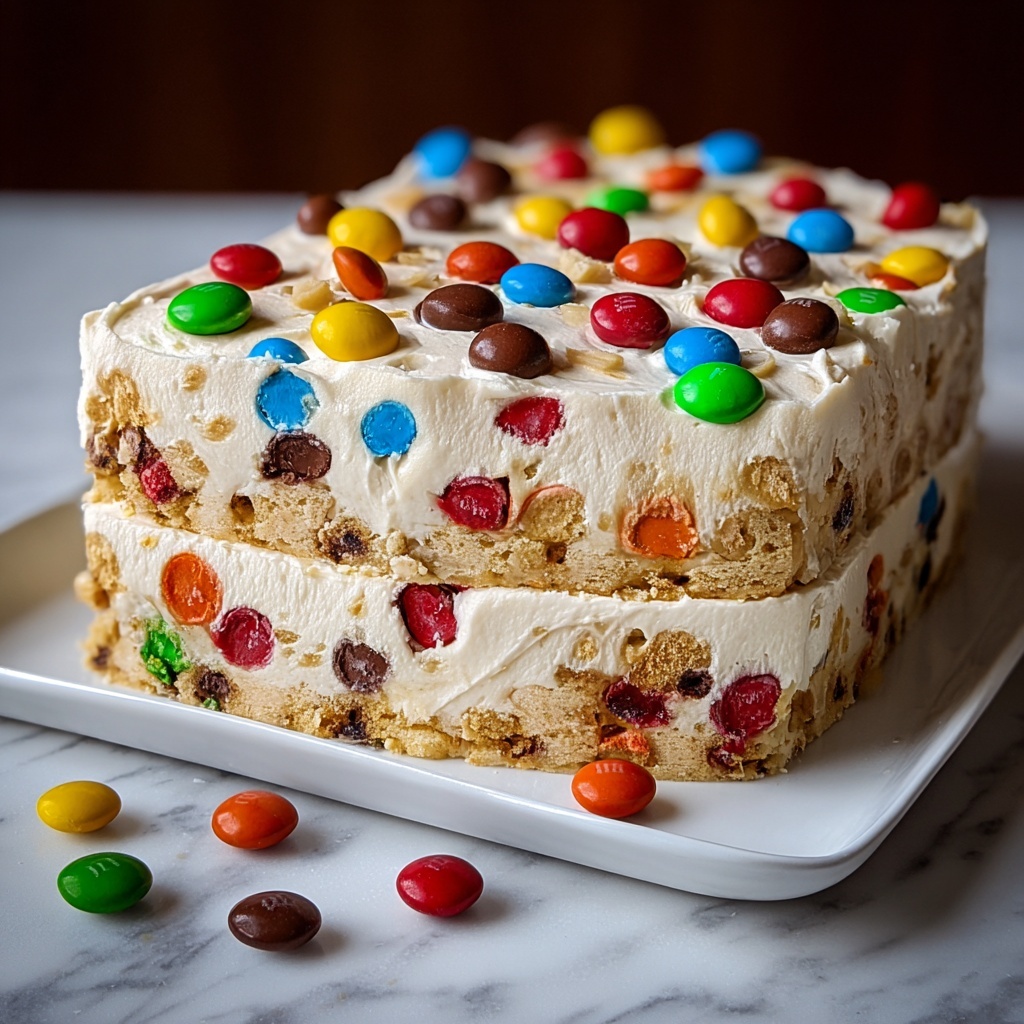
If you are craving a dessert that combines fun, color, and creamy indulgence all in one slice, then you will absolutely adore this Easy M&M Ice Cream Sandwich Cake Recipe. It’s the kind of treat that instantly brings smiles, with layers of soft vanilla ice cream, crunchy ice cream sandwiches, and bursts of M&M chocolates scattered throughout the cake. Whether you’re planning a special celebration or just want to treat yourself on a warm day, this cake is incredibly satisfying yet wonderfully simple to assemble. Get ready to dive into layers of sweetness and texture that will make your taste buds dance!
Ingredients You’ll Need
Ingredients You’ll Need
These ingredients are straightforward but each plays a crucial role in building the perfect Easy M&M Ice Cream Sandwich Cake Recipe. They offer the right balance of creaminess, crunch, and that colorful pop that makes this dessert irresistible.
- Ice Cream Sandwiches: These form the sturdy, chocolatey layers that hold everything together and provide a satisfying crunch.
- Vanilla Ice Cream: Softened for easy spreading, it’s the creamy glue between the crunchy sandwich layers and adds a smooth, cool flavor.
- M&M Candies: Bright and crunchy, these candies add vibrant color and a delicious chocolate burst inside the cake.
- Whipped Cream: This fluffy topping adds lightness and a luscious finish to the cake’s appearance and taste.
- Chocolate Syrup (optional): A drizzle on top for those who love a rich chocolate note and an elegant touch.
How to Make Easy M&M Ice Cream Sandwich Cake Recipe
Step 1: Prepare Your Ingredients
Start by letting the vanilla ice cream soften slightly at room temperature so it’s easy to spread without tearing the ice cream sandwiches. Meanwhile, arrange your ice cream sandwiches on a flat serving dish, creating the foundation for your delicious cake. This base is key because its firm texture supports all the creamy layers that follow.
Step 2: Layer the Ice Cream
Using a spatula, gently spread an even layer of the softened vanilla ice cream right over the ice cream sandwiches. This creamy layer acts like a delicious “glue” that binds the sandwiches and candy, helping the cake hold its shape once chilled.
Step 3: Add M&M Candies
Sprinkle a generous handful of M&M candies evenly over the vanilla ice cream layer. The colorful candies add delightful crunch and make each slice look like a party. Don’t hold back on this fun part—more M&Ms mean more joy in every bite!
Step 4: Repeat Layers
Place another layer of ice cream sandwiches on top of the M&Ms, then spread another layer of vanilla ice cream, followed by another sprinkle of candies. Continue layering until you reach your preferred cake height. Make sure the final layer is whipped cream for that light, pillowy finish.
Step 5: Top and Decorate
Spread whipped cream evenly over the top layer of your cake. Decorate with more M&Ms for an extra pop of color and texture. If you like, drizzle chocolate syrup in a pretty pattern to add a touch of richness and elegance that will impress everyone.
Step 6: Chill and Serve
Cover the cake with plastic wrap and refrigerate it for at least two hours. This chilling time lets everything firm up so you can slice clean pieces that hold together perfectly. Serve your Easy M&M Ice Cream Sandwich Cake Recipe chilled and watch it disappear quickly!
How to Serve Easy M&M Ice Cream Sandwich Cake Recipe
Garnishes
Adding a few extra M&Ms or a swirl of whipped cream on each serving makes the cake look festive and inviting. For a playful touch, scatter some colorful sprinkles or even crushed ice cream sandwiches around the platter.
Side Dishes
If you want to complement this sweet treat, consider a simple bowl of fresh berries or a light fruit salad. The natural acidity from fruits balances the rich creaminess beautifully. For adults, a small glass of coffee or a latte pairs amazingly with the cold cake.
Creative Ways to Present
Try serving individual cake portions in clear dessert cups layered with extra M&Ms for a cute, personal serving option. Or, place the cake on a vibrant platter and add edible flowers or mint leaves to elevate its look for special occasions. Presentation adds to the excitement of digging into this delightful dessert.
Make Ahead and Storage
Storing Leftovers
This cake keeps well covered in the refrigerator for up to three days. Make sure to wrap it tightly to prevent any flavors from escaping and avoid the cake absorbing fridge odors.
Freezing
You can freeze leftovers by wrapping the cake securely with plastic wrap and then aluminum foil to protect against freezer burn. When frozen, enjoy it within one month for the best texture and flavor.
Reheating
Since this is an ice cream-based cake, reheating isn’t recommended. Instead, allow frozen slices to thaw in the fridge for about 20-30 minutes before serving for the perfect soft but still chilled consistency.
FAQs
Can I use different ice cream flavors for this cake?
Absolutely! While vanilla complements the M&Ms beautifully, feel free to experiment with chocolate, mint, or even caramel-flavored ice cream to tailor the cake to your taste buds.
How long does this cake take to set properly?
For best results, refrigerate the cake for at least two hours before slicing. This resting time ensures the layers firm up and the cake slices cleanly without falling apart.
Can I substitute M&Ms with other candies?
Yes, you can swap M&Ms for similar small candies like Reese’s Pieces, mini chocolate chips, or even chopped nuts if you want to mix up the texture and flavor.
Is there a way to make this dessert dairy-free?
Definitely! Use dairy-free ice cream sandwiches and a plant-based ice cream alternative, along with coconut whipped cream, to create a delicious vegan-friendly version of this cake.
What’s the best way to cut the cake?
Use a sharp knife warmed under hot water and wipe it dry before slicing. This method helps you achieve neat cuts without the ice cream sticking to the blade.
Final Thoughts
This Easy M&M Ice Cream Sandwich Cake Recipe is one of those joyful desserts that brings people together with its colorful appearance and irresistible combination of textures. It’s a surefire way to impress your guests or delight your family with something playful and creamy that feels both special and delightfully simple. Trust me, once you make it, this cake will become a favorite dessert to turn to again and again!
Print
Easy M&M Ice Cream Sandwich Cake Recipe
- Prep Time: 15 minutes
- Cook Time: 0 minutes
- Total Time: 2 hours 15 minutes
- Yield: 8 servings
- Category: Dessert
- Method: No-Cook
- Cuisine: American
- Diet: Vegetarian
Description
This Easy M&M Ice Cream Sandwich Cake is a fun, colorful, and delicious frozen dessert perfect for parties and celebrations. Layers of ice cream sandwiches, softened vanilla ice cream, and crunchy M&M candies come together with whipped cream and optional chocolate syrup for a visually stunning and tasty treat that requires no baking and minimal prep.
Ingredients
Ice Cream Sandwich Cake Base and Layers
- 8–10 Ice Cream Sandwiches (enough to form multiple layers)
- 1.5 to 2 quarts Vanilla Ice Cream, softened
Layering and Decoration
- 1 to 1.5 cups M&M Candies
- 1 to 2 cups Whipped Cream
- Chocolate Syrup (optional, for drizzling)
Instructions
- Prepare Your Ingredients: Take the vanilla ice cream out of the freezer and allow it to soften slightly at room temperature. This will make it easier to spread later. Also, arrange the ice cream sandwiches on your serving dish or flat surface to start forming the base layer of the cake.
- Layer the Ice Cream: Using a spoon or spatula, gently spread a layer of the softened vanilla ice cream over the arranged ice cream sandwiches. Make sure to create an even, smooth layer that will help hold the layers together.
- Add M&M Candies: Sprinkle a generous amount of M&M candies evenly over the ice cream layer. The candies not only add a pop of bright color but also provide a fun crunchy texture contrast.
- Repeat Layers: Place another layer of ice cream sandwiches on top of the M&M candies. Repeat the process of spreading softened vanilla ice cream and sprinkling M&M candies until your cake reaches the desired height. Finish this step with a final layer of whipped cream on top.
- Top and Decorate: Spread the whipped cream evenly over the top of the cake. Decorate with additional M&M candies for a colorful finish and optionally drizzle with chocolate syrup for extra indulgence and a beautiful presentation.
- Chill and Serve: Carefully cover the cake with plastic wrap to prevent freezer burn and refrigerate for at least two hours. This chilling time allows the cake to firm up so it can be sliced cleanly. Serve chilled for the perfect frozen treat.
Notes
- Allow the ice cream to soften just enough to spread easily but not melt completely.
- You can customize this cake by using different ice cream sandwich flavors or candy toppings.
- Be sure to chill the cake well before slicing to maintain clean layers.
- This dessert is best enjoyed within 24 hours for optimal texture and freshness.
- For a quicker chill, you may freeze the assembled cake instead of refrigerating, but allow it to soften slightly before serving.


