
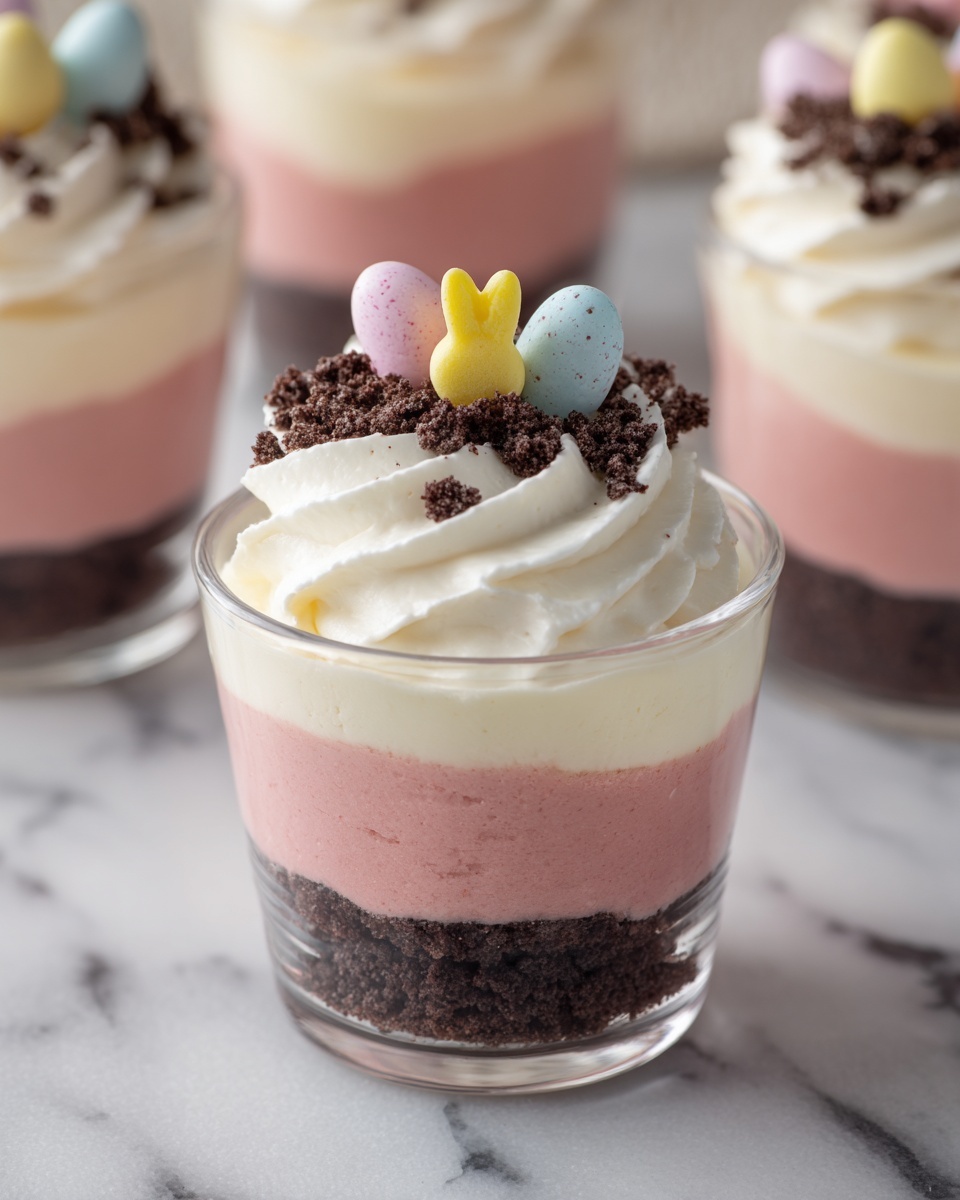
If you’re on the hunt for a fun, festive, and utterly delicious dessert, look no further than this Easter Dirt Cups Recipe. This whimsical treat combines creamy chocolate pudding, fluffy whipped topping, and crunchy cookie crumbs to recreate the perfect “dirt” base, topped with gummy worms and colorful candy eggs that scream springtime joy. It’s quick to whip up, irresistibly tasty, and guaranteed to bring smiles to kids and adults alike at your Easter celebration or any spring gathering.

Ingredients You’ll Need
The magic of the Easter Dirt Cups Recipe lies in its simplicity. Each ingredient plays a key role, from the rich chocolate pudding mix that forms the creamy foundation, to the crushed cookies adding that satisfying dirt-like crunch and visual appeal. The whipped topping keeps everything light and fluffy, while the decorative candies bring a playful, seasonal pop of color.
- Instant chocolate pudding mix: The star that gives you creamy, luscious chocolate flavor in minutes.
- Cold milk: To transform the pudding mix into a smooth, velvety base.
- Whipped topping (Cool Whip): Adds airy texture and sweetness, balancing the dense pudding.
- Chocolate sandwich cookies (crushed): Provides the essential “dirt” texture and a delightful chocolate crunch.
- Gummy worms (optional): These add a fun, playful vibe perfect for the holiday theme.
- Candy eggs: Mini chocolate or candy-coated eggs bring colorful springtime decoration.
- Powdered sugar (optional): A touch of sweetness to enhance the whipped topping, if desired.
How to Make Easter Dirt Cups Recipe
Step 1: Prepare the Chocolate Pudding
Start by whisking the instant chocolate pudding mix into cold milk until the mixture thickens, which takes just about two minutes. This creates your indulgently creamy base that you’ll layer throughout the dessert.
Step 2: Fold in the Whipped Topping
Next, gently fold the whipped topping into the pudding until everything is smooth and well combined. This step is key to achieving that light, dreamy texture that contrasts wonderfully with the crushed cookies.
Step 3: Layer the Pudding and Cookie Crumbs
Begin assembling your dirt cups by spooning a layer of the pudding mixture into your serving cups or bowls. Follow this with a generous sprinkle of crushed cookies, which mimics the look and texture of real dirt.
Step 4: Repeat Layers
Keep layering the pudding and crushed cookie crumbs until your cups are filled, making sure the topmost layer is cookie crumbs to maintain the dirt effect.
Step 5: Add the Finishing Touches
Top your creation with gummy worms and candy eggs to bring festive, colorful energy and a touch of whimsy that captures the spirit of Easter perfectly.
Step 6: Chill Before Serving
Allow the dirt cups to rest in the refrigerator for at least one hour. This chilling step not only helps the layers set but also enhances the flavors melding together for that perfect bite.
How to Serve Easter Dirt Cups Recipe
Garnishes
Garnishes make all the difference in presentation and excitement. Adding gummy worms crawling through the cookie crumbs instantly turns these desserts into a playful scene kids adore. The candy eggs bring a bright contrast, inviting a festive feel that’s just right for Easter.
Side Dishes
Pair these dirt cups with fresh fruit or a light spring salad to balance the richness. They also make a fun finish after a simple brunch or an Easter dinner where lighter, colorful dishes are the star.
Creative Ways to Present
For an extra wow factor, try serving your Easter Dirt Cups Recipe in clear mini mason jars or tiny flower pots for that authentic garden vibe. Add mini shovels or spoons with colorful ribbons for a delightful touch that guests will remember.
Make Ahead and Storage
Storing Leftovers
If you happen to have any leftovers, cover the cups tightly with plastic wrap or lid and store them in the refrigerator for up to two days. This keeps the pudding fresh and the cookie crumbs staying crunchy.
Freezing
Freezing isn’t recommended for this dessert as the whipped topping and pudding may lose their creamy texture once thawed, leading to a less enjoyable experience.
Reheating
Since this is a chilled dessert, reheating isn’t necessary. Instead, just pull it from the fridge and serve cold to enjoy the perfect creamy, crunchy texture combination.
FAQs
Can I use homemade pudding for this Easter Dirt Cups Recipe?
Absolutely! Homemade pudding can be used and it often adds a richer flavor, just be sure it’s fully chilled before layering with the other ingredients.
What other cookies can I use besides Oreos?
Chocolate wafers or any chocolate sandwich cookies work well. Just crush them finely enough to mimic soil while still giving that satisfying crunch.
Can I make these vegan or dairy-free?
Yes, by choosing dairy-free pudding mix, milk alternatives like almond or oat milk, and a vegan whipped topping, you can easily adapt the recipe for dietary needs.
How long do these dirt cups keep their texture?
For the best texture, enjoy them within two days. Over time, the cookies may soften, losing that crunchy “dirt” effect.
Are the gummy worms necessary?
They’re optional but highly recommended for that signature dirt cup fun factor and visual appeal. You can leave them out or substitute with other candy if preferred.
Final Thoughts
This Easter Dirt Cups Recipe is one of those delightful treats that brings joy and ease together perfectly. Whether you’re making it with kids, planning a festive gathering, or just craving a playful chocolate dessert, it’s a winner that’s sure to become a seasonal favorite. So grab those ingredients, get layering, and enjoy every sweet, crunchy bite of this fantastic dirt cup experience!
Print
Easter Dirt Cups Recipe
- Prep Time: 10 minutes
- Cook Time: 0 minutes
- Total Time: 1 hour 10 minutes (includes chilling time)
- Yield: 6 servings
- Category: Dessert
- Method: No-Cook
- Cuisine: American
Description
Easter Dirt Cups are a delightful no-bake dessert perfect for spring celebrations. Layers of creamy chocolate pudding and crushed chocolate sandwich cookies mimic garden soil, topped with gummy worms and candy eggs for a fun, festive treat. Easy to prepare in just 10 minutes and chilled to set, these cups are a favorite for kids and adults alike.
Ingredients
Pudding Mixture
- 1 (3.9 oz) package instant chocolate pudding mix
- 2 cups cold milk
- 1 (8 oz) tub of whipped topping (Cool Whip)
- 1 tablespoon powdered sugar (optional, to sweeten the whipped topping)
Dirt Layer and Garnish
- 15–20 chocolate sandwich cookies (Oreos), crushed
- 1/2 cup gummy worms (optional for the “dirt” effect)
- 1/2 cup candy eggs (mini chocolate eggs or candy-coated eggs for decoration)
Instructions
- Prepare the Pudding: In a medium bowl, whisk together the instant chocolate pudding mix and cold milk until it thickens, which should take about 2 minutes.
- Fold in Whipped Topping: Gently fold the whipped topping into the pudding mixture until smooth and evenly combined. Optionally, add powdered sugar to sweeten the whipped topping before folding.
- Layer the Dessert: In each serving cup or bowl, spoon a layer of the pudding mixture at the bottom.
- Add Crushed Cookies: Sprinkle a layer of crushed chocolate sandwich cookies on top of the pudding layer to mimic dirt.
- Repeat Layers: Continue layering pudding mixture and crushed cookies, ending with a final layer of crushed cookies on top.
- Garnish: Decorate the top layer with gummy worms and colorful candy eggs to create a festive Easter look.
- Chill: Refrigerate the dirt cups for at least 1 hour to allow the layers to set and flavors to meld.
- Serve: Serve chilled and enjoy this fun and easy Easter dessert!
Notes
- For a dairy-free version, use non-dairy milk and whipped topping substitutes.
- The gummy worms and candy eggs are optional but add a fun visual and textural element.
- Make the dirt cups a few hours ahead of time or the night before for best flavor and set.
- Use a clear glass or plastic cup to showcase the layers visually.
- Can be customized by adding crushed nuts or other candies for extra texture.


