Description
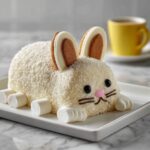
This charming Easter Bunny Cake is a delightful and festive dessert perfect for celebrating the holiday with family and friends. Made from a classic white or yellow cake mix and decorated with creamy vanilla frosting, sweet shredded coconut, and colorful candies, this cake is shaped like a cute bunny complete with ears, whiskers, cheeks, and a bow tie. It’s a fun and kid-friendly treat that adds a playful centerpiece to your Easter table.
Ingredients
Scale
Cake
- 1 box white or yellow cake mix (plus ingredients listed on box)
Frosting and Decorations
- 1 1/2 cups vanilla frosting
- 2 cups sweetened shredded coconut
- Pink food coloring
- Jelly beans or chocolate candies (for decoration)
- 2 large marshmallows (for cheeks)
- 2 mini marshmallows (for teeth)
- 1 black or pink jelly bean (for nose)
- 2 black licorice strings (for whiskers)
- Construction paper or cardstock (for bunny ears)
Instructions
- Prepare the Cake Batter: Follow the package instructions to prepare the cake batter from the cake mix. Be sure to use all the ingredients called for on the box to ensure proper texture and flavor.
- Bake the Cakes: Evenly divide the batter between two 8-inch round cake pans. Bake according to the package directions, then let the cakes cool completely to room temperature before decorating.
- Shape the Bunny: Place one whole cake round on your serving tray—this will be the bunny’s face. Cut the second cake round into three parts: two bunny ears cut from each side, and a bow tie cut from the center portion.
- Assemble the Cake: Position the ear pieces above the bunny’s head and the bow tie below it, arranging them carefully on the tray.
- Apply Frosting: Use vanilla frosting to cover the entire assembled cake evenly, ensuring all parts are well coated to help the coconut stick.
- Color the Coconut: Set aside about 1/2 cup of the shredded coconut and mix it with a drop of pink food coloring to create pink coconut for the ears.
- Decorate with Coconut: Sprinkle the white shredded coconut over the frosted cake to mimic bunny fur. Then sprinkle the pink-colored coconut inside the ear-shaped cake pieces for a cute accent.
- Add Facial Features: Position the large marshmallows on each side of the face as cheeks, place the mini marshmallows as bunny teeth at the center bottom of the face, and use a jelly bean as the nose.
- Finish the Face: Use two black licorice strings for whiskers on each side, and add jelly beans for the eyes to complete the bunny’s face.
- Create Paper Ears: Cut out two large bunny ear shapes from construction paper or cardstock and place them behind the cake ears if you want your bunny’s ears to stand out more.
- Decorate Bow Tie: Use jelly beans or colored sprinkles to decorate the bow tie piece beneath the bunny’s face for an extra festive touch.
Notes
- You may substitute homemade cake and frosting if preferred for a more personalized touch.
- Allow children to participate by letting them decorate their own bunny cakes with various candies and sprinkles for a fun activity.
- Store leftover cake covered at room temperature for up to 2 days to maintain freshness.