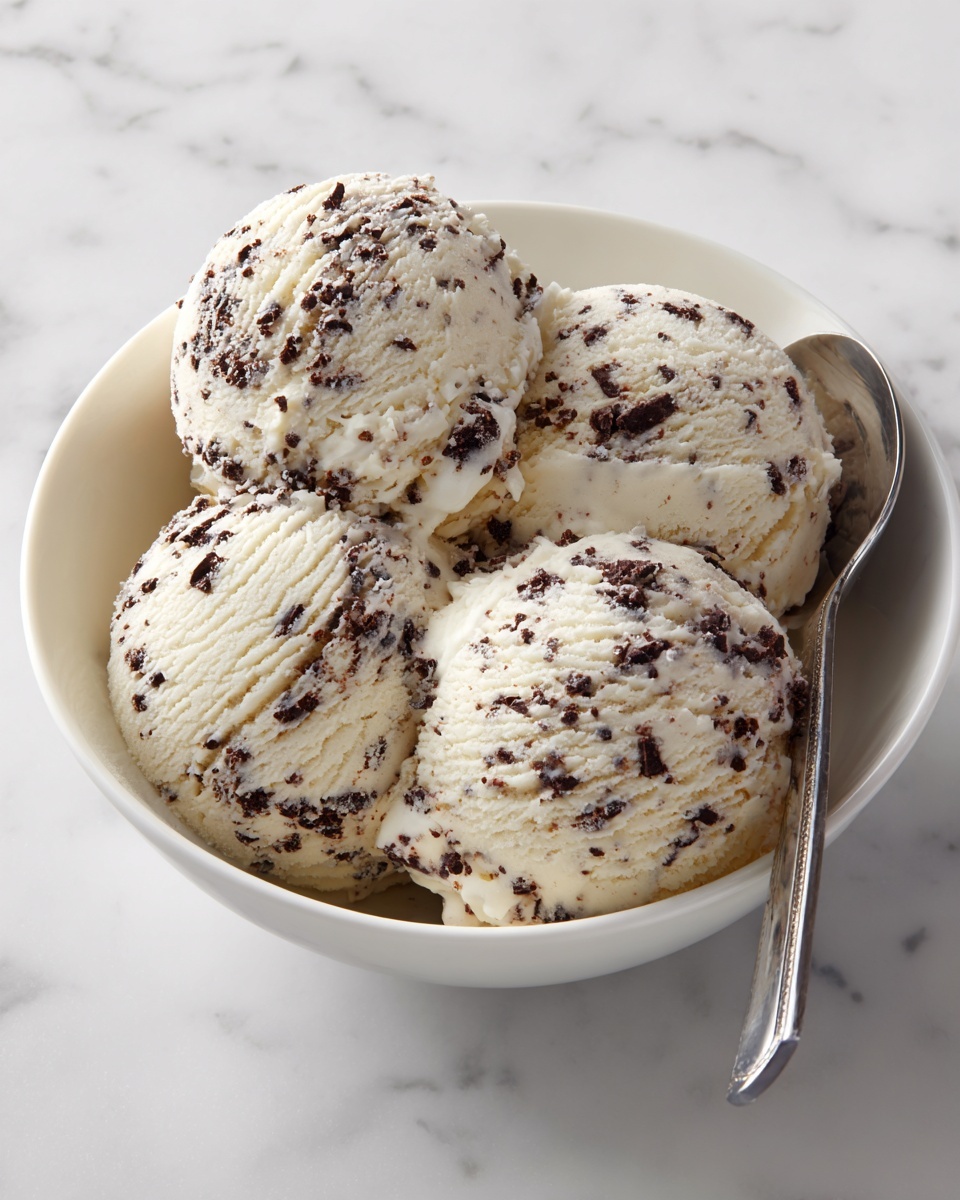
If there is one dessert that embodies comfort, nostalgia, and pure delight, it has to be homemade ice cream. This Classic Vanilla Ice Cream Recipe is everything you love about creamy, rich, and perfectly smooth ice cream, crafted with simple ingredients and a little bit of patience. Whether it’s a warm sunny afternoon or a cozy evening treat, this recipe brings joy in every scoop. Trust me, once you make this at home, you’ll wonder why you ever settled for store-bought versions again!

Ingredients You’ll Need
These ingredients are surprisingly straightforward, but each one plays a crucial role in delivering that velvety texture and deep vanilla flavor. From the creaminess of the heavy cream to the rich binding power of egg yolks, everything works together to create magic in a bowl.
- 2 cups heavy cream: Provides the luscious, creamy body that makes this ice cream so decadent.
- 1 cup whole milk: Adds a subtle lightness and balances the fat content perfectly.
- 3/4 cup granulated sugar: Sweetens the custard and helps achieve the ideal texture without grittiness.
- 1 tablespoon pure vanilla extract: The star flavor, bringing warmth and aromatic sweetness to every bite.
- 5 large egg yolks: Key to creating a rich custard base that thickens properly and gives that silky mouthfeel.
- Pinch of salt: Enhances all the flavors, preventing the ice cream from tasting flat.
How to Make Classic Vanilla Ice Cream Recipe
Step 1: Warm the Cream and Milk
Start by combining the heavy cream, whole milk, and sugar in a medium saucepan. Heat this mixture over medium heat, stirring occasionally until the sugar dissolves completely and the liquid is hot but not boiling. This step is crucial because it prepares the base for a smooth custard and ensures the sugar integrates flawlessly.
Step 2: Whisk the Egg Yolks
In a separate bowl, whisk together the egg yolks and a pinch of salt until the mixture becomes smooth and slightly pale. This will help prevent the eggs from scrambling when you temper them with the hot cream mixture.
Step 3: Temper the Egg Yolks
Slowly pour about half a cup of the hot cream mixture into the egg yolks while whisking constantly. This gradual process gently raises the temperature of the eggs so they don’t curdle later on.
Step 4: Combine the Mixtures
Pour the egg yolk mixture back into the saucepan with the rest of the cream mixture, whisking continuously. This step ensures everything is fully incorporated and ready to be thickened into custard.
Step 5: Cook to Custard Consistency
Return the saucepan to medium-low heat and stir constantly until the mixture thickens slightly and coats the back of a spoon. You want to reach about 170°F or 77°C to ensure the eggs are cooked but not scrambled. This silky custard base is what makes this Classic Vanilla Ice Cream Recipe truly outstanding.
Step 6: Add Vanilla Extract
Remove the custard from the heat and stir in the pure vanilla extract. This final addition brings a fragrant and inviting aroma that will carry through to the finished ice cream.
Step 7: Strain the Custard
Pour the mixture through a fine mesh strainer into a clean bowl to catch any stray bits of cooked egg or lumps. This keeps your ice cream ultra-smooth and creamy.
Step 8: Chill the Mixture
Allow the custard to cool to room temperature, then refrigerate it for at least 4 hours or overnight. Chilling helps the flavors to meld and the mixture to thicken, making it easier to churn into luscious ice cream.
Step 9: Churn the Ice Cream
When ready, pour the chilled custard into your ice cream maker and follow your machine’s instructions. This step aerates the mixture and freezes it simultaneously, transforming it into a soft, creamy treat.
Step 10: Freeze to Set
Transfer the churned ice cream into a freezer-safe container and freeze for a minimum of 4 hours. This step firms up the ice cream to scoop-ready perfection.
Step 11: Serve and Enjoy
Scoop out your homemade vanilla ice cream and savor the incredible texture and flavor. There’s nothing quite like the taste of your very own Classic Vanilla Ice Cream Recipe made from scratch.
How to Serve Classic Vanilla Ice Cream Recipe

Garnishes
Elevate your serving experience by adding simple garnishes like fresh berries, a drizzle of hot fudge, or a sprinkle of toasted nuts. Even a dusting of cinnamon or edible flower petals can turn a plain scoop into a stunning dessert.
Side Dishes
This ice cream pairs beautifully with warm desserts such as apple pie, brownie sundaes, or freshly baked cookies. The contrast between warm and cold is always a winner, and the vanilla flavor complements a wide range of sweets.
Creative Ways to Present
For a fun twist, serve your ice cream in waffle cones, hollowed-out fruit shells like pineapple or watermelon, or alongside colorful sorbets for a delightful flavor combo. You can even create ice cream sandwiches using homemade cookies for an extra-special treat.
Make Ahead and Storage
Storing Leftovers
If you have any ice cream left over, store it in an airtight container to prevent freezer burn and maintain its creamy texture. Pressing a piece of parchment paper flat on the surface before sealing helps minimize ice crystals.
Freezing
This Classic Vanilla Ice Cream Recipe freezes exceptionally well for up to two weeks. When you want to enjoy some later, simply pop it in the freezer beforehand, and it will be ready to scoop with that fresh-from-the-machine texture.
Reheating
While reheating isn’t typical for ice cream, allowing any overly firm portions to sit at room temperature for a few minutes softens them nicely without losing flavor or texture.
FAQs
Can I make this recipe without an ice cream maker?
Absolutely! While an ice cream maker makes the process easier and more consistent, you can freeze the custard in a shallow container and stir it vigorously every 30 minutes until it firms up. This manual method helps prevent large ice crystals from forming.
What type of vanilla extract works best?
Pure vanilla extract is best for this recipe since it offers the richest and most natural flavor. Avoid imitation vanilla as it can taste artificial and detract from the final quality.
Why do I use egg yolks in this Classic Vanilla Ice Cream Recipe?
Egg yolks act as a natural emulsifier and thickener, creating a custard base that’s rich, smooth, and creamy. They are essential for achieving that luxurious texture that distinguishes homemade ice cream.
Can I substitute heavy cream with half-and-half?
You can, but keep in mind that the ice cream will be less rich and creamy. Heavy cream provides the fat content needed for the best texture, so it’s ideal if you want that true classic taste.
How long can I store homemade vanilla ice cream?
Stored properly in an airtight container, homemade ice cream lasts about 2 weeks in the freezer before it starts to lose quality. For the freshest taste, enjoy it within that timeframe.
Final Thoughts
Making your own ice cream at home might seem daunting at first, but this Classic Vanilla Ice Cream Recipe proves just how approachable and rewarding it can be. It’s creamy, versatile, and filled with the warm, inviting flavor of real vanilla—perfect for impressing friends or simply treating yourself. So go ahead, gather those simple ingredients, and indulge in one of life’s sweetest pleasures made completely from scratch. You won’t regret it!
Print
Classic Vanilla Ice Cream Recipe
- Prep Time: 15 minutes
- Cook Time: 20 minutes
- Total Time: 4 hours 35 minutes
- Yield: 4 servings
- Category: Dessert
- Method: Stovetop
- Cuisine: American
Description
This Classic Vanilla Ice Cream recipe offers a rich, creamy, and smooth homemade dessert using simple ingredients. Made by tempering egg yolks with a warm cream mixture and then churning in an ice cream maker, it delivers a perfectly balanced vanilla flavor that’s both nostalgic and satisfying.
Ingredients
Ice Cream Base
- 2 cups heavy cream
- 1 cup whole milk
- 3/4 cup granulated sugar
- 1 tablespoon pure vanilla extract
- 5 large egg yolks
- Pinch of salt
Instructions
- Heat cream and milk mixture: In a medium saucepan, combine the heavy cream, whole milk, and sugar. Heat over medium heat, stirring occasionally, until the sugar has dissolved and the mixture is hot but not boiling. Remove from heat.
- Whisk egg yolks: In a separate bowl, whisk the egg yolks and salt together until smooth.
- Temper egg yolks: Gradually pour about 1/2 cup of the hot cream mixture into the egg yolks, whisking constantly to temper the eggs and prevent curdling.
- Combine mixtures: Slowly pour the egg yolk mixture back into the saucepan with the rest of the cream mixture, whisking continuously to combine evenly.
- Cook custard: Return the saucepan to the stove over medium-low heat. Cook while stirring constantly until the mixture thickens slightly and coats the back of a spoon, reaching about 170°F (77°C).
- Add vanilla: Remove from heat and stir in the pure vanilla extract for flavor.
- Strain custard: Pour the custard through a fine mesh strainer into a clean bowl to remove any curdled bits and ensure a smooth texture.
- Cool and chill: Allow the custard to cool to room temperature, then refrigerate for at least 4 hours or overnight to chill thoroughly.
- Churn ice cream: Once chilled, pour the mixture into an ice cream maker and churn according to the manufacturer’s instructions until it reaches a soft-serve consistency.
- Freeze: Transfer the churned ice cream to a container and freeze for at least 4 hours to harden.
- Serve: Scoop the homemade vanilla ice cream and enjoy a classic creamy treat.
Notes
- Use an instant-read thermometer to monitor the temperature when cooking the custard to avoid overheating.
- Chilling the custard overnight improves the final texture and flavor.
- If you don’t have an ice cream maker, you can pour the chilled custard into a shallow container and freeze, stirring every 30 minutes until firm to mimic churning.
- For a richer flavor, use high-quality vanilla extract or real vanilla bean if preferred.


