“`html
If you’ve ever dreamed of capturing the essence of a classic cherry pie but in an easier, handheld form, this Cherry Pie Bars Recipe is your dream come true. It’s a vibrant, fruit-packed treat where buttery, crumbly layers meet a luscious cherry filling, all topped with a luscious glaze. Perfect for sharing, these bars combine the nostalgia of homemade pie with the convenience of a dessert you can enjoy anywhere. Trust me, once you try this recipe, it will become a beloved staple in your baking rotation!
Ingredients You’ll Need
Every ingredient in this Cherry Pie Bars Recipe plays a crucial role in building the perfect balance of flavor, texture, and eye-catching color. From the buttery crust to the sweet-tart cherry filling, these simple essentials come together beautifully.
- Unsalted butter, melted: Provides rich flavor and helps bind the crust and topping to a perfect crumbly texture.
- Granulated sugar: Sweetens both the dough and the cherry filling to balance the tartness of the cherries.
- Brown sugar: Adds a hint of caramel depth to the crust’s flavor that makes it extra special.
- Vanilla extract: Enhances sweetness and adds warmth to the dough and the glaze.
- All-purpose flour: The sturdy base for the crust and topping, giving structure to the bars.
- Salt: Amplifies flavor and balances the sweetness in the dough.
- Fresh or frozen cherries, pitted: The star ingredient that brings fruity brightness and juiciness to every bite.
- Cornstarch: Thickens the cherry filling to prevent sogginess and keep it perfectly luscious.
- Lemon juice: Adds brightness and balance to the cherry mixture, lifting the flavors.
- Almond extract: A subtle nod to classic cherry pie flavor, it deepens the fruit’s cheerfulness.
- Powdered sugar: Used in the glaze, it creates a delicate sweetness and pretty finish.
- Milk: Thins the glaze just right for drizzling over the bars.
How to Make Cherry Pie Bars Recipe
Step 1: Preheat and Prepare Your Pan
Start by preheating your oven to 350°F (177°C). Then, line a 9×13-inch baking pan with parchment paper, leaving enough overhang on the sides so you can easily lift your finished cherry pie bars out later. This simple step ensures clean edges and an easier serving process.
Step 2: Make the Crust and Topping
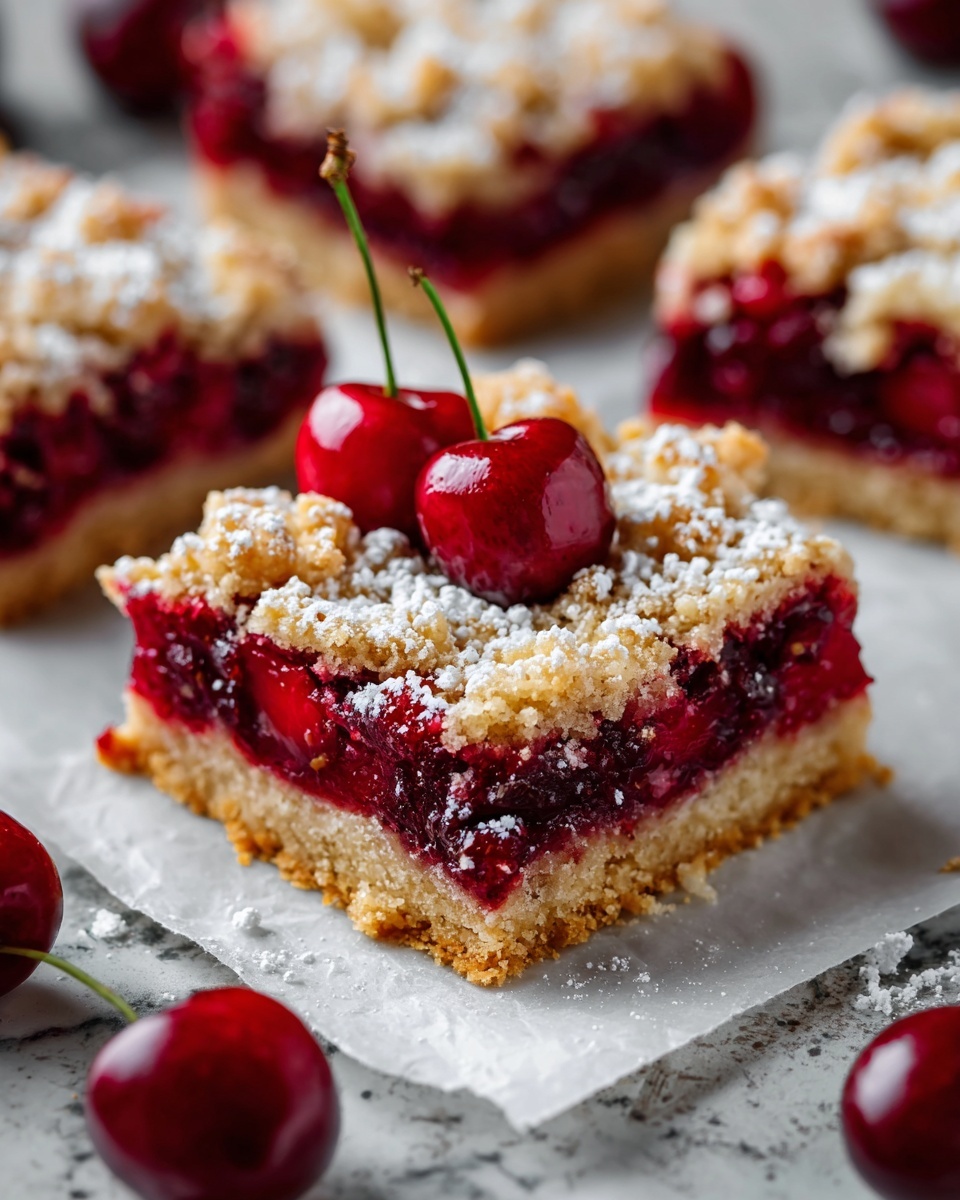
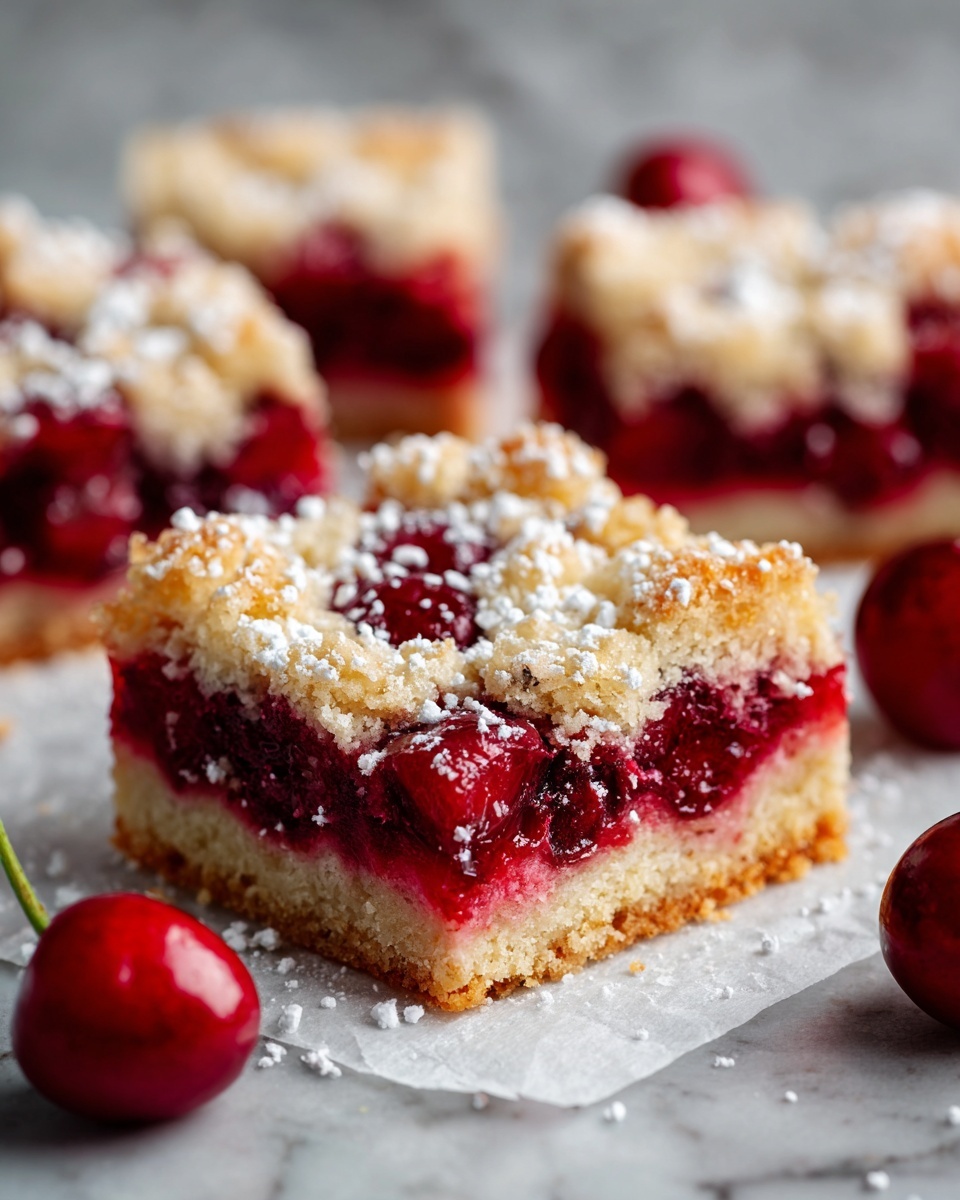
In a large bowl, combine the melted butter with both granulated and brown sugars, plus vanilla extract. This mixture becomes the flavorful base for your dough. Next, stir in the all-purpose flour and salt until you have a thick, crumbly dough. Scoop out 1 cup and set it aside—that’s going to be your crumbly topping. Press the remaining mixture evenly into your prepared pan, which will be the luscious, buttery crust beneath the cherries.
Step 3: Prepare the Cherry Filling
Now for the juicy heart of your Cherry Pie Bars Recipe. Toss the fresh or thawed frozen cherries with sugar, cornstarch, lemon juice, and almond extract in a medium bowl. The cornstarch is key to thickening the filling so it won’t be too runny. The lemon juice adds just the right zing, and almond extract lifts the cherry flavor to a whole new level. Stir everything until the cherries are coated evenly.
Step 4: Assemble and Bake
Spread your cherry filling with care over the buttery crust, creating a thick, even layer bursting with color. Then crumble the reserved dough over the cherries to create a lovely, golden crumble topping. Pop your pan into the oven and bake for 45 to 55 minutes, until the top is lightly golden and the cherry filling bubbles like a dream. If you notice the topping browning too fast, just loosely cover with foil to prevent burning.
Step 5: Cool and Glaze
Once baked to perfection, let your bars cool completely right in the pan on a wire rack—this helps the filling set nicely. In the meantime, whisk up a simple glaze by combining powdered sugar, milk, and a dash of vanilla extract. Drizzle this over your cooled bars for an irresistible finish that adds a hint of sweetness and a beautiful shine.
How to Serve Cherry Pie Bars Recipe

Garnishes
Nothing says special like a sprinkle of fresh cherries or a dusting of powdered sugar atop your bars just before serving. A dollop of whipped cream or a scoop of vanilla ice cream on the side can elevate this dessert even more, turning it into an indulgent, restaurant-style treat.
Side Dishes
While the bars shine on their own, pairing them with a light, fresh salad or a cup of hot coffee or tea makes for a complete experience. The crispness of a green salad or the warmth of a fragrant drink perfectly complements the sweet and fruity flavors.
Creative Ways to Present
For parties, consider cutting the bars into bite-sized squares and presenting them on a pretty platter lined with edible flowers or mint leaves. You could also serve them stacked in a rustic wooden box for a charming picnic setup. The beautiful cherry red filling will instantly brighten any dessert table.
Make Ahead and Storage
Storing Leftovers
Cherry Pie Bars Recipe leftovers are best kept in an airtight container at room temperature for up to two days or refrigerated for up to five days. Make sure they are fully cooled before storing to maintain that delicious crumbly texture without sogginess.
Freezing
If you want to enjoy these bars later, they freeze wonderfully! Wrap them tightly in plastic wrap and aluminum foil, then store in the freezer for up to three months. When you’re ready, thaw them overnight in the fridge before serving.
Reheating
To revive that freshly baked warmth, gently reheat individual bars in the microwave for about 15-20 seconds or pop them in a preheated oven at 350°F for 10 minutes. Just be careful not to overheat, as it might dry out the crumbly topping.
FAQs
Can I use frozen cherries in the Cherry Pie Bars Recipe?
Absolutely! Frozen cherries work really well here. Just be sure to thaw and drain them well to avoid excess moisture in the filling.
Is this Cherry Pie Bars Recipe gluten-free?
The traditional recipe uses all-purpose flour, but you can swap in a gluten-free flour blend suitable for baking to make a gluten-free version that still tastes fantastic.
Can I substitute almond extract?
If almond extract isn’t your thing or you have allergies, simply omit it or use an extra teaspoon of vanilla extract to maintain that lovely flavor balance.
How long do Cherry Pie Bars keep fresh?
Stored properly in an airtight container, they stay fresh for about five days in the refrigerator, making them a great make-ahead dessert.
Can I double this recipe?
Yes! Just use a larger pan or two pans and adjust baking time accordingly. Keep an eye on the bars as thicker layers may need extra baking time.
Final Thoughts
I can’t recommend this Cherry Pie Bars Recipe enough if you love that perfect mix of buttery crust, vibrant cherry filling, and a sweet glaze topping. It’s approachable to make, yet yields stunningly delicious results that will light up any gathering or cozy night in. Give it a try and watch it become one of your go-to desserts — I promise it’s a game-changer!
“`
Print
Cherry Pie Bars Recipe
- Prep Time: 20 minutes
- Cook Time: 50 minutes
- Total Time: 1 hour 10 minutes
- Yield: 16 servings
- Category: Dessert
- Method: Baking
- Cuisine: American
Description
These Cherry Pie Bars are a delightful twist on the classic cherry pie, featuring a buttery crumb crust, a luscious cherry filling, and a sweet glaze drizzle. Perfect for dessert or a sweet snack, they combine fresh or frozen cherries with a tender, crumbly base and topping, baked to golden perfection.
Ingredients
Crust and Topping
- 1 cup unsalted butter, melted
- 1 cup granulated sugar
- 1/2 cup packed brown sugar
- 1 teaspoon vanilla extract
- 3 cups all-purpose flour
- 1/2 teaspoon salt
Cherry Filling
- 4 cups fresh or frozen cherries, pitted
- 1 cup granulated sugar
- 2 tablespoons cornstarch
- 1 tablespoon lemon juice
- 1 teaspoon almond extract
Glaze
- 1 cup powdered sugar
- 2–3 tablespoons milk
- 1/2 teaspoon vanilla extract
Instructions
- Preheat Oven: Preheat the oven to 350°F (177°C). Line a 9×13-inch baking pan with parchment paper, leaving an overhang on the sides to lift the bars out easily after baking.
- Make the Crust and Topping: In a large bowl, mix the melted butter, granulated sugar, brown sugar, and vanilla extract until combined. Add the all-purpose flour and salt, stirring until a thick dough forms. Reserve 1 cup of dough for the topping, then press the remaining dough evenly into the prepared pan to form the crust layer.
- Prepare the Cherry Filling: In a medium bowl, toss together the pitted cherries, granulated sugar, cornstarch, lemon juice, and almond extract until the cherries are evenly coated with the mixture.
- Assemble the Bars: Spread the cherry filling evenly over the crust in the pan. Crumble the reserved dough over the cherry layer to create the topping.
- Bake: Bake the bars for 45 to 55 minutes, until the topping is lightly golden and the cherry filling is bubbling. If the topping begins to brown too quickly, loosely cover the pan with aluminum foil to prevent burning.
- Cool and Glaze: Cool the bars completely in the pan on a wire rack. Whisk the powdered sugar, milk, and vanilla extract together to make the glaze, then drizzle it evenly over the cooled bars before cutting into squares and serving.
Notes
- Use fresh or frozen cherries as desired; if using frozen, do not thaw before mixing.
- For a thinner glaze, add more milk as needed.
- Line the baking pan with parchment paper for easy removal and clean-up.
- Store bars in an airtight container at room temperature for up to 3 days or refrigerate for up to a week.
- To prevent the topping from burning, tent with foil halfway through baking if browning too fast.

