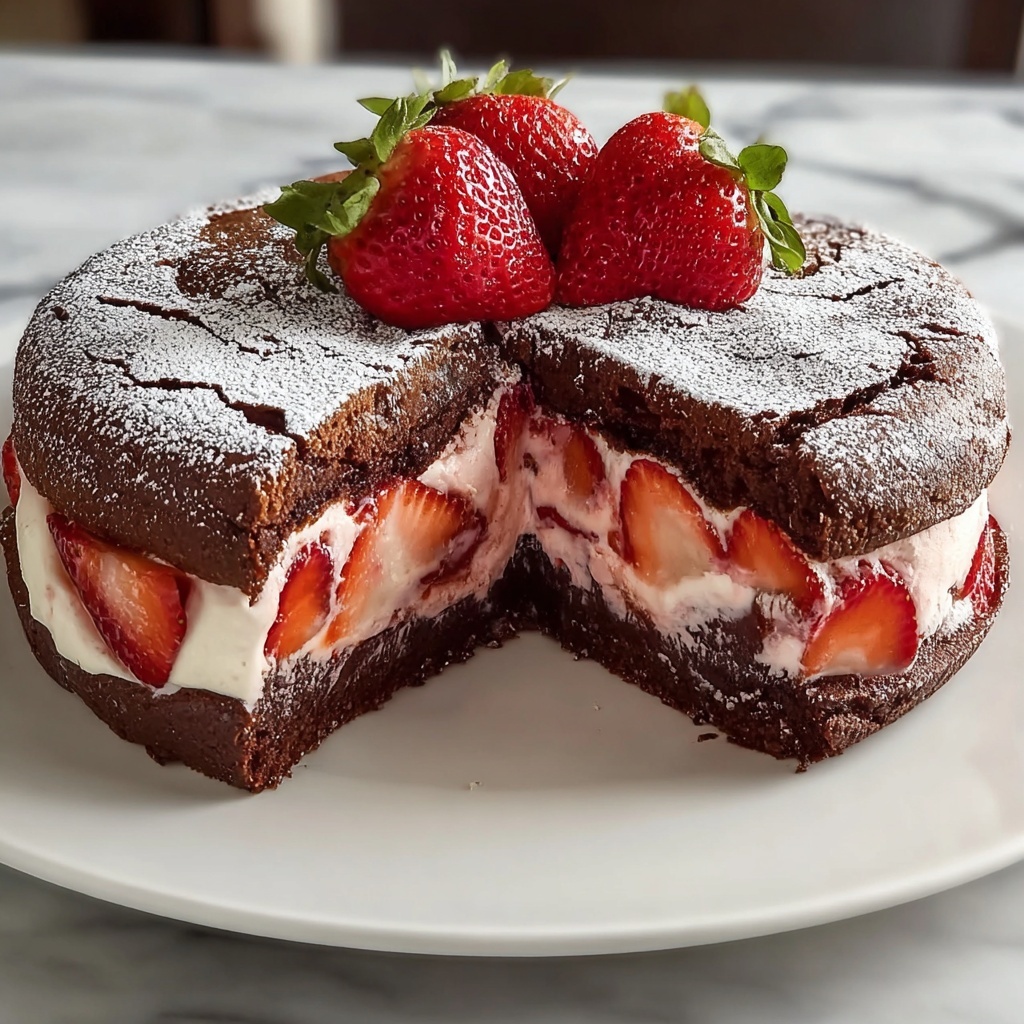
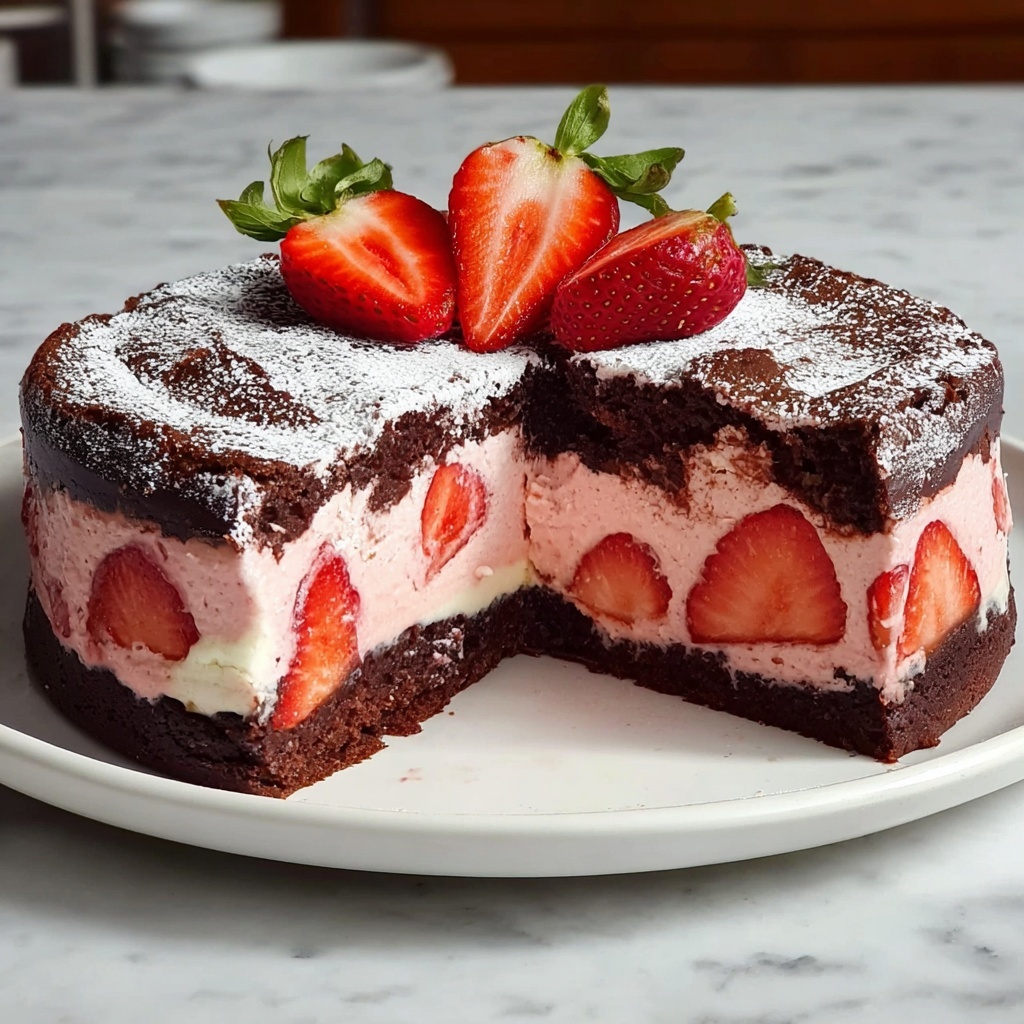
If you have a sweet spot for dessert that blends the rich decadence of chocolate with the vibrant freshness of strawberries, you are going to fall head over heels for this Easy Strawberry Earthquake Cake Recipe. Imagine a moist, chocolatey cake bearing chunks of luscious strawberries, topped with a silky cream cheese swirl and a kiss of strawberry jam for a flavor explosion that feels like a celebration in every bite. This cake is not only a feast for your taste buds but also a sight to behold, making it the perfect treat to share with friends, family, or simply to indulge your own sweet cravings.
Ingredients You’ll Need
The beauty of this recipe lies in its simplicity. Each ingredient plays a crucial role, from the fluffy chocolate cake base to the tangy cream cheese topping, and the sweet, jammy swirls that bring it all together. Having quality ingredients at the ready will ensure your cake is bursting with flavor and irresistibly moist.
- Chocolate cake mix (1 box, 15.25 oz): The foundation of our dessert, delivering effortless rich chocolate flavor and moist crumb.
- Water (1 cup): Keeps the cake batter light and perfectly textured.
- Vegetable oil (1/2 cup): Adds moisture, ensuring the cake stays tender and fresh.
- Eggs (3 large): Bind everything together and help create a fluffy rise.
- Fresh strawberries (1 cup, chopped): Infuse fruity brightness and juicy bursts in every bite. Frozen can work too, just be sure to thaw and drain.
- Cream cheese (8 oz, softened): Brings creamy tang to the swirled topping, balancing the sweetness beautifully.
- Powdered sugar (1 cup): Sweetens the cream cheese filling smoothly.
- Vanilla extract (1 teaspoon): Adds a warm, aromatic note to the cream cheese mixture.
- Strawberry jam (1/2 cup): Creates those delightful, gooey pockets of fruity goodness on top.
- Powdered sugar (1/4 cup, for dusting): A final touch that gives the cake a pretty, irresistible finish.
How to Make Easy Strawberry Earthquake Cake Recipe
Step 1: Prepare Your Pan and Oven
Start by preheating your oven to 350°F (175°C). Grease and flour a 9×13 inch baking pan well so your cake releases easily and bakes evenly. This little prep step can make a world of difference in both texture and ease of serving later on.
Step 2: Mix the Chocolate Cake Batter
In a spacious mixing bowl, combine the chocolate cake mix, water, vegetable oil, and eggs. Use an electric mixer on medium speed for about 2 minutes until you achieve a smooth, luscious batter with no lumps. This step ensures your cake will have a tender crumb and rich flavor in every forkful.
Step 3: Fold in the Strawberries
Gently fold in your chopped strawberries. Use a light hand here to preserve those juicy bursts and prevent overmixing, which could make the batter too heavy or bruise the fruit. The strawberries create those delightful pockets of freshness that make this earthquake cake so memorable.
Step 4: Bake the Base Cake
Pour the strawberry-studded batter into your prepared pan. Bake for 30 to 35 minutes, or until a toothpick inserted in the center comes out clean. At this point, your kitchen will already smell like a chocolate-strawberry dream come true.
Step 5: Prepare the Cream Cheese Swirl
While your cake is baking, whip up the cream cheese mixture. Beat the softened cream cheese with an electric mixer until it’s nice and smooth. Gradually add powdered sugar and vanilla, mixing until perfect. This topping adds a lovely tang and richness that balances the chocolate beautifully.
Step 6: Add Cream Cheese to the Hot Cake
As soon as you take the cake out of the oven, dollop spoonfuls of the cream cheese mixture over the surface. Use a knife to swirl it gently throughout the top of the batter. This step is crucial for creating that signature “earthquake” look and texture, where the cream cheese melds into the chocolate base.
Step 7: Swirl Strawberry Jam Over the Cake
Next, spoon the strawberry jam evenly over the cake. Using your knife, swirl the jam with the cream cheese in broad, artistic strokes. This adds another layer of fruity sweetness and gives the cake a beautifully marbled appearance.
Step 8: Bake Again Until Set
Return your creation to the oven for an additional 10 to 15 minutes. This will let the cream cheese set and the jam meld into the cake, finishing off the bake to perfection.
Step 9: Cool and Dust with Powdered Sugar
Allow the cake to cool in the pan for about 15 minutes. When cooled just right, dust the top with powdered sugar. This finishing touch instantly makes it feel celebratory and adds a touch of sweetness to each slice.
Step 10: Slice and Serve
Cut into generous slices, serving on a simple white plate to let the cake’s colors and textures pop. Garnish with fresh strawberry slices if you want to elevate the presentation even further. Now, get ready to dig into pure, joyful indulgence!
How to Serve Easy Strawberry Earthquake Cake Recipe

Garnishes
Fresh strawberries add a vibrant pop of color and an extra juicy bite that complements the cake’s chocolate and cream cheese flavors perfectly. A sprinkle of powdered sugar or even a small drizzle of melted chocolate can also turn each slice into a little work of art.
Side Dishes
This cake pairs wonderfully with a scoop of vanilla bean ice cream or a dollop of lightly whipped cream to add a cool, creamy contrast. For a fruity note, serve alongside raspberry coulis or a fresh berry salad to brighten the plate even more.
Creative Ways to Present
For informal gatherings, consider placing the cake slices on pretty dessert stands or rustic wooden boards with fresh herbs like mint for a fresh green accent. You can even serve bite-sized squares on toothpicks for easy, crowd-pleasing finger food options.
Make Ahead and Storage
Storing Leftovers
After enjoying your cake, wrap any leftovers tightly with plastic wrap or place them in an airtight container. Store in the refrigerator to keep the cream cheese topping fresh and the cake moist. It will stay wonderful for about 3 to 4 days.
Freezing
If you want to save some for later, you can freeze this cake! Cut it into individual portions, wrap each piece securely in plastic wrap, then in foil, and place them in a freezer-safe container. Frozen cake will maintain its tasty magic for up to 2 months.
Reheating
To enjoy frozen or refrigerated cake slices at their best, let them thaw in the fridge overnight. For a warm treat, microwave for 15 to 20 seconds or briefly warm in a low oven to soften and bring out that gooey cream cheese swirl again.
FAQs
Can I use frozen strawberries instead of fresh?
Absolutely! Just be sure to thaw them completely and drain any excess liquid before folding them into the batter to avoid watering down your cake.
Is there a substitute for the chocolate cake mix?
If you prefer, you can use a homemade chocolate cake batter, but using a box mix keeps this recipe quick and foolproof while still delivering terrific flavor and texture.
Can I make this cake dairy-free?
You can try substituting dairy-free cream cheese and milk alternatives, but keep in mind the texture and taste may slightly differ from the original version.
Why is it called an Earthquake Cake?
The name comes from the signature swirls of cream cheese and strawberry jam that make the cake’s surface look cracked and “shaken,” creating a visually exciting and deliciously textured dessert.
How do I prevent the cream cheese from sinking to the bottom?
Dolloping the cream cheese on the hot cake right after the first bake and swirling it lightly helps it set nicely during the second bake instead of sinking down into the batter.
Final Thoughts
This Easy Strawberry Earthquake Cake Recipe is one of those rare desserts that’s as fun to make as it is to eat. It brings together simple, accessible ingredients and transforms them into a stunning, mouthwatering masterpiece that’s perfect for any occasion. Whether you’re treating yourself or delighting friends and family, I promise this cake will become a beloved classic in your recipe collection. Go ahead, give it a try, and get ready for all the “oohs” and “aahs”!
Print
Easy Strawberry Earthquake Cake Recipe
- Prep Time: 15 minutes
- Cook Time: 45 minutes
- Total Time: 1 hour
- Yield: 12 servings
- Category: Dessert
- Method: Baking
- Cuisine: American
Description
Indulge in this Easy Strawberry Earthquake Cake, a luscious chocolate cake swirled with cream cheese and strawberry jam for a delightful explosion of flavors and textures. This crowd-pleasing dessert combines moist chocolate cake with fresh strawberries, a creamy sweetened cream cheese layer, and fruity strawberry swirls, baked to perfection for a spectacularly rich and tangy treat perfect for any occasion.
Ingredients
Cake Ingredients
- 1 box of chocolate cake mix (15.25 oz)
- 1 cup of water
- 1/2 cup of vegetable oil
- 3 large eggs
- 1 cup of fresh strawberries, chopped (or frozen, thawed and drained)
Cream Cheese Topping
- 8 oz cream cheese, softened
- 1 cup powdered sugar
- 1 teaspoon vanilla extract
Additional Toppings
- 1/2 cup strawberry jam
- 1/4 cup powdered sugar (for dusting)
Instructions
- Preheat the Oven and Prepare Pan: Preheat your oven to 350°F (175°C). Grease and flour a 9×13 inch baking pan to prevent sticking and ensure even cooking.
- Make Cake Batter: In a large mixing bowl, combine the chocolate cake mix, water, vegetable oil, and eggs. Beat with an electric mixer on medium speed for about 2 minutes until the batter is smooth and well combined, ensuring there are no lumps.
- Incorporate Strawberries: Gently fold the chopped strawberries into the cake batter with a spatula, distributing them evenly without breaking them down too much.
- Bake Cake Initially: Pour the strawberry-studded batter into the prepared baking pan. Bake in the preheated oven for 30-35 minutes or until a toothpick inserted into the center comes out clean, signaling thorough baking.
- Prepare Cream Cheese Mixture: While baking, beat the softened cream cheese with an electric mixer in a separate bowl until smooth. Gradually add the powdered sugar and vanilla extract, blending until fully combined and creamy.
- Apply Cream Cheese Swirling: Once the cake is out of the oven, immediately spoon dollops of the cream cheese mixture onto the hot cake surface. Use a knife to gently swirl the cream cheese into the cake batter, creating a marbled effect.
- Add Strawberry Jam Swirls: Spoon the strawberry jam over the cake and use a knife to swirl it together with the cream cheese layer, enhancing flavor and visual appeal.
- Bake Again to Set Toppings: Return the cake to the oven and bake for an additional 10-15 minutes until the cream cheese topping is set and the cake is fully cooked through.
- Cool and Dust: Let the cake cool in the pan for about 15 minutes. Then dust the top evenly with powdered sugar for a delicate sweetness and pretty finish.
- Serve with Garnish: Cut the cake into 12 slices, serve on simple white plates, and garnish each slice with fresh strawberries for an extra fresh touch. Enjoy this delightful treat!
Notes
- Fresh strawberries are preferred, but frozen and thawed can be used as long as they are well drained to avoid excess moisture.
- Use room temperature cream cheese for the smoothest topping mixture.
- Ensure not to overmix the batter after adding strawberries to keep their texture.
- Swirling the cream cheese and jam while the cake is hot ensures better marbling and flavor blending.
- Allow the cake to cool slightly before dusting with powdered sugar to prevent it from melting.
- Storage: Keep leftover cake covered in the refrigerator for up to 3 days.


