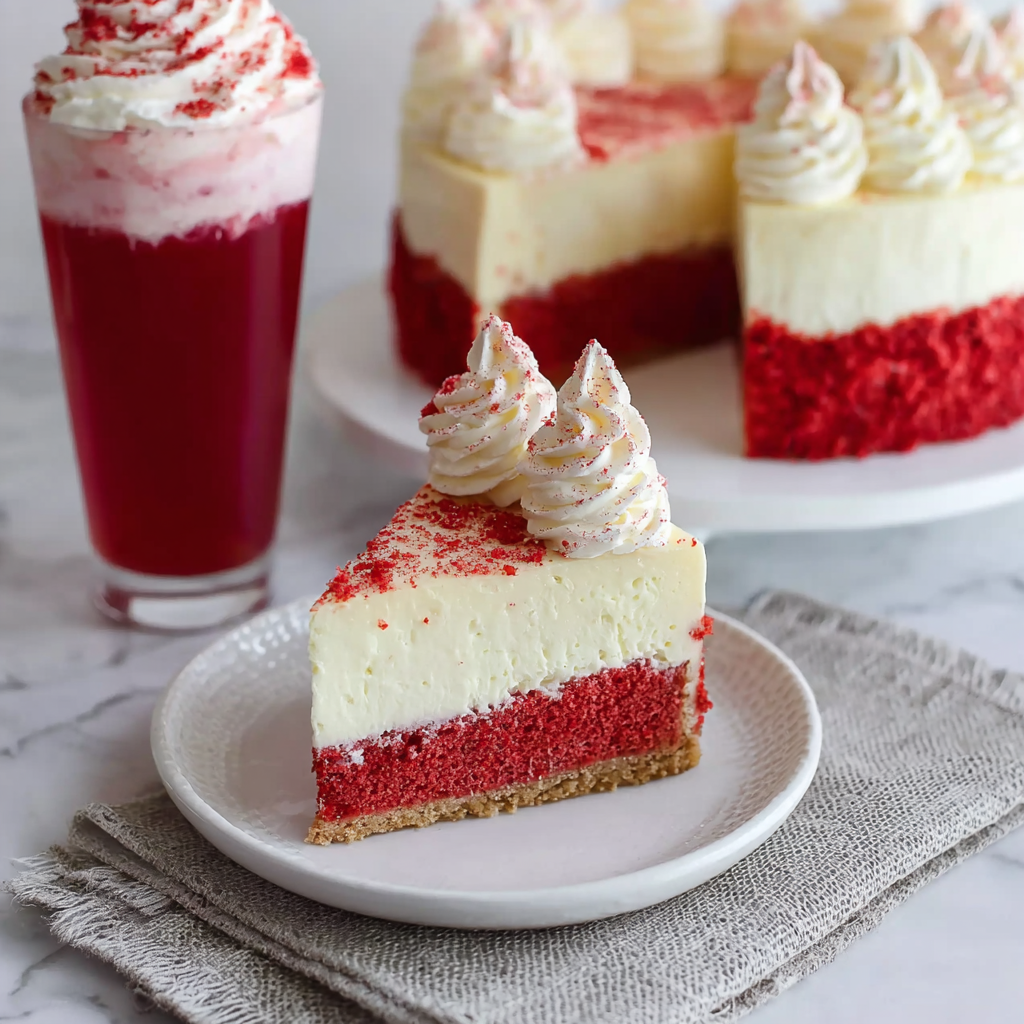
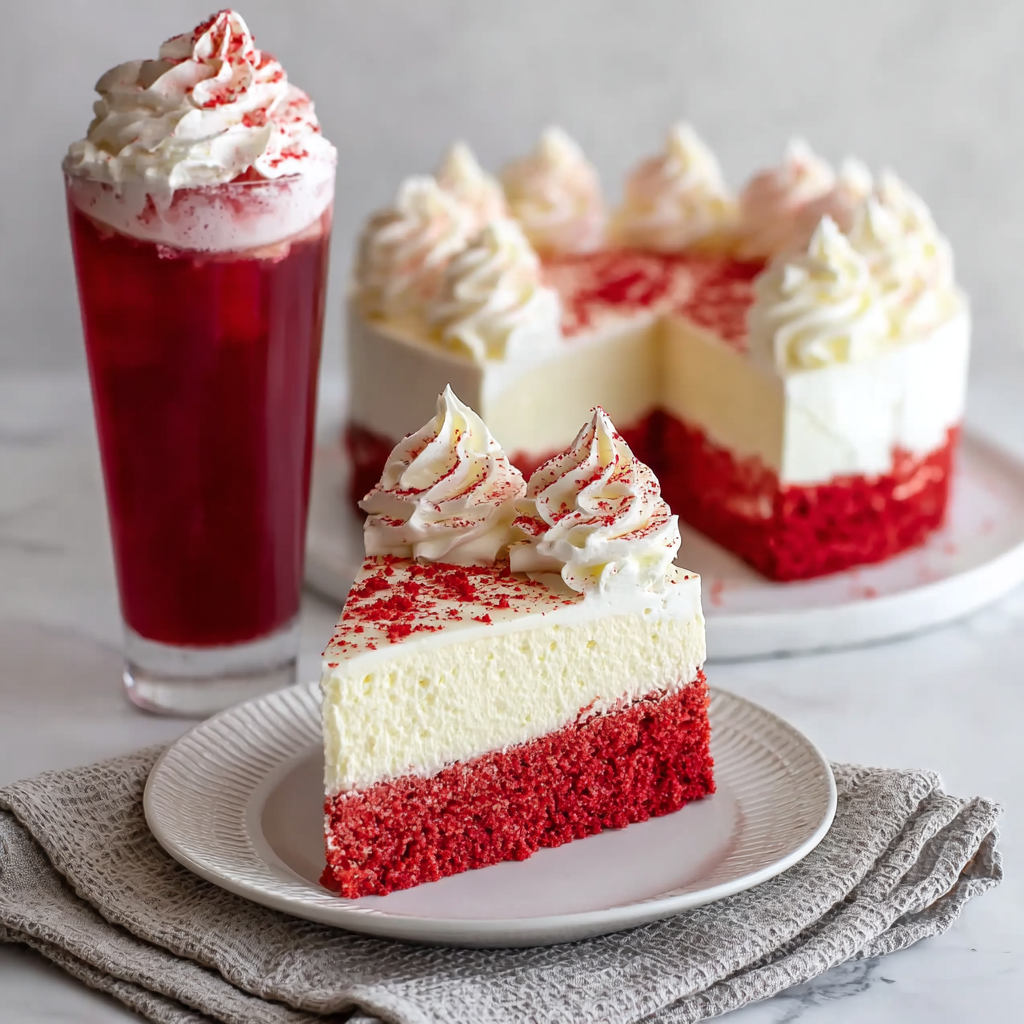
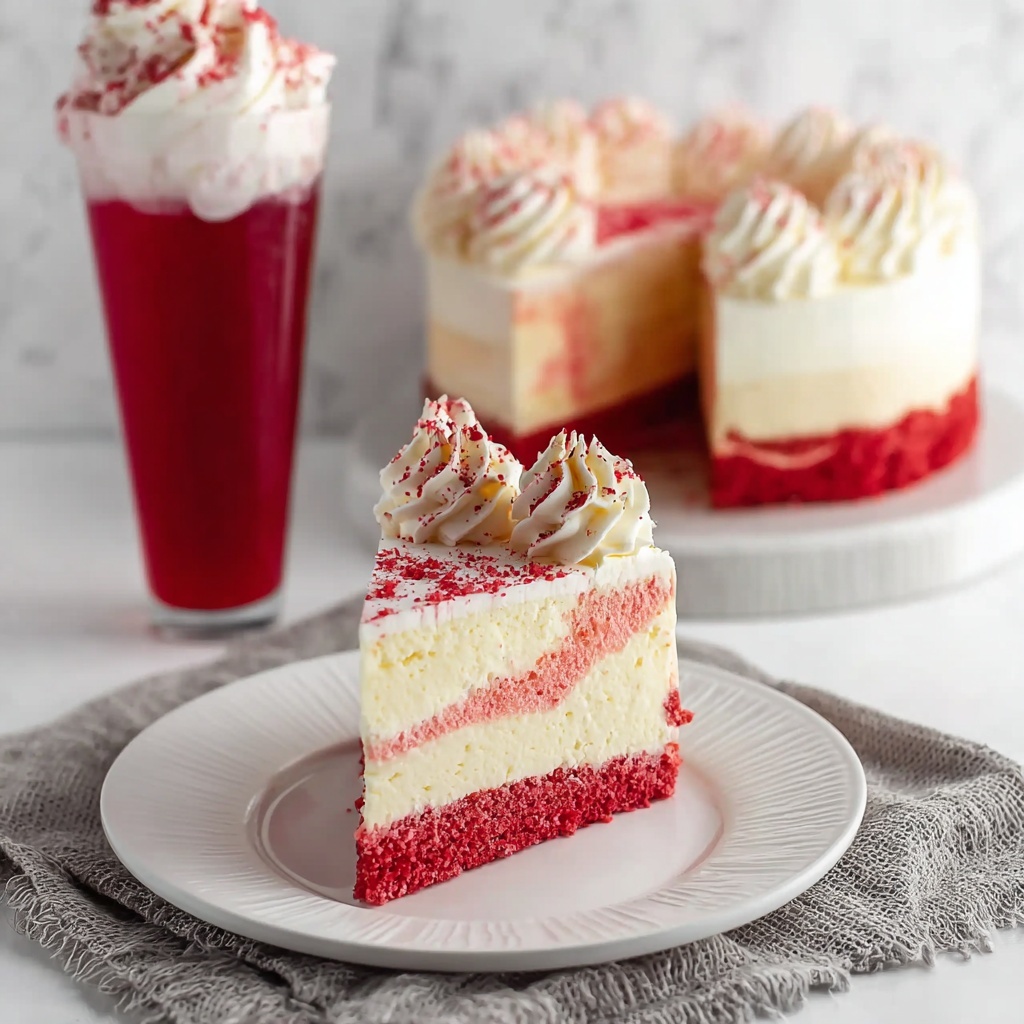
There is something absolutely magical about combining classic comfort flavors into one unforgettable treat, and the Red Velvet Cheesecake Dessert Recipe does exactly that. Imagine the rich, moist layers of red velvet cake meeting the creamy, tangy texture of homemade cheesecake, all crowned with fluffy whipped cream and garnished with cake crumbs for that perfect festive pop of color. It’s a dessert that feels luxurious yet approachable, making it an instant crowd-pleaser for any occasion. If you love bold flavors with a beautiful presentation, this recipe is guaranteed to become a favorite in your baking repertoire.
Ingredients You’ll Need
Getting this decadent dessert just right depends on a handful of simple yet essential ingredients. Each one shapes the flavor, texture, and striking red hue that makes this dish so special and satisfying.
- Red Velvet Cake Mix: The foundation of the dessert, providing the signature color and a moist crumb for the cake layer.
- Cream Cheese (16 oz, softened): Gives the cheesecake layer its creamy, tangy richness and smooth texture.
- Sugar (1 1/3 cups): Sweetens both the cheesecake and the whipped topping, balancing the tanginess beautifully.
- Eggs (4 large): Essential for structure and a velvety crumb in the cheesecake filling.
- Sour Cream (2/3 cup): Adds moisture and a subtle tang to the filling for depth of flavor.
- Flour (2 tablespoons): Helps stabilize the cheesecake layer for that perfect slice.
- Vanilla Extract (2 teaspoons): Brings warmth and aroma to both the cheesecake and the whipped cream topping.
- Salt (1/2 teaspoon): Enhances all the flavors without overpowering them.
- Heavy Cream (2 cups): Whipped to create the light, fluffy topping that balances the richness below.
- Powdered Sugar (4 tablespoons): Adds smooth sweetness to the whipped cream without graininess.
How to Make Red Velvet Cheesecake Dessert Recipe
Step 1: Prepare the Red Velvet Cake Layer
Begin your delicious journey by preheating your oven to 350ºF and lightly flouring a 9-inch springform pan. The cake mix turns into a vibrant red velvet base here. Follow the box instructions for the batter, then pour it into your prepared pan with care. Bake for about 30 to 32 minutes until a toothpick comes out clean. Let the cake cool slightly in the pan before leveling the top to create a perfect, even surface for the cheesecake layer.
Step 2: Make the Cheesecake Layer
Next up is the creamy heart of the dessert. Beat softened cream cheese with sugar until it’s fluffy and smooth, then add eggs one at a time, mixing after each until everything is silky. Blend in sour cream, flour, vanilla, and salt, making sure the mixture is well combined but not overmixed. Pour this luscious filling over your red velvet cake layer and bake at 350ºF for 55 to 65 minutes. The center should have just a slight wiggle when done—this ensures it stays creamy. Once out of the oven, cool it slightly, then pop it in the freezer for an hour to firm up and set perfectly.
Step 3: Prepare the Whipped Topping
While the cake chills, whip your heavy cream with powdered sugar and vanilla by hand using a balloon whisk. Take your time to reach soft peaks—this airy topping will add a light finishing touch that complements the dense cheesecake and rich cake layers.
Step 4: Assemble and Garnish
Spread that luscious whipped cream evenly over your chilled cheesecake layer. For a stunning presentation, pipe whipped dollops around the edges with a decorator’s pastry tip and sprinkle red velvet cake crumbs on top for an inviting, decorative finish. Keep this beauty chilled until it’s time to slice and serve.
How to Serve Red Velvet Cheesecake Dessert Recipe
Garnishes
Visual appeal matters, and garnishes are your secret weapon. Beyond the cake crumbs, fresh berries like raspberries or strawberries pair beautifully with the flavors and add a juicy contrast. A light dusting of cocoa powder or a drizzle of white chocolate ganache can also elevate the richness and aesthetics of your dessert.
Side Dishes
Serve slices of this delightful Red Velvet Cheesecake Dessert Recipe alongside a simple espresso or a smooth cup of tea to balance the sweetness. For a celebratory approach, pair it with sparkling wine or a rich dessert wine to create an indulgent experience.
Creative Ways to Present
Want to impress your guests further? Try serving individual portions in clear glasses or mason jars by layering cake crumbs, cheesecake filling, and whipped topping. This not only looks gorgeous but also makes portioning effortless. You can also top each serving with edible flowers or a sprinkle of festive sprinkles if the occasion calls for it.
Make Ahead and Storage
Storing Leftovers
Once assembled, your Red Velvet Cheesecake Dessert Recipe is best stored in the refrigerator, covered tightly with plastic wrap or in an airtight container. It will stay fresh and moist for up to 4 days, giving you delicious seconds or even dessert for a whole weekend.
Freezing
If you want to make this dessert ahead of a big event, it freezes beautifully. Wrap the whole cheesecake securely with plastic wrap and then aluminum foil to prevent ice crystals. When frozen, it can keep for up to 2 months. Thaw overnight in the refrigerator before serving for the best texture.
Reheating
This dessert is best enjoyed chilled, so reheating isn’t necessary or recommended. However, allowing refrigerated leftovers to sit at room temperature for about 15 minutes before serving will bring the flavors and textures back to their perfect state.
FAQs
Can I use homemade red velvet cake instead of the cake mix?
Absolutely! Homemade cake will add a personal touch and allow you to customize flavors more deeply, but the cake mix is a great shortcut that doesn’t compromise taste or texture.
What if I don’t have a springform pan?
A regular 9-inch round cake pan can work, but removing the dessert might be a bit trickier. Line the pan with parchment paper and be sure it’s well greased to help with removal.
Can I substitute sour cream in the cheesecake filling?
You can swap sour cream for Greek yogurt or crème fraîche if needed, though each substitution will slightly change the texture and tanginess of the cheesecake layer.
How do I prevent cracks in the cheesecake layer?
Ensure your cream cheese is fully softened and beat just until smooth. Avoid overmixing and try baking the cheesecake in the center of the oven where heat is more even.
What’s the best way to get cake crumbs for garnish?
Use a clean box grater on slightly stale or leftover red velvet cake edges, or just crumble pieces by hand finely—either way, they add great texture and color for decoration.
Final Thoughts
With its vibrant colors, rich flavors, and luscious layers, the Red Velvet Cheesecake Dessert Recipe truly stands out as a must-try for any dessert lover. Sharing this recipe feels like sharing a little celebration, and I hope you find as much joy in making it as in devouring it. Whether for a holiday, a birthday, or any day that deserves a special treat, this recipe promises smiles and satisfied sweet tooths. So go ahead, gather your ingredients, and dive into crafting one of the most delightful desserts around.
Print
Red Velvet Cheesecake Dessert Recipe
- Prep Time: 20 minutes
- Cook Time: 1 hour 35 minutes
- Total Time: 1 hour 55 minutes
- Yield: 12 servings
- Category: Dessert
- Method: Baking
- Cuisine: American
Description
This luscious Red Velvet Cheesecake Dessert combines the rich, moist layers of classic red velvet cake with a creamy, smooth cheesecake filling and a light whipped cream topping. Perfectly balanced in sweetness and texture, this elegant dessert is ideal for special occasions or indulgent treats.
Ingredients
Red Velvet Cake Layer
- 1 box Red Velvet Cake Mix plus ingredients called for on the box (usually eggs, oil, and water)
Cheesecake Layer
- 16 ounces Cream Cheese, softened
- 1 1/3 cups Sugar
- 4 large Eggs
- 2/3 cup Sour Cream
- 2 tablespoons Flour
- 2 teaspoons Vanilla Extract
- 1/2 teaspoon Salt
Whipped Topping
- 2 cups Heavy Cream
- 4 tablespoons Powdered Sugar
- 2 teaspoons Vanilla Extract
Instructions
- Prepare Red Velvet Cake Layer: Preheat oven to 350ºF and lightly flour a 9-inch springform cake pan. Prepare the red velvet cake batter as per box instructions. Pour batter into pan and bake for 30-32 minutes. Once done, cool slightly, remove from pan, and level the top using a cake leveler. Set aside.
- Make Cheesecake Layer: In a large bowl, beat softened cream cheese and sugar with a hand or stand mixer until fluffy, about 3 minutes. Add eggs one at a time, mixing well after each. Mix in sour cream, flour, vanilla extract, and salt until smooth. Pour this filling over the cake layer in the pan, then bake at 350ºF for 55-65 minutes until the center is just slightly jiggly. Cool slightly, then freeze for one hour to firm up. Level the top if needed.
- Prepare Whipped Topping: In a bowl, whisk heavy cream, powdered sugar, and vanilla extract by hand with a balloon whisk until soft peaks form, taking care not to overwhip.
- Assemble and Garnish: Spread the whipped cream evenly over the cooled cheesecake layer. Pipe decorative dollops around the edge using a pastry tip and garnish with red velvet cake crumbs on top. Serve chilled.
Notes
- Be sure to soften cream cheese fully for a smooth cheesecake layer.
- Chilling the cheesecake layer in the freezer helps it firm up and makes leveling easier.
- Do not overwhip the cream; otherwise, it may turn into butter.
- You can make the cake layer and cheesecake layer a day ahead; just assemble and add whipping cream topping before serving.
- Using a springform pan makes it easier to remove the cake without damaging layers.

