
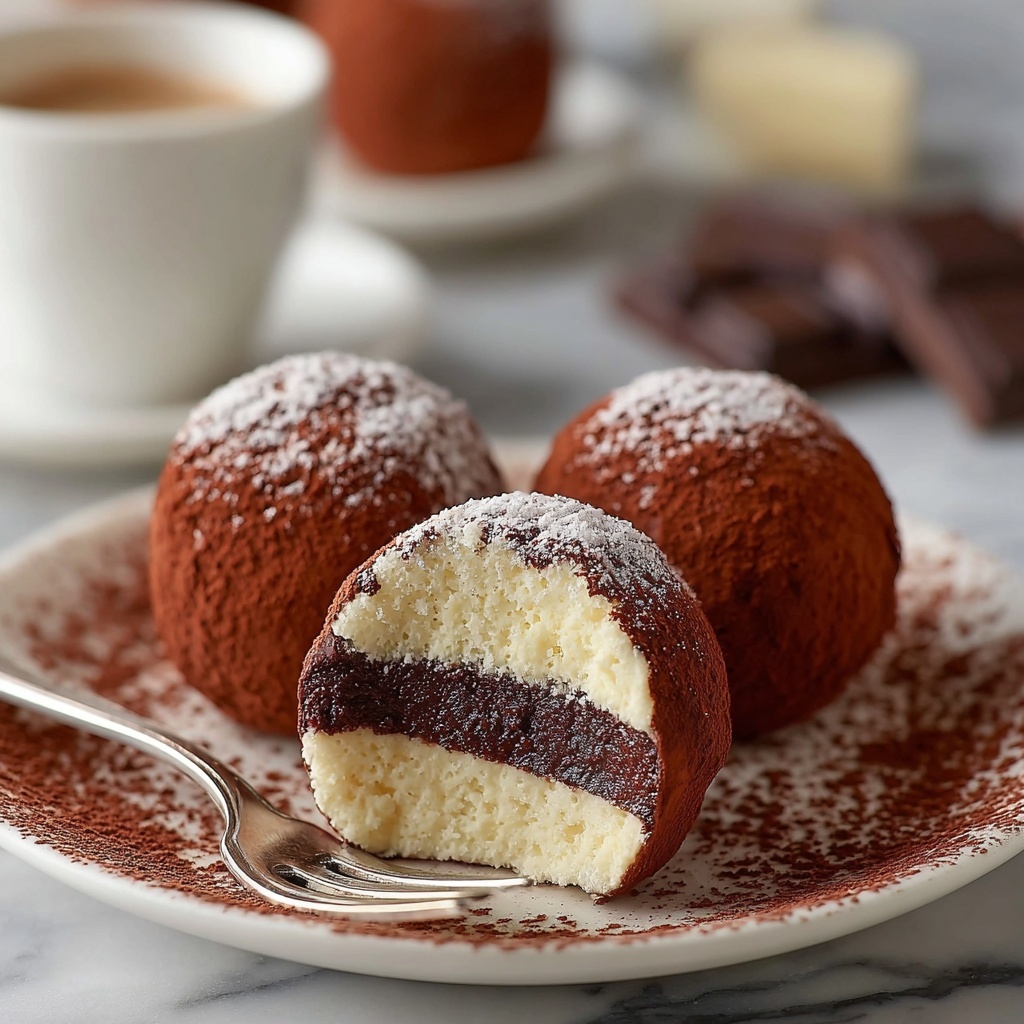
If you adore the rich and creamy flavors of classic tiramisu but want something delightfully bite-sized and fuss-free, then you’re in for a real treat. These Tiramisu Balls: Easy No-Bake Dessert Recipe bring all the luscious layers of this Italian favorite into charming little spheres that are perfect for any occasion. They combine the smooth mascarpone cream with coffee-soaked ladyfingers, dusted with cocoa powder, creating an irresistible dessert that’s as elegant as it is easy to make. Whether you’re hosting a party or craving a quick sweet indulgence, these tiramisu balls will quickly become your new favorite go-to dessert.
Ingredients You’ll Need
Gathering the right ingredients is the first step toward making these heavenly Tiramisu Balls. Each one plays an essential role, building layers of flavor and texture that make this dessert so special, yet keeping the recipe refreshingly straightforward.
- Mascarpone Cheese: The creamy and mild Italian cheese that forms the rich base of the dessert.
- Heavy Cream: Whipped until stiff, it brings lightness and airy texture to the mascarpone mixture.
- Powdered Sugar: Finely sifted to ensure smooth sweetness without any graininess.
- Vanilla Extract: Adds subtle warmth and depth to the cream filling.
- Pinch of Salt: Enhances the flavors by balancing sweetness perfectly.
- Ladyfingers (Savoiardi biscuits): The classic sponge biscuits that soak up coffee beautifully.
- Strong Brewed Coffee: Provides that signature bold espresso flavor.
- Coffee Liqueur (optional): Adds an adult touch with a hint of rich coffee spirit.
- Unsweetened Cocoa Powder: For dusting and lending a slightly bitter contrast to the sweet cream.
- Chocolate Shavings (optional): For garnish, delivering an elegant finishing touch and extra chocolatey goodness.
How to Make Tiramisu Balls: Easy No-Bake Dessert Recipe
Step 1: Whip the Heavy Cream
Start by chilling your mixing bowl and beaters to help the heavy cream whip up nicely. Beat the cold heavy cream at medium-high speed until you see stiff peaks—this means your cream will hold shape without collapsing, essential for creating a light and fluffy texture in your mascarpone mixture. Be careful though; overwhipping can turn your cream grainy, so keep a close eye.
Step 2: Combine Mascarpone and Sugar
In a separate bowl, gently stir together the mascarpone cheese and sifted powdered sugar. The key here is to mix just until smooth and combined, so your cream base remains velvety and creamy without becoming runny.
Step 3: Add Vanilla and Salt
Now, add the vanilla extract and a pinch of salt to quietly enhance the flavors and provide a well-rounded taste. Salt might seem small in quantity but plays a big role in balancing your dessert’s sweetness.
Step 4: Fold in the Whipped Cream
Gently fold your whipped cream into the mascarpone mixture in two or three additions. This gentle folding preserves the airiness created in the whipped cream, ensuring a fluffy and dreamy filling for your tiramisu balls.
Step 5: Chill the Cream
Cover the combined mascarpone cream and refrigerate it for at least 30 minutes. Chilling firms up the texture, making it easier to work with in the next steps and allowing the flavors to meld beautifully.
Step 6: Brew Strong Coffee
Brew a fresh cup of strong coffee and allow it to cool completely. The bold coffee flavor is vital to capturing the essence of classic tiramisu in this bite-sized form.
Step 7: Add Coffee Liqueur (Optional)
If you’re feeling a little adventurous or want to add an adult twist, stir in coffee liqueur at this point. This deepens the coffee notes and adds a lovely warmth to the dessert.
Step 8: Dip the Ladyfingers
Quickly dip each ladyfinger into the cooled coffee mixture. The trick is to soak them just briefly so they absorb the coffee without becoming soggy or falling apart.
Step 9: Crush the Ladyfingers
After dipping, crush the ladyfingers until finely broken using a food processor or by putting them in a ziplock bag and rolling with a pin. These crumbs will add great texture and flavor when mixed with the mascarpone cream.
Step 10: Combine Ladyfingers and Cream
Fold the crushed ladyfingers gently into the chilled mascarpone cream, making sure the coffee-infused crumbs are evenly distributed throughout the mixture for that perfect bite.
Step 11: Chill the Mixture
Cover and place the mixture in the fridge to chill for at least 1 hour, or ideally up to 4 hours. This resting time lets all the flavors meld together and the mixture firm up for shaping.
Step 12: Shape into Balls
Using a spoon or cookie scoop, portion out the mixture and roll each into smooth, roughly 1-inch diameter balls between your palms. The chilled mixture should be easy to handle and maintain shape.
Step 13: Dust with Cocoa Powder
Pour unsweetened cocoa powder into a shallow dish and roll each tiramisu ball in it until well coated. This adds that signature bittersweet note and beautiful finish to your dessert.
Step 14: Garnish (Optional)
If you want to elevate the presentation, sprinkle chocolate shavings or grated chocolate over the cocoa-dusted balls. It adds a luscious texture contrast and a touch of elegance.
Step 15: Chill Again
Place your finished tiramisu balls on a parchment-lined tray and refrigerate for another 30 minutes before serving. This final chill firms them up perfectly and ensures every bite is a creamy coffee delight.
How to Serve Tiramisu Balls: Easy No-Bake Dessert Recipe

Garnishes
Simple garnishes can take your tiramisu balls from delightful to show-stopping. A dusting of cocoa powder brings that classic takeaway flavor, while a sprinkle of chocolate shavings adds extra indulgence and visual appeal. You can even add a few coffee beans on top for a charming touch that hints at the luscious coffee flavor inside.
Side Dishes
Though tiramisu balls shine on their own, pairing them with fresh berries or a dollop of whipped cream balances out the richness beautifully. A small glass of sweet dessert wine or espresso also pairs wonderfully, complementing the coffee and cream while making your dessert experience truly indulgent.
Creative Ways to Present
For entertaining, consider serving your tiramisu balls on elegant skewers or inside mini cupcake liners for a fun finger-food vibe. You could arrange them on a platter decorated with fresh mint leaves or edible flowers for a festive feel. Another fun idea is to place them in small mason jars for an individual dessert serving that guests will love unwrapping.
Make Ahead and Storage
Storing Leftovers
Once made, tiramisu balls keep beautifully in an airtight container in the refrigerator for up to three days. The flavors actually deepen overnight, making leftovers even more delicious. Just be sure to keep them covered to prevent drying out.
Freezing
You can freeze tiramisu balls for longer storage by placing them on a tray lined with parchment paper and freezing them until firm. Then transfer to a freezer-safe container. When ready to enjoy, thaw them overnight in the fridge. Keep in mind that the texture may be slightly softer after freezing, but still delicious.
Reheating
This dessert is best served chilled and does not require reheating. Simply remove from the refrigerator a few minutes before serving if you prefer them slightly soft at room temperature, but they are meant to be enjoyed cool.
FAQs
Can I make Tiramisu Balls without coffee liqueur?
Absolutely! The coffee liqueur is entirely optional and can be omitted without compromising the flavor. The strong brewed coffee is the main contributor to the signature taste.
How long do these tiramisu balls last in the fridge?
Properly stored in an airtight container, they stay fresh for up to three days. For best taste and texture, try to consume them within this timeframe.
Can I use a different type of biscuit instead of ladyfingers?
Ladyfingers are traditional due to their light and spongy texture, but you can experiment with other light biscuits like sponge cake squares or vanilla wafers. Just keep in mind that texture and absorption will vary.
Is it possible to make these gluten-free?
Yes! Just substitute regular ladyfingers with gluten-free ones. Many specialty stores carry gluten-free sponge biscuits that work beautifully in this recipe.
Can I make these ahead for a party?
Definitely. Preparing your tiramisu balls a day in advance not only saves time but also enhances the flavor as they chill and meld together. Just keep them refrigerated until serving.
Final Thoughts
There is something truly magical about turning a beloved classic like tiramisu into a delightful, bite-sized treat. With this Tiramisu Balls: Easy No-Bake Dessert Recipe, you get all the luscious flavors and creamy textures without any baking stress. Whether you’re making them for a gathering, as a special treat, or just because, these little balls of joy are sure to win hearts and cravings. I encourage you to try this recipe—it’s a fun, simple, and seriously delicious way to bring a little Italian sweetness into your kitchen!
Print
Tiramisu Balls: Easy No-Bake Dessert Recipe
- Prep Time: 30 minutes
- Cook Time: 0 minutes
- Total Time: 2 hours (including chilling time)
- Yield: 24 servings
- Category: Dessert
- Method: No-Cook
- Cuisine: Italian
- Diet: Vegetarian
Description
These Tiramisu Balls are a quick and delightful dessert that captures the classic flavors of tiramisu in a fun, bite-sized form. Made with mascarpone, whipped cream, soaked ladyfingers, and dusted with cocoa powder, they’re perfect for parties or a sweet treat anytime.
Ingredients
Mascarpone Cream
- 250g Mascarpone Cheese, at room temperature
- 150ml Heavy Cream, cold
- 50g Powdered Sugar, sifted
- 1 tsp Vanilla Extract
- Pinch of Salt
Base
- 150g Ladyfingers (Savoiardi biscuits)
- 1 cup Strong Brewed Coffee, cooled
- 2 tbsp Coffee Liqueur (e.g., Kahlua or Tia Maria), optional
Finishing
- 2 tbsp Unsweetened Cocoa Powder, for dusting
- Chocolate shavings or grated chocolate, for garnish (optional)
Instructions
- Whip the Heavy Cream: In a large, chilled bowl, whip the cold heavy cream on medium-high speed until stiff peaks form, which usually takes about 3-5 minutes. Take care not to overwhip as it can cause the cream to separate.
- Combine Mascarpone and Sugar: In a separate bowl, mix the mascarpone cheese and sifted powdered sugar gently until smooth, avoiding overmixing to maintain a creamy texture.
- Add Vanilla and Salt: Stir in the vanilla extract and a pinch of salt into the mascarpone mixture to enhance flavor.
- Fold in the Whipped Cream: Gently fold the whipped cream into the mascarpone mixture in two to three additions to keep the blend light and airy.
- Chill the Cream: Cover the mascarpone cream and refrigerate it for at least 30 minutes to set the mixture.
- Brew Strong Coffee: Prepare a cup of strong brewed coffee and let it cool completely.
- Add Coffee Liqueur (Optional): If desired, stir coffee liqueur like Kahlua or Tia Maria into the cooled coffee to add a rich flavor.
- Dip the Ladyfingers: Quickly dip each ladyfinger into the coffee mixture, ensuring they absorb some coffee without becoming soggy.
- Crush the Ladyfingers: Place the dipped ladyfingers in a food processor and pulse until finely crushed, or alternatively crush them manually using a rolling pin inside a ziplock bag.
- Combine Ladyfingers and Cream: Gently fold the crushed ladyfingers into the chilled mascarpone cream until fully combined.
- Chill the Mixture: Cover and refrigerate the combined mixture for at least 1 hour, preferably up to 4 hours to allow flavors to meld.
- Shape into Balls: Using a spoon or cookie scoop, portion out the mixture and roll each into a smooth 1-inch diameter ball between your palms.
- Dust with Cocoa Powder: Roll each tiramisu ball in a shallow dish of unsweetened cocoa powder until fully coated.
- Garnish (Optional): Add a decorative touch by garnishing with chocolate shavings or grated chocolate on top.
- Chill Again: Place the finished tiramisu balls on parchment-lined tray or plate and refrigerate for at least 30 minutes before serving to let them set.
Notes
- Do not soak ladyfingers too long in coffee to avoid mushy texture.
- Use chilled bowl and cream for best whipping results.
- The coffee liqueur is optional but adds depth in flavor.
- Ensure mascarpone is at room temperature for smooth mixing.
- These tiramisu balls can be stored covered in the fridge for up to 3 days.
- For a non-alcoholic version, omit the coffee liqueur.
- Handle the balls gently to maintain shape and texture.


