
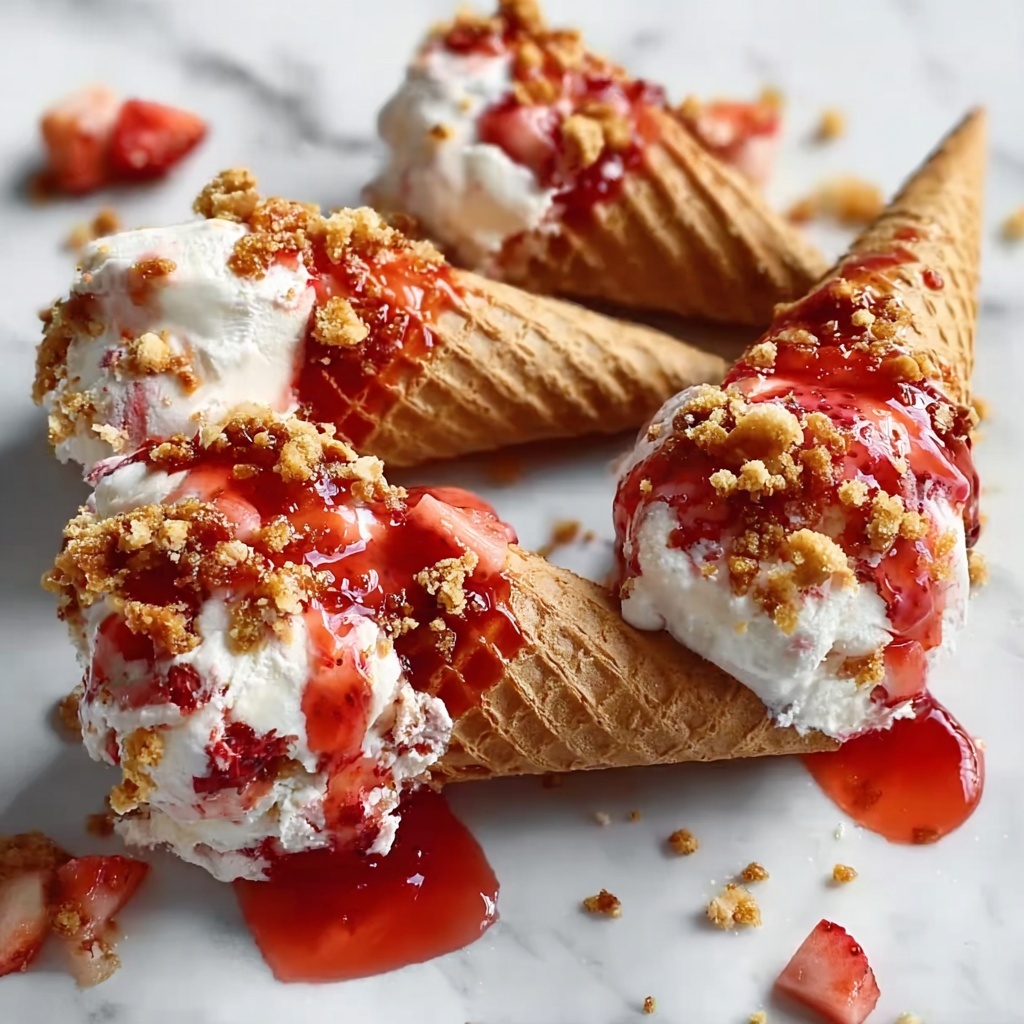
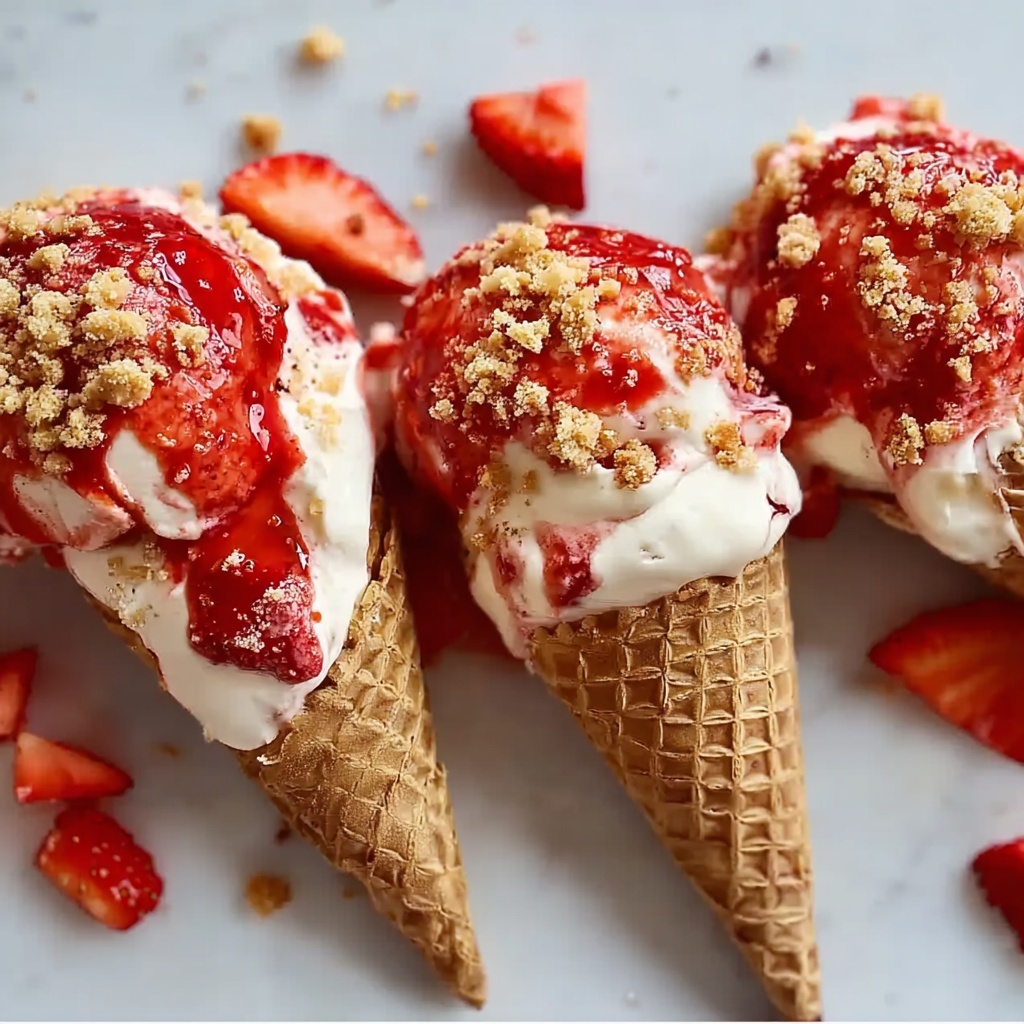
If you are on the hunt for a dessert that’s as fun to eat as it is delicious, this Strawberry Crunch Cheesecake Cones Recipe is an absolute must-try. Imagine the perfect marriage of creamy, velvety cheesecake filling nestled inside crisp waffle cones, embellished with a luscious strawberry glaze and a delightful crunch that bursts with every bite. Each element works together to create a dessert that’s fresh, colorful, and irresistible—ideal for warm afternoons, special occasions, or anytime you want to impress your friends with something unique and downright tasty.
Ingredients You’ll Need
As you gather these ingredients, you’ll notice how each one plays a crucial role in making these cones shine. From the creamy richness of cream cheese to the crispy texture of graham cracker crumbs and the bright freshness of strawberries, every component is essential to perfecting this recipe.
- 6 waffle cones: These serve as the crunchy vessel to hold all the delightful fillings and toppings.
- 8 oz (225 g) full-fat cream cheese, softened: Provides the creamy and smooth base for the no-bake cheesecake filling.
- 1/2 cup (100 g) fine granulated sugar: Just the right amount of sweetness to balance the tartness of the cream cheese.
- 1 cup (240 ml) heavy cream, cold, for whipping: Whipped to fluffy perfection, it gives the filling its light texture.
- 1 teaspoon (5 ml) pure vanilla extract: Adds a warm, inviting aroma and flavor to the cheesecake mixture.
- 1 cup (100 g) finely crushed graham cracker crumbs: Provides a subtle hint of sweetness and adds to the crunch layers.
- 4 tablespoons (56 g) unsalted butter, melted slightly: Used to bind the cracker crumbs and add richness in the crunch topping.
- Fresh strawberries, diced: The star ingredient that delivers bursts of juicy freshness in every bite.
- Red food coloring, a drop (optional): Enhances the vibrant strawberry color for an eye-catching look.
- White chocolate: For dipping the cones and providing a creamy contrast to the crispy waffle.
- Strawberry glaze: Adds a glossy, sweet layer that complements the fresh strawberries.
- Strawberry crunch topping: This topping adds irresistible texture to every mouthful.
How to Make Strawberry Crunch Cheesecake Cones Recipe
Step 1: Prepare the Glaze
Your first move is to make the strawberry glaze according to the linked recipe. This luscious glaze isn’t just for flavor; it keeps the cones from drying out by adding moisture, while also amplifying the fresh strawberry essence that defines this dish.
Step 2: Create the Crunch Topping
Next up, prepare the strawberry crunch topping as directed. This magical mixture gives your cones the perfect textural contrast and enhances the sweetness, making every bite a joyous mix of creamy and crispy sensations.
Step 3: Melt the White Chocolate
Carefully melt the white chocolate following package instructions. Remember to use low heat and gentle stirring to keep it silky smooth. If it cools too quickly and hardens, simply reheat in 10-second increments in the microwave until perfectly melted again. This step is key to getting a flawless chocolate coating on your cones.
Step 4: Dip the Cones
Now, dip the tops of each waffle cone into the warm white chocolate. Once dipped, gently tap off any excess to avoid drips and achieve a neat finish. This luxurious chocolate layer acts like a seal for your cones and adds creamy goodness with each bite.
Step 5: Coat with Crunch Topping
Quickly roll the chocolate-covered section of the cones into the strawberry crunch topping until the entire dipped area is evenly coated. This coat not only elevates the look but also ensures every crunch you taste is packed with vibrant strawberry flavor.
Step 6: Set the Cones
Place the dipped, coated cones upright on a parchment-lined baking sheet. Let the chocolate harden fully, which typically takes around 10 minutes. Be sure to keep them separate and upright to prevent sticking or misshaping—patience here pays off beautifully!
Step 7: Prepare the Filling
While the cones set, whip up the no-bake cheesecake filling. Transfer it into a piping bag or a resealable plastic bag with a small corner snipped off—this makes filling the cones tidier and more fun!
Step 8: Layer the Filling
Fill each cone halfway with the cheesecake mixture. Then add a little dollop of strawberry glaze and some diced fresh strawberries to introduce bursts of color, flavor, and delightful juiciness, building layers that surprise your palate.
Step 9: Complete the Filling
Finish filling the cones with the remaining cheesecake, repeating the glaze and diced strawberry layering once again. Be careful not to overfill, so the delightful layers don’t cascade out and create a sticky situation.
Step 10: Top with Crunch
Finally, sprinkle extra strawberry crunch topping over the filled cones to crown them with crunch and charm. This finishing touch makes your Strawberry Crunch Cheesecake Cones Recipe pop visually and texturally.
How to Serve Strawberry Crunch Cheesecake Cones Recipe
Garnishes
Serve with a handful of fresh strawberry slices on top or a small mint leaf for a pop of color and freshness. A light dusting of powdered sugar or an additional drizzle of strawberry glaze can make these cones look as fabulous as they taste.
Side Dishes
Pair these delightful cones with a simple bowl of fresh berries or a glass of sparkling lemonade. The light and fruity sides help balance the richness of the cheesecake and maintain the summery, vibrant feel of the dessert.
Creative Ways to Present
To impress at your next gathering, stand the cones upright in a decorative holder or place them in a shallow tray filled with crushed graham crackers for a playful presentation. You can also serve them in colorful cups to add a cheerful flair and make them easy to handle.
Make Ahead and Storage
Storing Leftovers
If you have any leftovers (which is unlikely!), store the cheesecake cones in an airtight container in the refrigerator. The cones might lose some crunch overnight, but the flavors will remain delightful for up to two days.
Freezing
These cones don’t freeze well because the fresh strawberries and glaze may alter texture once thawed. It’s best to prepare and enjoy them fresh to fully appreciate the strawberry crunch and creamy filling.
Reheating
Since this dessert is served chilled and involves no baking, reheating is not recommended. Allow refrigerated cones to come to room temperature briefly before serving for the best flavor and texture.
FAQs
Can I use other types of fruit in place of strawberries?
Absolutely! While this recipe shines with strawberries, raspberries, blueberries, or even peaches could be delightful, especially when paired with a matching glaze or crunch topping.
Is there a way to make this recipe vegan or dairy-free?
Yes, you can substitute cream cheese and heavy cream with plant-based versions such as coconut cream and vegan cream cheese. Keep in mind texture and taste may vary slightly, but the overall idea remains delicious.
How far in advance can I assemble the cones?
For the best texture, assemble the cones no more than a few hours before serving. Any longer, and the waffle cones may soften from the filling and glaze moisture.
Can I prepare the cheesecake filling a day ahead?
Definitely! Making the cheesecake filling the day before saves time. Just keep it refrigerated and give it a gentle stir before piping into the cones.
What’s the best way to crush graham crackers finely?
Place the graham crackers in a sealed plastic bag and crush them using a rolling pin or the bottom of a sturdy glass until finely textured. This ensures the crunch topping binds well and provides a consistent texture.
Final Thoughts
This Strawberry Crunch Cheesecake Cones Recipe is one of those delightful finds that instantly becomes a favorite for family and friends. It’s a fun twist on classic cheesecake that looks stunning, feels light, and tastes absolutely fresh and indulgent. I encourage you to give it a try and watch how these cones quickly disappear at your next gathering—pure joy in every bite!
Print
Strawberry Crunch Cheesecake Cones Recipe
- Prep Time: 20 minutes
- Cook Time: 0 minutes
- Total Time: 20 minutes
- Yield: 6 servings
- Category: Dessert
- Method: No-Cook
- Cuisine: American
- Diet: Vegetarian
Description
Strawberry Crunch Cheesecake Cones are a delightful no-bake dessert perfect for summer treats or special occasions. These waffle cones are filled with creamy, rich cheesecake filling layered with fresh strawberries and strawberry glaze for a burst of fruity flavor. The cones are dipped in smooth white chocolate and coated with a crunchy strawberry topping for a beautiful and delicious presentation. This recipe offers a perfect balance of creamy, crunchy, and fruity textures that will impress guests and satisfy any sweet tooth.
Ingredients
Cones and Coating
- 6 waffle cones
- White chocolate (amount per package directions for melting and dipping)
- 1 cup (100 g) strawberry crunch topping (prepared according to linked recipe)
Cheesecake Filling
- 8 oz (225 g) full-fat cream cheese, softened
- 1/2 cup (100 g) fine granulated sugar
- 1 cup (240 ml) heavy cream, cold, for whipping
- 1 teaspoon (5 ml) pure vanilla extract
- Red food coloring, a drop (optional, for enhancing color)
Crunch Base
- 1 cup (100 g) finely crushed graham cracker crumbs
- 4 tablespoons (56 g) unsalted butter, melted slightly
Fruit Layers
- Fresh strawberries, diced (amount as desired for layering)
- Strawberry glaze (prepared according to linked recipe)
Instructions
- Prepare the Glaze: Begin by preparing the strawberry glaze according to the provided recipe. This glaze will add fresh flavor and moisture to each cone, ensuring the final dessert is juicy and not dry.
- Create the Crunch Topping: Follow the instructions on the linked strawberry crunch topping recipe to prepare the crunchy coating. This topping will add texture and sweetness that contrasts wonderfully with the creamy cheesecake filling.
- Melt the Chocolate: Melt the white chocolate carefully following package directions using low heat to avoid burning. Stir frequently and if the chocolate hardens too quickly, remelt in short 10-second bursts in the microwave to maintain smoothness.
- Dip the Cones: Dip the top portion of each waffle cone into the melted white chocolate. Gently tap each cone to remove excess chocolate and achieve an even, neat coating.
- Coat with Crunch Topping: Immediately after dipping, roll the chocolate-coated cone in the prepared strawberry crunch topping until evenly covered. This step creates a visually appealing and flavorful outer layer.
- Set the Cones: Place the coated cones upright on a parchment-lined baking sheet. Let the chocolate harden for about 10 minutes without stacking or tilting the cones to avoid mess and ensure even setting.
- Prepare the Filling: Combine the softened cream cheese, sugar, vanilla extract, and a drop of red food coloring (if using). Whip the heavy cream separately to soft peaks, then gently fold it into the cream cheese mixture until smooth. Transfer the no-bake cheesecake filling into a piping bag or a Ziploc bag with a corner cut off for easy filling.
- Layer the Filling: Fill each cone halfway with the cheesecake filling, then add a spoonful of strawberry glaze and a few diced fresh strawberries on top to create distinct flavor layers and texture contrasts.
- Complete the Filling: Add the remaining cheesecake filling to fill the cones near the top, repeating the glaze and fresh strawberry layers carefully to avoid overfilling and spills.
- Top with Crunch: Sprinkle additional strawberry crunch topping on the top of each filled cone for extra decoration and a satisfying crunch in every bite.
Notes
- Use cold heavy cream for best whipping results.
- If the white chocolate hardens, gently remelt in short increments to avoid overheating.
- Keep the coated cones upright during the setting process to prevent dripping or uneven coating.
- The strawberry glaze and crunch can be prepared ahead of time to save time.
- This dessert is best served the same day but can be refrigerated for up to 24 hours for freshness.
- Optional red food coloring enhances the pink hue of the cheesecake filling but can be omitted for natural color.

