
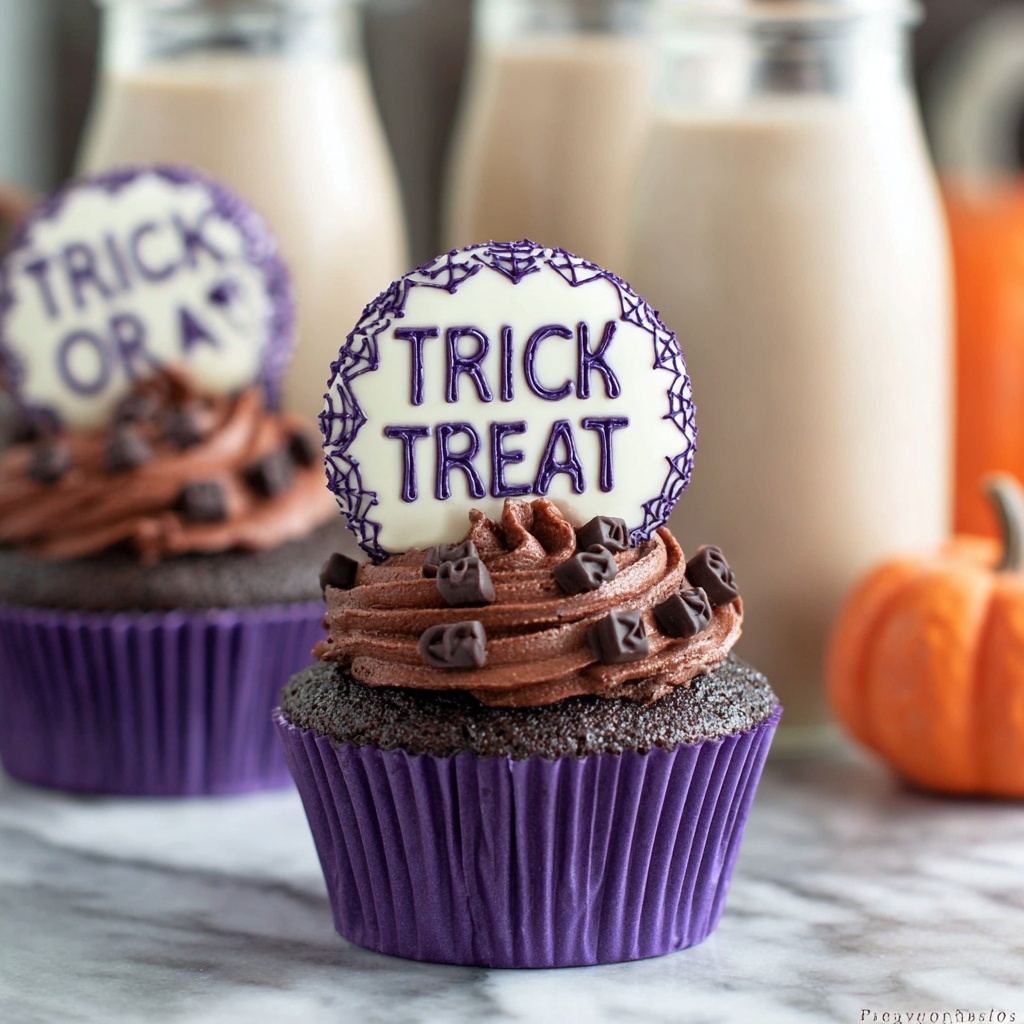
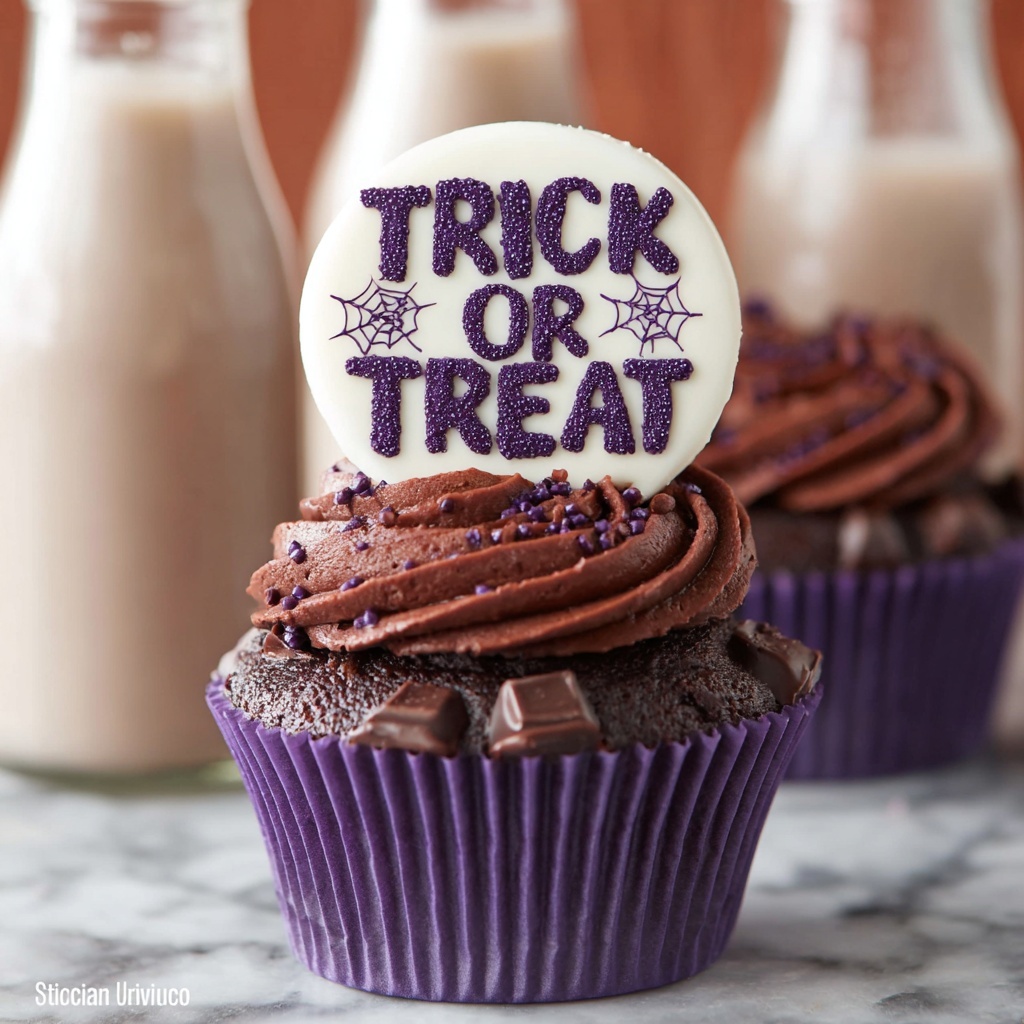
If you are looking for an unforgettable Halloween treat that combines festive fun with rich chocolate goodness, this Stamped Halloween Cupcakes Recipe is just what you need. These cupcakes have a wonderful moist texture and deep chocolate flavor, and the real magic happens when you decorate them with charming, spooky stamps that bring each cupcake to life. Whether you’re planning a party or just want to sprinkle some Halloween spirit on your dessert table, these cupcakes are sure to impress and delight everyone around.
Ingredients You’ll Need
Every ingredient in this Stamped Halloween Cupcakes Recipe plays an essential role, from the fluffy texture provided by the baking powder to the rich cocoa creating that deep chocolate burst we all love. The frosting colors add the perfect Halloween vibe, making these cupcakes irresistible both to the eyes and the taste buds.
- 1 1/2 cups all-purpose flour: This provides the structure and base for the cupcakes, ensuring they rise perfectly.
- 1/2 cup unsweetened cocoa powder: Adds rich chocolate flavor without extra sweetness.
- 1 teaspoon baking powder: Helps the cupcakes rise for a light and fluffy texture.
- 1/2 teaspoon baking soda: Works alongside baking powder to achieve the ideal crumb.
- 1/4 teaspoon salt: Enhances the chocolate flavors by balancing sweetness.
- 1 cup granulated sugar: Sweetens the cupcakes just right without overpowering.
- 1/2 cup unsalted butter (softened): Contributes to a tender crumb and rich taste.
- 2 large eggs: Provide moisture and bind the ingredients together beautifully.
- 1 teaspoon vanilla extract: Adds warmth and depth to the flavor profile.
- 1/2 cup sour cream or Greek yogurt: Moisturizes and adds a slight tang for balance.
- 1/2 cup milk: Creates the perfect batter consistency for moist cupcakes.
- For the frosting: 1/2 cup unsalted butter (softened), 2 cups powdered sugar, 1–2 tablespoons milk, 1/2 teaspoon vanilla extract, gel food coloring (orange, purple, green, etc.) – all are essential for creamy, vividly colored frosting.
- For stamping decoration: Clean food-safe rubber stamps, powdered sugar or cocoa powder for dusting, or edible ink pens – perfect for crafting spooky, festive designs.
How to Make Stamped Halloween Cupcakes Recipe
Step 1: Prepare the Batter
Start by preheating your oven to 350°F (175°C) and lining a muffin tin with 12 cupcake liners. In a medium bowl, whisk together the flour, cocoa powder, baking powder, baking soda, and salt. This dry mix is the foundation of your cupcakes’ structure and chocolate goodness.
Step 2: Cream Butter and Sugar
In a large bowl, beat the softened butter and granulated sugar until the mixture becomes light and fluffy. This step is crucial for aerating the batter, which will help your cupcakes have that delightful, soft crumb.
Step 3: Add Eggs and Vanilla
Beat in the eggs one at a time to ensure even mixing, then stir in the vanilla extract. These ingredients provide moisture and flavor depth that elevate the cupcakes from ordinary to irresistibly tasty.
Step 4: Combine Wet and Dry Ingredients
Alternately add the dry ingredients and the milk to the wet mixture, starting and ending with the dry. Stir in the sour cream or Greek yogurt for added moisture and a slight tang that perfectly balances the chocolate.
Step 5: Bake the Cupcakes
Divide the batter evenly into your cupcake liners and bake for 18–20 minutes. You’ll know they’re ready when a toothpick inserted into the center comes out clean. Let them cool completely on a wire rack before frosting.
Step 6: Make and Tint the Frosting
Beat the softened butter until creamy, then gradually add powdered sugar, vanilla extract, and milk until the frosting is fluffy and spreadable. Use gel food coloring to achieve classic Halloween shades like orange, purple, and green – the brighter, the better!
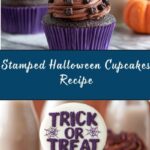
Step 7: Decorate with Stamps
After frosting each cupcake, chill them briefly to set the frosting surface. Lightly dust the frosting with powdered sugar or cocoa powder, then gently press a clean, food-safe stamp into the surface. Alternatively, use edible ink pens to draw spooky shapes like bats, pumpkins, or webs, giving your cupcakes that perfect Halloween flair.
How to Serve Stamped Halloween Cupcakes Recipe
Garnishes
Add extra fun by topping your cupcakes with small candy corn pieces, edible glitter, or mini fondant pumpkins for an eye-catching and festive presentation. These garnishes bring texture and color contrast, boosting the Halloween vibe.
Side Dishes
Serve these cupcakes alongside warm apple cider or a rich hot chocolate for a complete Halloween dessert experience. The warm drinks complement the moist cupcakes wonderfully, making your party spread stand out.
Creative Ways to Present
Arrange your stamped cupcakes on a tiered stand decorated with cobwebs and mini LED pumpkins to create a spooky centerpiece. For a more interactive twist, set up a cupcake decorating station where guests can stamp their own designs and personalize their treats.
Make Ahead and Storage
Storing Leftovers
Store any leftover cupcakes in an airtight container at room temperature for up to two days, or keep them in the fridge for up to four days. Keeping them covered maintains moisture and keeps the frosting fresh without losing its vivid colors.
Freezing
You can freeze unfrosted cupcakes by wrapping them tightly in plastic wrap and placing them in a freezer-safe bag for up to three months. To freeze with frosting, flash freeze the cupcakes first, then wrap carefully to maintain the decoration’s integrity.
Reheating
Warm frozen cupcakes gently in the microwave for about 15 seconds before serving. Avoid overheating to keep the cupcakes moist and the frosting from melting too much—this allows you to enjoy them almost as fresh as the day they were baked.
FAQs
Can I use other types of flour in the Stamped Halloween Cupcakes Recipe?
While all-purpose flour works best for the ideal texture, you can substitute with gluten-free blends designed for baking if needed, but results may slightly vary in crumb and rise.
Are the stamps reusable and how do I clean them?
Yes, food-safe rubber stamps are reusable. Clean them with warm soapy water immediately after use and let them dry completely before storing or reusing to keep them hygienic.
Can I prepare the frosting ahead of time?
Definitely! You can make the frosting a day in advance and keep it refrigerated. Just let it come to room temperature and re-whip briefly before tinting and using it to frost your cupcakes.
How do I ensure the stamped images come out clearly?
Make sure your frosting surface is smooth and firmly chilled, then lightly dust your stamp with powdered sugar or cocoa powder to prevent sticking. Press gently and evenly for the best imprint.
Is it possible to make these cupcakes vegan?
It would require some adjustments like using plant-based butter, flax eggs, and alternative milk. While the recipe wasn’t developed for vegan baking, experimenting with these swaps can work with some tweaks.
Final Thoughts
This Stamped Halloween Cupcakes Recipe is a delightful way to bring creativity and deliciousness to your Halloween festivities. The combination of rich chocolate, colorful frosting, and fun stamped designs makes every cupcake a mini work of art. I can’t wait for you to try these and watch how they transform your Halloween dessert table into something truly special!
Print
Stamped Halloween Cupcakes Recipe
- Prep Time: 20 minutes
- Cook Time: 20 minutes
- Total Time: 40 minutes
- Yield: 12 cupcakes
- Category: Dessert
- Method: Baking
- Cuisine: American
- Diet: Vegetarian
Description
Celebrate Halloween with these delightful Stamped Halloween Cupcakes, featuring rich chocolate cupcakes topped with colorful, creamy frosting and spooky stamped decorations. Perfect for parties, these festive treats combine moist, cocoa-infused cupcakes with customizable, vibrant frosting and creative stamping techniques for a fun and impressive dessert.
Ingredients
Cupcakes
- 1 1/2 cups all-purpose flour
- 1/2 cup unsweetened cocoa powder
- 1 teaspoon baking powder
- 1/2 teaspoon baking soda
- 1/4 teaspoon salt
- 1 cup granulated sugar
- 1/2 cup unsalted butter, softened
- 2 large eggs
- 1 teaspoon vanilla extract
- 1/2 cup sour cream or Greek yogurt
- 1/2 cup milk
Frosting
- 1/2 cup unsalted butter, softened
- 2 cups powdered sugar
- 1–2 tablespoons milk
- 1/2 teaspoon vanilla extract
- Gel food coloring (orange, purple, green, etc.)
Stamping Decoration
- Clean food-safe rubber stamps
- Powdered sugar or cocoa powder (for dusting)
- Edible ink pens
Instructions
- Preheat and Prepare: Preheat your oven to 350°F (175°C). Line a muffin tin with 12 cupcake liners to ensure easy removal and even baking.
- Mix Dry Ingredients: In a medium bowl, whisk together the all-purpose flour, unsweetened cocoa powder, baking powder, baking soda, and salt. This ensures the leavening agents and cocoa are evenly distributed.
- Cream Butter and Sugar: In a large bowl, cream the softened butter and granulated sugar using a mixer until the mixture is light and fluffy, which creates a tender crumb.
- Add Eggs and Vanilla: Beat in the eggs one at a time, fully incorporating each before adding the next, then mix in the vanilla extract to add flavor depth.
- Combine Wet and Dry Ingredients: Stir in the sour cream to add moisture and tanginess. Alternately add the dry ingredients and milk to the butter mixture, starting and ending with the dry ingredients, mixing until just combined to avoid overmixing.
- Fill Cupcake Liners: Divide the batter evenly among the prepared cupcake liners, filling each about two-thirds full to allow room for rising.
- Bake Cupcakes: Bake for 18–20 minutes, or until a toothpick inserted in the center comes out clean. Remove from oven and transfer to a wire rack to cool completely before frosting.
- Prepare Frosting: Beat softened butter until creamy. Gradually add powdered sugar, vanilla extract, and milk, continuing to beat until the frosting is fluffy and spreadable. Tint the frosting with gel food coloring to create Halloween-themed colors like orange, purple, and green.
- Frost Cupcakes: Spread the tinted frosting evenly over each cooled cupcake. Chill the cupcakes briefly to firm the frosting surface for stamping.
- Stamp Decorations: Lightly dust the frosting surface with powdered sugar or cocoa powder if desired. Using clean, food-safe rubber stamps, press gently into the frosting to create spooky Halloween shapes like bats, pumpkins, or webs. Alternatively, draw designs using edible ink pens for detailed decorations.
Notes
- Ensure all stamps used are food-grade or thoroughly sanitized if previously used.
- Fondant discs can be used as an alternative smooth surface for stamping.
- Store cupcakes in a cool place and decorate shortly before serving to maintain the appearance and freshness of the stamping.
