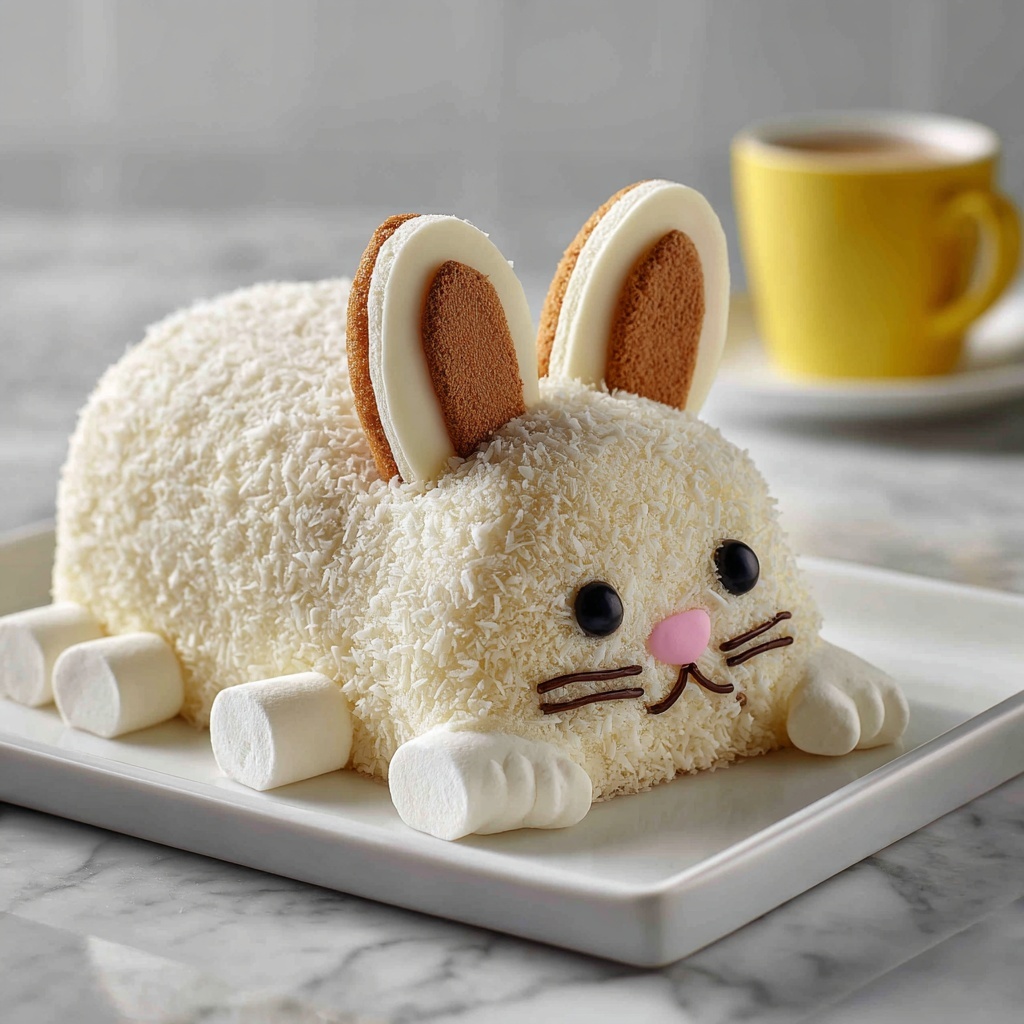
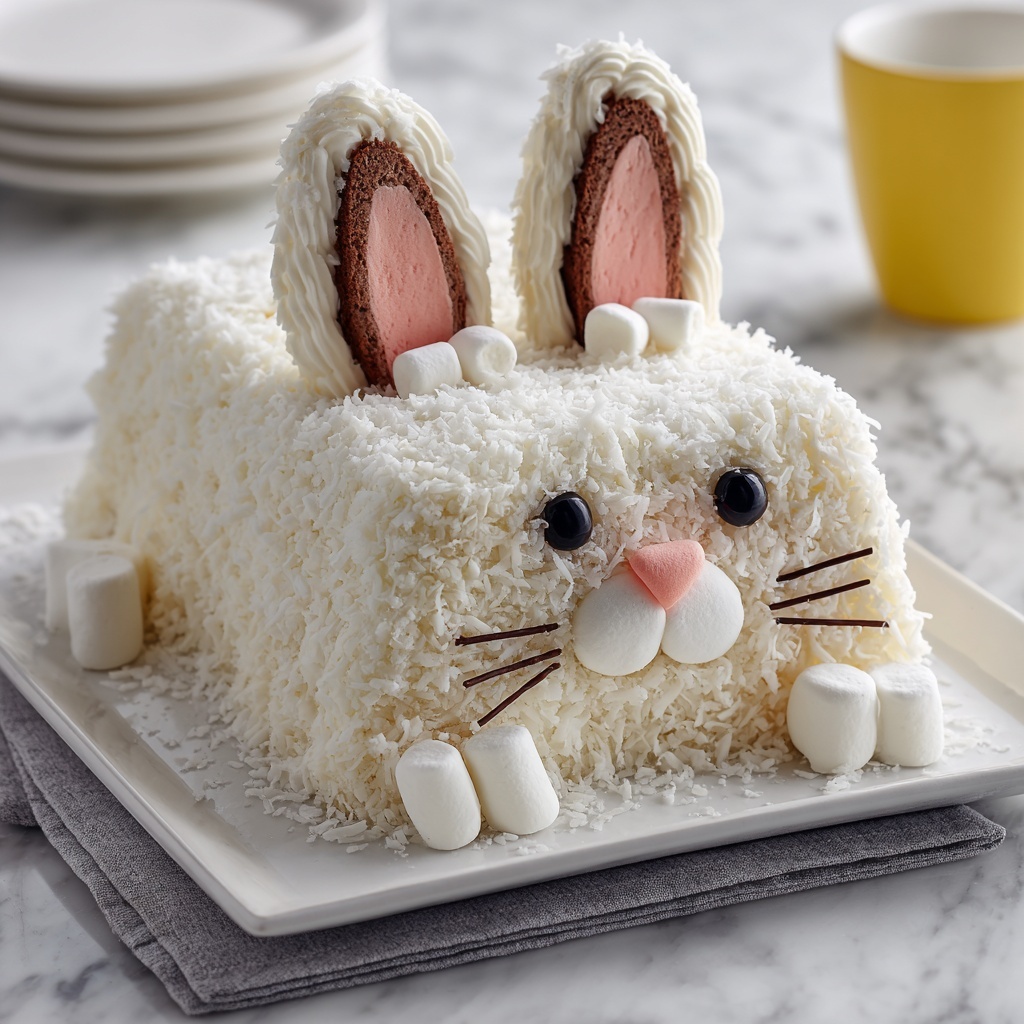
If you are looking for a charming and delicious centerpiece for your Easter celebration, this Easter Bunny Cake Recipe is exactly what you need. It’s a delightful combination of fluffy cake, creamy vanilla frosting, and sweet shredded coconut that brings the bunny to life in the most adorable and tasty way. Whether you’re baking with kids or just want a fun seasonal treat, this cake promises to impress and spread smiles around the table.
Ingredients You’ll Need
Nothing complicated here! This recipe shines because of its straightforward, pantry-friendly ingredients that all play a special role — from providing light texture to adding that signature coconut “fur” effect and colorful accents that bring the bunny’s personality to life.
- 1 box white or yellow cake mix (plus ingredients listed on box): Ensures a moist and fluffy base that’s easy to prepare.
- 1 1/2 cups vanilla frosting: Adds sweetness and helps the coconut stick, creating the bunny’s soft “fur.”
- 2 cups sweetened shredded coconut: Provides texture and fluffy appearance; half dyed pink for ear details.
- Pink food coloring: Used to tint coconut for the cute blush inside the ears.
- Jelly beans or chocolate candies: Perfect for decorating eyes, bow tie, and extra festive touches.
- 2 large marshmallows: Craft the bunny’s cheeks with a pillowy sweetness.
- 2 mini marshmallows: Small but essential for creating adorable bunny teeth.
- 1 black or pink jelly bean: Forms the nose, adding a pop of color to the face.
- 2 black licorice strings: Use for whiskers, giving the bunny character.
- Construction paper or cardstock: Optional but fun for making giant bunny ears behind the cake.
How to Make Easter Bunny Cake Recipe
Step 1: Bake the Cake
Start by preparing the cake batter according to the package instructions. Divide it evenly between two 8-inch round cake pans for even cooking. Baking these layers gives you the bunny’s face and ears once cooled, so be patient while they cool completely — this ensures the frosting doesn’t melt and the cake shapes hold.
Step 2: Shape the Bunny
Place one cake round flat on your serving tray; this will be the bunny’s face. Take the second cake round, then carefully cut out the ears from each side and a bow tie shape from the middle section. Arrange the ears above the round, and the bow tie below, positioning your bunny’s charming silhouette.
Step 3: Frost the Cake
Using the vanilla frosting, coat the entire bunny — face, ears, and bow tie — with a smooth layer, making sure to cover every part evenly. This sticky frosting layer is key for holding the coconut “fur” that gives the bunny its magical texture.
Step 4: Add the Coconut Fur
Reserve about half a cup of coconut and mix it with a drop of pink food coloring to create a gentle blush for the bunny’s ears. Sprinkle the plain white shredded coconut all over the frosted cake to mimic fluffy fur, then carefully add the pink coconut inside the ear areas for that cute splash of color.
Step 5: Decorate the Face and Bow Tie
Use the large marshmallows for the bunny’s cheeks, placing them on each side of the face. Position the two mini marshmallows for teeth below the mouth area. For the nose, add one jelly bean centrally above the teeth. Create the whiskers using black licorice strings and place jelly bean eyes to finish bringing your bunny to life. Decorate the bow tie with jelly beans or colorful sprinkles for a festive touch.
Step 6: Add Paper Bunny Ears (Optional)
Cut out two large bunny ears from construction paper or cardstock and place them behind the cake ears for a playful and dramatic effect that makes your bunny stand out proudly at any Easter gathering.
How to Serve Easter Bunny Cake Recipe
Garnishes
Consider adding a little extra color with pastel-colored sprinkles or edible glitter on the bow tie or cheeks for some extra sparkle. Fresh strawberries or blueberries around the base can add a lovely pop of color and freshness to balance the sweetness.
Side Dishes
This cake pairs wonderfully with light, spring-inspired sides such as fresh fruit salad, lemon sorbet, or even a simple cup of herbal tea. These sides complement the sweet, rich flavors without overwhelming the Easter Bunny Cake Recipe’s delightful charm.
Creative Ways to Present
Present your Easter Bunny Cake on a large platter decorated with fresh greenery, pastel-colored napkins, and maybe a few scattered Easter eggs for a themed table centerpiece. You can also serve individual slices on cute bunny-shaped plates for a whimsical touch kids will love.
Make Ahead and Storage
Storing Leftovers
If you have any leftovers, cover the cake loosely with plastic wrap or place it in an airtight container at room temperature. This keeps the cake moist and fresh for up to two days — just in time for seconds or even thirds!
Freezing
You can freeze the baked cake layers (before decorating) wrapped tightly in cling film and stored in freezer bags for up to a month. Thaw completely in the fridge overnight before assembling and decorating to preserve the best texture for your Easter Bunny Cake Recipe.
Reheating
This cake is best served at room temperature, so if refrigerated or frozen, allow it to sit out for 30 minutes before serving. Avoid microwaving, as it can melt the frosting and ruin the coconut texture.
FAQs
Can I make this Easter Bunny Cake Recipe from scratch?
Absolutely! While the recipe uses a box cake mix for convenience, you can definitely use your favorite homemade white or yellow cake recipe. Just make sure it’s sturdy enough to hold the bunny shapes when cutting.
Is this recipe kid-friendly?
Definitely. Kids love helping with decorating — the marshmallow cheeks and jelly bean details make it very interactive and fun for little hands to get creative.
Can I substitute the coconut if someone has allergies?
If coconut is a no-go, you can try crushed vanilla wafers or finely shredded white chocolate shavings to mimic the furry look, though it won’t have the exact same texture or flavor. Just be sure to pick something that sticks well to the frosting.
How far in advance can I prepare this cake?
You can bake and assemble the cake up to one day ahead of serving. Keep it covered at room temperature to maintain freshness and decorate right before your celebration for the best presentation.
Can I use other decorations besides jelly beans?
Of course! Mini chocolate chips, colored candies, or edible pearls also work well to create eyes, nose, and bow tie details. Feel free to experiment with whatever you have on hand to make your Easter Bunny Cake Recipe uniquely yours.
Final Thoughts
This Easter Bunny Cake Recipe is such a joyful and delicious way to celebrate the season, whether with family or a fun friends’ gathering. Its easy preparation, playful design, and wonderful taste make it a recipe you’ll want to come back to year after year. Give it a try and watch everyone’s faces light up with delight — it really is as adorable as it is scrumptious!
Print
Easter Bunny Cake Recipe
- Prep Time: 30 minutes
- Cook Time: 25 minutes
- Total Time: 55 minutes (plus cooling time)
- Yield: 12 servings
- Category: Dessert
- Method: Baking
- Cuisine: American
- Diet: Vegetarian
Description
This charming Easter Bunny Cake is a delightful and festive dessert perfect for celebrating the holiday with family and friends. Made from a classic white or yellow cake mix and decorated with creamy vanilla frosting, sweet shredded coconut, and colorful candies, this cake is shaped like a cute bunny complete with ears, whiskers, cheeks, and a bow tie. It’s a fun and kid-friendly treat that adds a playful centerpiece to your Easter table.
Ingredients
Cake
- 1 box white or yellow cake mix (plus ingredients listed on box)
Frosting and Decorations
- 1 1/2 cups vanilla frosting
- 2 cups sweetened shredded coconut
- Pink food coloring
- Jelly beans or chocolate candies (for decoration)
- 2 large marshmallows (for cheeks)
- 2 mini marshmallows (for teeth)
- 1 black or pink jelly bean (for nose)
- 2 black licorice strings (for whiskers)
- Construction paper or cardstock (for bunny ears)
Instructions
- Prepare the Cake Batter: Follow the package instructions to prepare the cake batter from the cake mix. Be sure to use all the ingredients called for on the box to ensure proper texture and flavor.
- Bake the Cakes: Evenly divide the batter between two 8-inch round cake pans. Bake according to the package directions, then let the cakes cool completely to room temperature before decorating.
- Shape the Bunny: Place one whole cake round on your serving tray—this will be the bunny’s face. Cut the second cake round into three parts: two bunny ears cut from each side, and a bow tie cut from the center portion.
- Assemble the Cake: Position the ear pieces above the bunny’s head and the bow tie below it, arranging them carefully on the tray.
- Apply Frosting: Use vanilla frosting to cover the entire assembled cake evenly, ensuring all parts are well coated to help the coconut stick.
- Color the Coconut: Set aside about 1/2 cup of the shredded coconut and mix it with a drop of pink food coloring to create pink coconut for the ears.
- Decorate with Coconut: Sprinkle the white shredded coconut over the frosted cake to mimic bunny fur. Then sprinkle the pink-colored coconut inside the ear-shaped cake pieces for a cute accent.
- Add Facial Features: Position the large marshmallows on each side of the face as cheeks, place the mini marshmallows as bunny teeth at the center bottom of the face, and use a jelly bean as the nose.
- Finish the Face: Use two black licorice strings for whiskers on each side, and add jelly beans for the eyes to complete the bunny’s face.
- Create Paper Ears: Cut out two large bunny ear shapes from construction paper or cardstock and place them behind the cake ears if you want your bunny’s ears to stand out more.
- Decorate Bow Tie: Use jelly beans or colored sprinkles to decorate the bow tie piece beneath the bunny’s face for an extra festive touch.
Notes
- You may substitute homemade cake and frosting if preferred for a more personalized touch.
- Allow children to participate by letting them decorate their own bunny cakes with various candies and sprinkles for a fun activity.
- Store leftover cake covered at room temperature for up to 2 days to maintain freshness.

