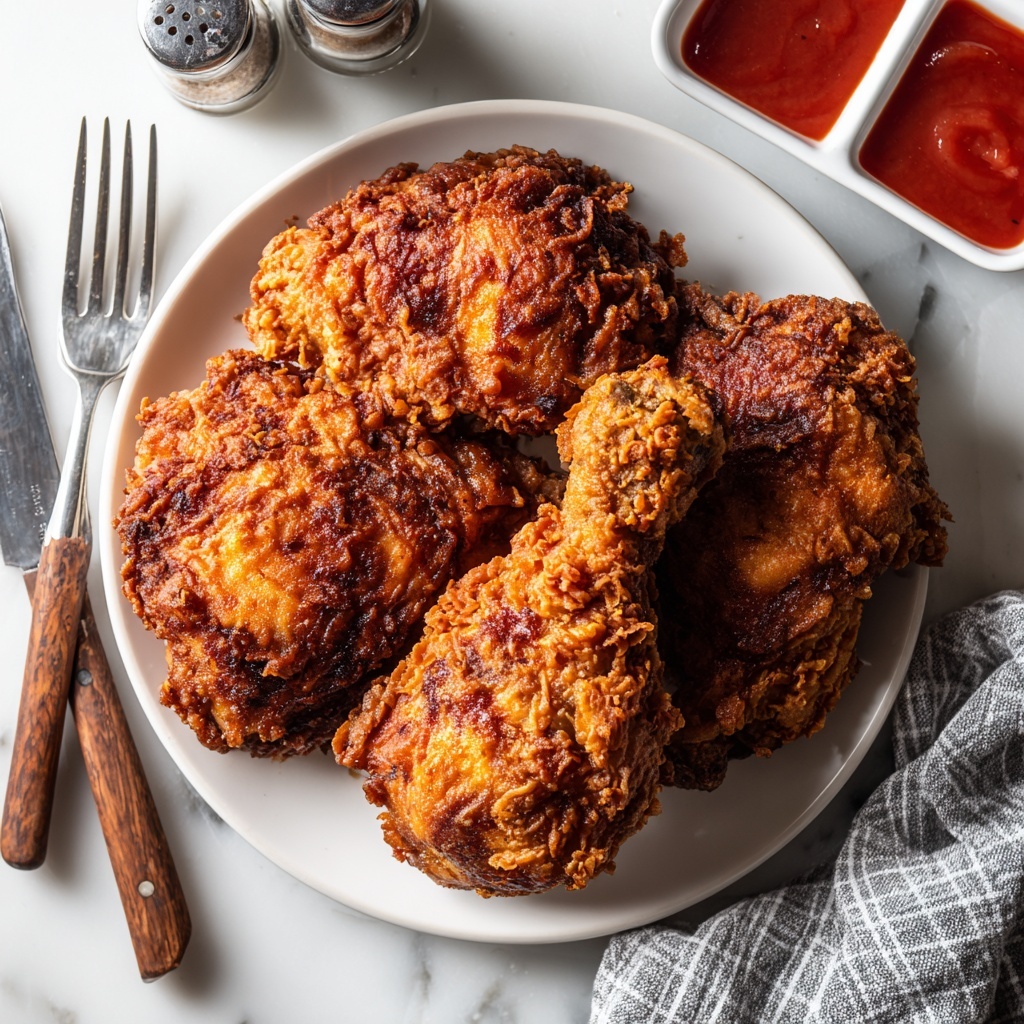
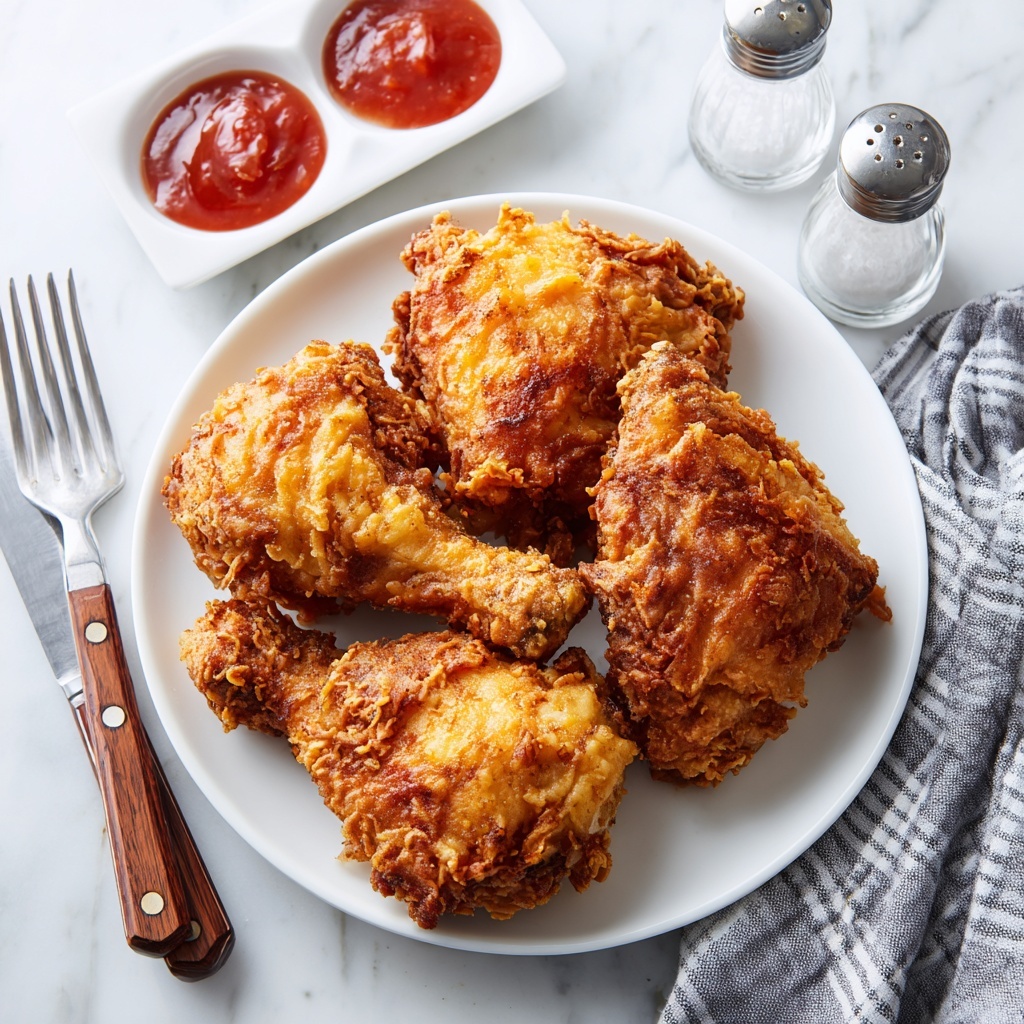
If you have ever craved that perfect balance of juicy, tender meat wrapped in a golden, crunchy coating, then this Crispy Fried Chicken Recipe is exactly what you need to try next. It’s a beautiful blend of simple, heartfelt ingredients and classic technique that yields chicken bursting with flavor and an irresistible, crunchy texture that keeps you reaching for just one more piece. From the tangy buttermilk marinade to the seasoned flour dredge, every step is designed to deliver that iconic crispy crust and mouthwatering chicken that feels like a warm hug from the South.

Ingredients You’ll Need
All the magic in this Crispy Fried Chicken Recipe comes from a handful of straightforward ingredients that work together harmoniously. Each component plays a crucial role, whether it’s layering flavor, building crunch, or ensuring the perfect golden color.
- Chicken pieces (2 pounds): Drumsticks, thighs, and wings offer a mix of textures and flavors ideal for frying.
- Buttermilk (2 cups): This tenderizes the chicken while adding a subtle tang, creating juicy, flavorful meat inside.
- Salt (2 teaspoons): Essential for seasoning and enhancing all other flavors.
- Black pepper (1 teaspoon): Adds gentle heat and depth.
- Paprika (1 teaspoon): Contributes a mild smokiness and vibrant color.
- Garlic powder (1/2 teaspoon): Infuses the chicken with its irresistibly savory aroma.
- Onion powder (1/2 teaspoon): Adds subtle sweetness and complexity.
- Cayenne pepper (1/2 teaspoon): Gives just a touch of heat for a flavorful kick.
- All-purpose flour (2 cups): The cornerstone of that crispy exterior, perfectly capturing seasonings.
- Baking powder (1 teaspoon): Helps achieve the light, crisp texture in the coating.
- Vegetable oil: Used for frying, it ensures the chicken cooks evenly and crisps up without overpowering flavors.
How to Make Crispy Fried Chicken Recipe
Step 1: Marinate the Chicken
Start by combining the buttermilk with half the salt, pepper, paprika, garlic powder, onion powder, and cayenne pepper in a large bowl. Nestle the chicken pieces into this flavorful bath, ensuring each piece is well coated. Marination is a key step in this Crispy Fried Chicken Recipe as it tenderizes the meat and infuses it with deep flavors, so be sure to cover and refrigerate for at least 4 hours, or preferably overnight.
Step 2: Prepare the Coating
While the chicken is marinating, whisk together the flour, baking powder, remaining salt, pepper, paprika, garlic powder, onion powder, and cayenne pepper in a second bowl. This seasoned flour mixture will be the secret to building that coveted crunchy crust.
Step 3: Dredge the Chicken
Remove chicken pieces from the marinade and let excess drip off to avoid clumps. Dredge each piece in the flour mixture, pressing gently so the coating adheres fully. Let the coated chicken rest on a tray for about 10 minutes; this pause allows the flour to bind properly, which helps create a crackling shell that holds up during frying.
Step 4: Fry to Perfection
Heat vegetable oil in a deep skillet or Dutch oven to about 350°F (175°C). Maintaining a consistent temperature during frying is critical: too hot, and the crust burns too fast; too cool, and the chicken will be greasy. Fry the chicken in batches, turning occasionally, for about 12 to 15 minutes until the outside is a perfect golden brown and the internal temperature reaches 165°F (74°C). Drain the cooked pieces on a wire rack or paper towels to keep them crispy.
How to Serve Crispy Fried Chicken Recipe
Garnishes
Sometimes, a sprinkle of fresh herbs like chopped parsley or chives adds a fresh pop of color and a hint of brightness that complements the richness. A wedge of lemon on the side can also be a delightful option for those who enjoy a little citrus zing with their crispy fried chicken.
Side Dishes
Classic pairings like creamy mashed potatoes, buttery corn on the cob, or tangy coleslaw are fantastic companions to balance the meal. For a lighter option, a crisp green salad with a zesty vinaigrette cuts through the richness beautifully.
Creative Ways to Present
For a fun twist, serve your crispy fried chicken in mini sliders with pickles and your favorite sauce. Or pile it atop a fresh salad for an elevated entree. No matter how you present it, this Crispy Fried Chicken Recipe is versatile enough to shine on any plate.
Make Ahead and Storage
Storing Leftovers
Leftovers can be stored in an airtight container in the refrigerator for up to 3 days. To keep the chicken’s signature crunch, place a paper towel between layers to absorb any excess moisture.
Freezing
If you want to save some for later, wrapped well in foil or freezer bags, fried chicken can be frozen for up to 1 month. Just be sure to cool completely before wrapping to avoid sogginess.
Reheating
Reheat leftovers in the oven at 375°F (190°C) on a wire rack set over a baking sheet for about 10 to 15 minutes. This method helps revive that crispy coating better than microwaving, which can make it soggy.
FAQs
Can I use chicken breast instead of dark meat for this recipe?
Absolutely! While drumsticks and thighs stay juicier during frying, chicken breasts can also work well. Just be mindful to not overcook them to avoid dryness, and consider cutting the breasts into smaller strips for even cooking.
Why is buttermilk important in this Crispy Fried Chicken Recipe?
Buttermilk acts as a tenderizing agent due to its acidity, which breaks down proteins and results in juicy, flavorful chicken. It also helps the seasoning penetrate deeper for more robust taste.
What’s the benefit of adding baking powder to the flour?
Baking powder introduces air bubbles in the coating, contributing to an extra-light, crispy crust. It’s a simple step that makes a noticeable difference in texture.
How do I know when the oil is at the right temperature?
A kitchen thermometer is the best way to check. If you don’t have one, drop a small pinch of flour into the oil; it should sizzle immediately but not burn. Maintaining 350°F (175°C) ensures even cooking and crispiness.
Can I make this Crispy Fried Chicken Recipe gluten-free?
Definitely! Swap the all-purpose flour for a gluten-free flour blend that is suitable for frying. Just ensure your blend contains a bit of starch for crunch, and adjust seasoning if needed.
Final Thoughts
This Crispy Fried Chicken Recipe isn’t just about a meal; it’s about creating moments filled with joy, comfort, and that satisfying crunch that makes every bite memorable. Whether it’s a family dinner, a special gathering, or a cozy homemade feast, I encourage you to roll up your sleeves and give it a try—you’ll soon find it’s a keeper that everyone comes back for seconds and thirds.
Print
Crispy Fried Chicken Recipe
- Prep Time: 15 minutes (plus 4+ hours marinating)
- Cook Time: 15 minutes
- Total Time: 30 minutes active (excluding marinating time)
- Yield: 4 servings
- Category: Main Course
- Method: Frying
- Cuisine: American
Description
This Crispy Fried Chicken recipe features tender chicken pieces marinated in flavorful buttermilk and coated in a seasoned flour mixture for an extra crunchy, golden brown finish. Perfect for a classic American main course, this recipe delivers juicy, flavorful chicken with a crispy exterior that’s sure to satisfy your fried chicken cravings.
Ingredients
Marinade
- 2 cups buttermilk
- 1 teaspoon salt
- 1/2 teaspoon black pepper
- 1/2 teaspoon paprika
- 1/2 teaspoon garlic powder
- 1/2 teaspoon onion powder
- 1/2 teaspoon cayenne pepper
- 2 pounds chicken pieces (drumsticks, thighs, wings)
Coating
- 2 cups all-purpose flour
- 1 teaspoon baking powder
- 1 teaspoon salt
- 1/2 teaspoon black pepper
- 1/2 teaspoon paprika
- 1/2 teaspoon garlic powder
- 1/2 teaspoon onion powder
- 1/2 teaspoon cayenne pepper
For Frying
- Vegetable oil (for frying, about 2–3 inches depth)
Instructions
- Prepare the Marinade: In a large bowl, combine 2 cups buttermilk with 1 teaspoon salt, 1/2 teaspoon black pepper, 1/2 teaspoon paprika, 1/2 teaspoon garlic powder, 1/2 teaspoon onion powder, and 1/2 teaspoon cayenne pepper. Mix well to combine the flavors.
- Marinate the Chicken: Add 2 pounds of chicken pieces (drumsticks, thighs, wings) into the marinade. Ensure all pieces are thoroughly coated. Cover and refrigerate for at least 4 hours or preferably overnight to tenderize and infuse flavor.
- Mix the Coating: In a separate bowl, mix 2 cups all-purpose flour, 1 teaspoon baking powder, 1 teaspoon salt, 1/2 teaspoon black pepper, 1/2 teaspoon paprika, 1/2 teaspoon garlic powder, 1/2 teaspoon onion powder, and 1/2 teaspoon cayenne pepper thoroughly.
- Dredge the Chicken: Remove chicken pieces from the marinade, allowing excess to drip off. Dredge each piece into the seasoned flour mixture, pressing firmly so coating adheres evenly.
- Rest the Coated Chicken: Place coated chicken pieces on a tray and let them rest for 10 minutes to help the breading stick better to the chicken.
- Heat the Oil: In a deep skillet or Dutch oven, heat vegetable oil to 350°F (175°C) with a depth of 2–3 inches for deep frying.
- Fry the Chicken: Fry the chicken pieces in batches to avoid overcrowding. Cook for 12–15 minutes, turning occasionally to ensure even golden brown crispiness. Use a kitchen thermometer to confirm the internal temperature reaches 165°F (74°C) indicating doneness.
- Drain and Serve: Remove fried chicken and drain on a wire rack or paper towels to remove excess oil. Serve hot and enjoy your crispy fried chicken.
Notes
- Double-dipping the chicken in buttermilk and flour helps achieve extra crispiness.
- Maintain consistent oil temperature with a kitchen thermometer to avoid greasy or undercooked chicken.
- Allow resting time after coating to improve breading adherence.
- Fry in batches to keep oil temperature steady.
