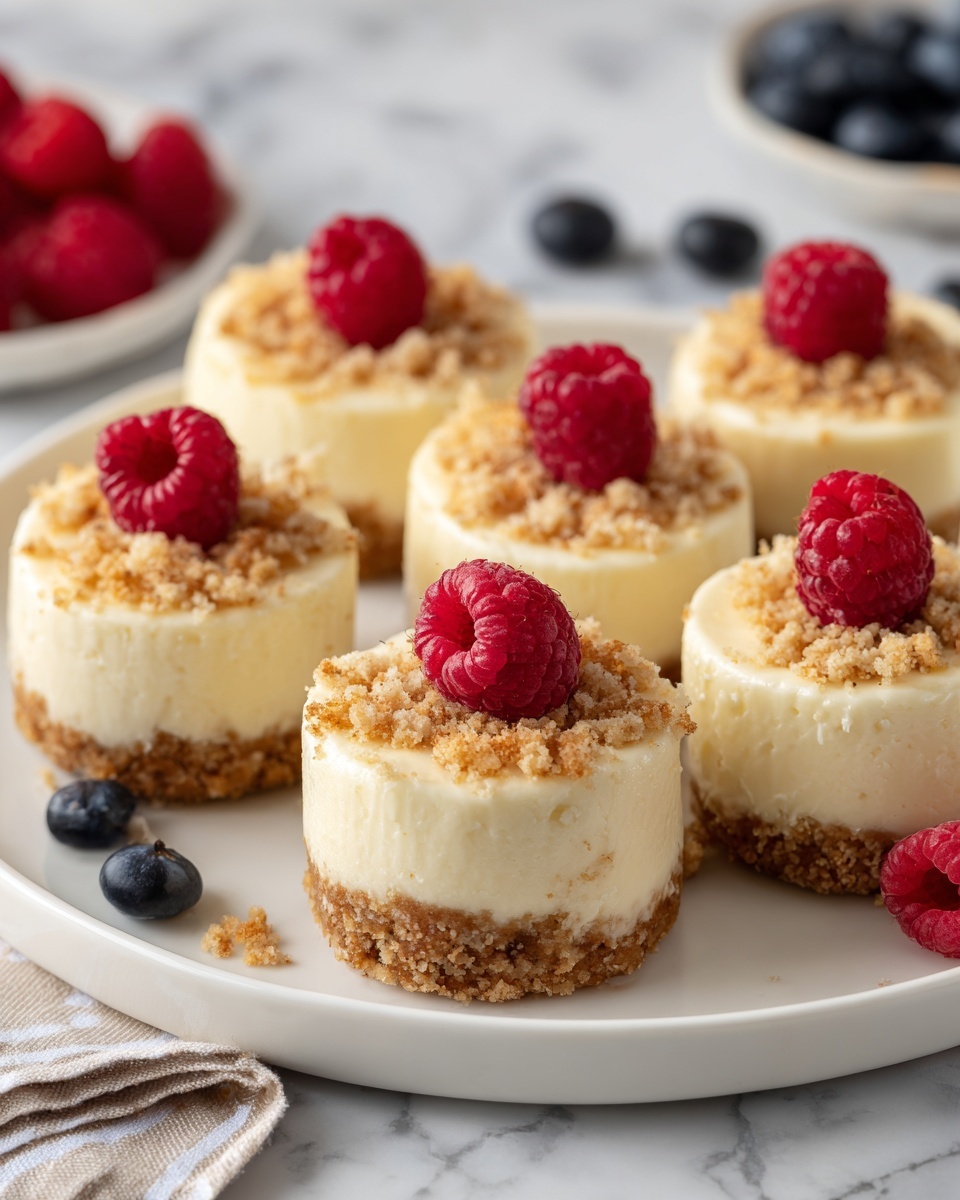
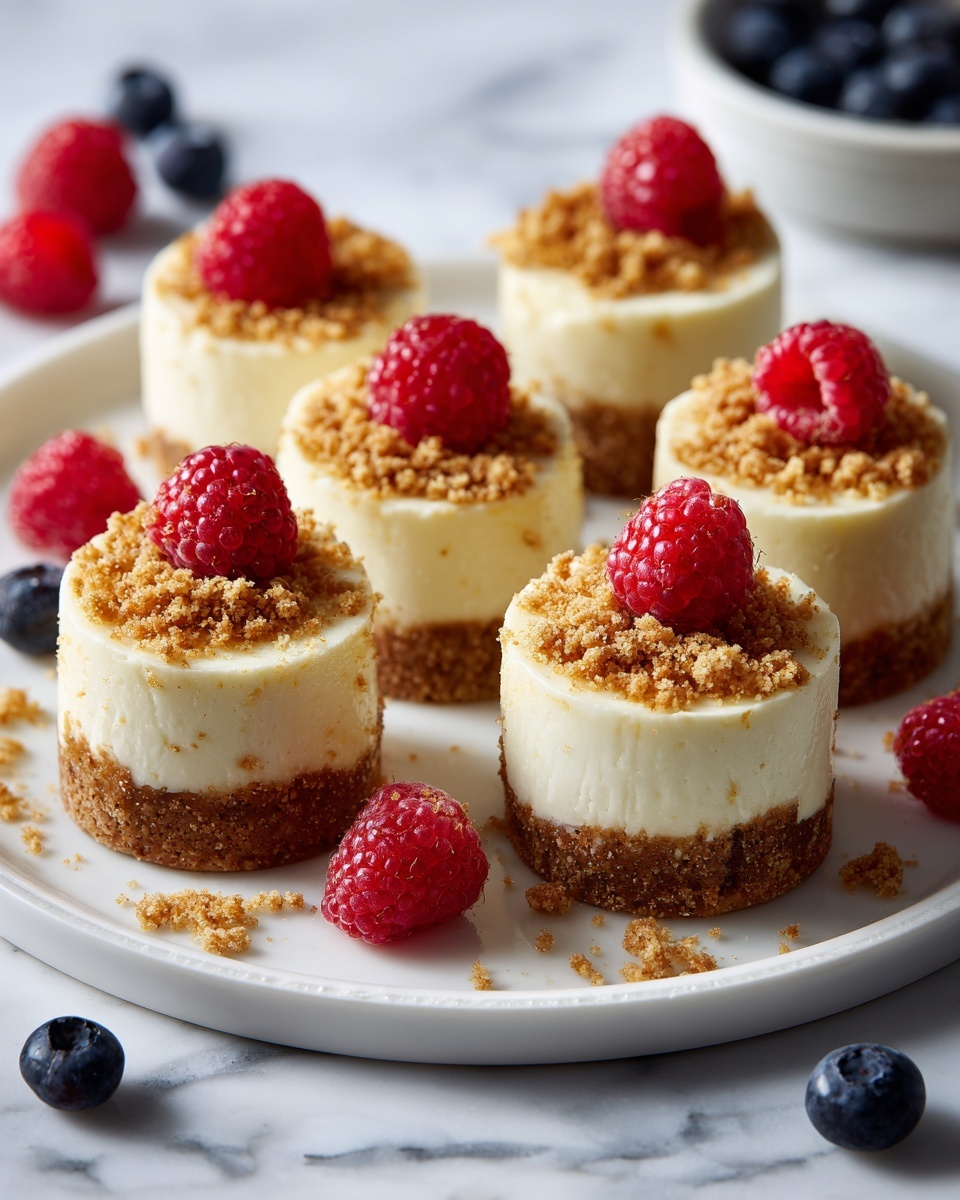
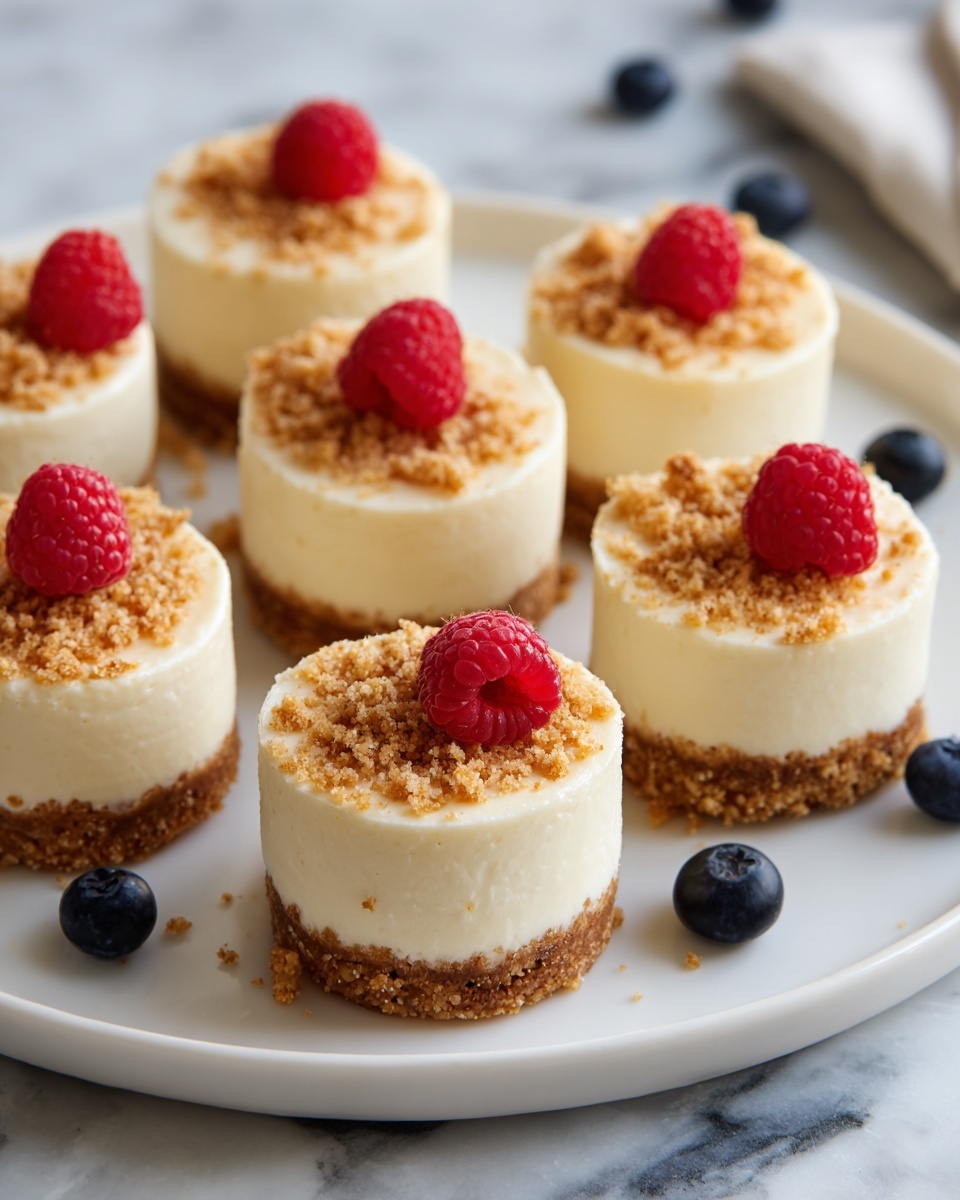
If you’ve been searching for a delightful dessert that’s both indulgent and friendly to your dietary needs, this Gluten-Free Mini Cheesecakes Recipe is here to brighten your day and your taste buds. Imagine creamy, melt-in-your-mouth mini cheesecakes that have a perfectly crumbly gluten-free crust, topped generously with fresh berries and a drizzle of chocolate. They’re small in size but big on flavor, making them the perfect treat for celebrations, casual gatherings, or simply when you want to spoil yourself with something special that doesn’t compromise on taste or texture.
Ingredients You’ll Need
The beauty of this Gluten-Free Mini Cheesecakes Recipe lies in its simplicity and the quality of the ingredients. Each component plays a crucial role in creating the delicious balance of creamy cheesecake and crumbly crust you’re craving. From the gluten-free graham cracker crumbs that provide the perfect base to the fresh berries that add a burst of freshness, every ingredient is essential for achieving that flawless dessert.
- 1 1/2 cups gluten-free graham cracker crumbs: This forms the crisp, flavorful crust without any gluten.
- 4 tablespoons unsalted butter, melted: Binds the crumbs together for a sturdy yet buttery base.
- 2 tablespoons granulated sugar: Enhances the sweetness of the crust with just a touch of sparkle.
- 16 oz cream cheese, softened: The silky heart of the cheesecake bringing rich, creamy goodness.
- 1/2 cup granulated sugar: Sweetens the cheesecake filling perfectly without overpowering it.
- 1 teaspoon pure vanilla extract: Adds warmth and aroma to the filling for an inviting flavor.
- 2 large eggs: Help set the cheesecake filling to the ideal creamy yet firm texture.
- 2 tablespoons sour cream: Keeps the filling smooth with a slight tang for depth.
- Pinch of salt: Balances all the sweetness and brings out the flavors wonderfully.
- Fresh berries: For topping, these add a juicy burst of natural sweetness and vibrant color.
- Whipped cream: Optional but highly recommended for a fluffy, cloud-like finish.
- Chocolate drizzle: To add a decadent touch and beautiful presentation.
How to Make Gluten-Free Mini Cheesecakes Recipe
Step 1: Prepare Your Pan and Crust
Start by preheating your oven to 325°F (160°C) and lining a 12-cup muffin tin with paper liners—this sets the stage perfectly for your mini cheesecakes. In a mixing bowl, combine the gluten-free graham cracker crumbs, melted butter, and sugar until every crumb is evenly coated. This mixture will form the sturdy, buttery crust you’ll press firmly into each muffin cup to build the base for these delicious bites.
Step 2: Mix the Creamy Filling
Next, whip the cream cheese together with sugar until you get a smooth, creamy texture. This step is key for avoiding a lumpy filling and ensures every bite melts in your mouth. Then, add the vanilla extract, eggs one at a time for even incorporation, sour cream, and a pinch of salt—mix gently until just combined to keep that perfect, delicate texture.
Step 3: Assemble and Bake
Carefully spoon the luscious cheesecake batter over the crusts in the muffin tin, filling each cup about three-quarters full. The volume is just right to get a nice rise and keep a charming mini size. Bake for 18 to 20 minutes, until the centers are set but still have a slight jiggle to them, so you get that dreamy creamy consistency after cooling.
Step 4: Cool and Chill
Allow these beauties to cool to room temperature in the pan before transferring them to the refrigerator. Chilling for at least two hours is essential—it firms up the cheesecakes, allowing the flavors to deepen and meld beautifully. This wait is absolutely worth it!
How to Serve Gluten-Free Mini Cheesecakes Recipe
Garnishes
Once chilled, top your mini cheesecakes with fresh berries like strawberries, blueberries, or raspberries. Their natural sweetness and slight tartness perfectly complement the rich filling. A dollop of whipped cream adds a lovely airy contrast, and a drizzle of warm chocolate transforms each cheesecake into a little piece of dessert heaven.
Side Dishes
These mini cheesecakes are excellent on their own, but pairing them with a scoop of homemade vanilla ice cream or a side of fresh fruit salad really makes the experience shine. A cup of rich coffee or a delicate herbal tea also works wonders to balance the creamy sweetness.
Creative Ways to Present
Thinking outside the box? Serve these mini cheesecakes on a tiered dessert stand for a stunning presentation at parties or gatherings. You can also pop them in pretty paper cupcake wrappers for a festive touch, or individually wrap them in clear cellophane tied with a colorful ribbon as charming edible gifts.
Make Ahead and Storage
Storing Leftovers
Refrigerate any leftover mini cheesecakes in an airtight container for up to 4 days. Keeping them chilled ensures they maintain their creamy texture and fresh flavor so you can enjoy them later without compromise.
Freezing
If you want to make these ahead for special occasions, they freeze beautifully. Place the mini cheesecakes on a baking sheet, freeze until solid, then transfer to a freezer-safe container or zip-top bag. They’ll keep well for up to 2 months. Thaw overnight in the refrigerator before serving to preserve that perfect consistency.
Reheating
Because of their delicate nature, reheating isn’t usually necessary or recommended for best taste and texture. If desired, bring them to room temperature by taking them out of the fridge 15 to 20 minutes before serving, which is perfect for enjoying their signature creaminess.
FAQs
Can I use a different type of gluten-free crust?
Absolutely! While gluten-free graham cracker crumbs are the classic choice, finely ground gluten-free cookies or nuts mixed with butter work beautifully too, giving your mini cheesecakes a unique flavor and texture twist.
What if I don’t have sour cream on hand?
You can substitute sour cream with Greek yogurt, which adds a similar tang and creaminess. Just keep the quantity the same to maintain the texture and flavor balance of the filling.
Are these mini cheesecakes suitable for freezing and serving later?
Yes, they freeze incredibly well! Freeze them solid on a tray first, then store in an airtight container for up to 2 months. Just thaw overnight in the fridge when you’re ready to indulge.
Is it okay to add flavors or mix-ins to the filling?
Definitely! You can fold in fresh fruit, chocolate chips, or even swirl in caramel or fruit puree right before baking. Just be careful not to add too much extra moisture so the cheesecakes stay firm.
How do I make sure the centers don’t crack during baking?
Mix your filling just until combined and avoid overbeating the eggs. Also, baking at a moderate temperature and removing them when the centers are still slightly jiggly helps prevent cracks and keeps the cheesecakes silky smooth.
Final Thoughts
There’s something truly special about baking your own Gluten-Free Mini Cheesecakes Recipe and sharing those tender, creamy bites with the people you love. Not only do they satisfy a sweet tooth, but they also prove that eating gluten-free never means missing out on indulgence. So grab your ingredients, get cozy in the kitchen, and treat yourself to this deliciously charming dessert—you won’t regret it!
Print
Gluten-Free Mini Cheesecakes Recipe
- Prep Time: 25 minutes
- Cook Time: 20 minutes
- Total Time: 2 hours 45 minutes
- Yield: 12 mini cheesecakes
- Category: Dessert
- Method: Baking
- Cuisine: American
- Diet: Gluten Free
Description
These Gluten-Free Mini Cheesecakes are creamy, rich, and perfectly portioned for individual servings. Made with a gluten-free graham cracker crust and a smooth cream cheese filling, they are baked to perfection and topped with fresh berries, whipped cream, and a chocolate drizzle for an irresistible dessert that suits gluten-sensitive diets.
Ingredients
Crust
- 1 1/2 cups gluten-free graham cracker crumbs
- 4 tablespoons unsalted butter, melted
- 2 tablespoons granulated sugar
Filling
- 16 oz cream cheese, softened
- 1/2 cup granulated sugar
- 1 teaspoon pure vanilla extract
- 2 large eggs
- 2 tablespoons sour cream
- Pinch of salt
Toppings
- Fresh berries
- Whipped cream
- Chocolate drizzle
Instructions
- Preheat Oven and Prepare Pan: Preheat your oven to 325°F (160°C) and line a 12-cup muffin tin with paper liners to ensure easy removal of the mini cheesecakes after baking.
- Make the Crust Mixture: In a mixing bowl, combine the gluten-free graham cracker crumbs, melted butter, and 2 tablespoons of granulated sugar. Stir until all crumbs are evenly coated with butter and sugar, forming a moist mixture.
- Form the Crust Bases: Divide the crust mixture among the muffin cups, pressing firmly on the bottom to create an even and compact crust layer. Set the muffin tin aside.
- Prepare the Cheesecake Filling: In a large bowl, beat the softened cream cheese and 1/2 cup granulated sugar together until the texture is creamy and smooth, free of lumps.
- Add Flavorings and Eggs: Stir in the vanilla extract. Add eggs one at a time, mixing gently after each addition to prevent overmixing. Then incorporate the sour cream and a pinch of salt, blending until combined but not overly mixed to maintain a creamy texture.
- Fill the Muffin Cups: Spoon the cheesecake batter evenly over the prepared crust in each muffin cup, filling about three-quarters full to allow room for rising.
- Bake the Mini Cheesecakes: Place the muffin tin in the preheated oven and bake for 18 to 20 minutes. The centers should be set but retain a slight jiggle when gently shaken.
- Cool and Chill: Remove the cheesecakes from the oven and allow them to cool to room temperature in the pan. Once cooled, refrigerate them for at least 2 hours to fully set and enhance flavor.
- Add Toppings and Serve: Before serving, garnish each mini cheesecake with fresh berries, a dollop of whipped cream, and a drizzle of chocolate to add vibrant color and complementary flavors.
Notes
- Ensure the cream cheese is softened to room temperature for a smoother filling.
- Do not overmix the batter to prevent excess air bubbles that can cause cracking.
- Chilling the cheesecakes is essential for the best texture and flavor.
- Gluten-free graham crackers are necessary to keep the recipe gluten-free, check labels carefully.
- Customize toppings based on preference; nuts or caramel sauce can also be great options.

